The buttons on a toolbar must reflect your application's specific command set.
When a user places the mouse pointer over a button, your application can display useful information about the command associated with that particular button.
Just like menu commands, toolbar buttons must be associated with message-response functions.
You're not stuck with MFC's default status bar. Your application's status bar can display whatever information you'd like it to display.
Building a good user interface is half the battle of programming a Windows application. Luckily, Visual C++ and its AppWizard supply an amazing amount of help in creating an application that supports all the expected user-interface elements, including menus, dialog boxes, toolbars, and status bars. The subjects of menus and dialog boxes are covered elsewhere in this book. In this chapter, you learn how to get the most out of toolbars and status bars.
The buttons on a toolbar correspond to commands, just as the items on a menu do. Although you can add a toolbar to your application with AppWizard, you still need to use a little programming polish to get things just right. This is because every application is different, and AppWizard can create only the most generally useful toolbar for most applications. When you create your own toolbars, you'll probably want to add or delete buttons to support your application's unique command set.
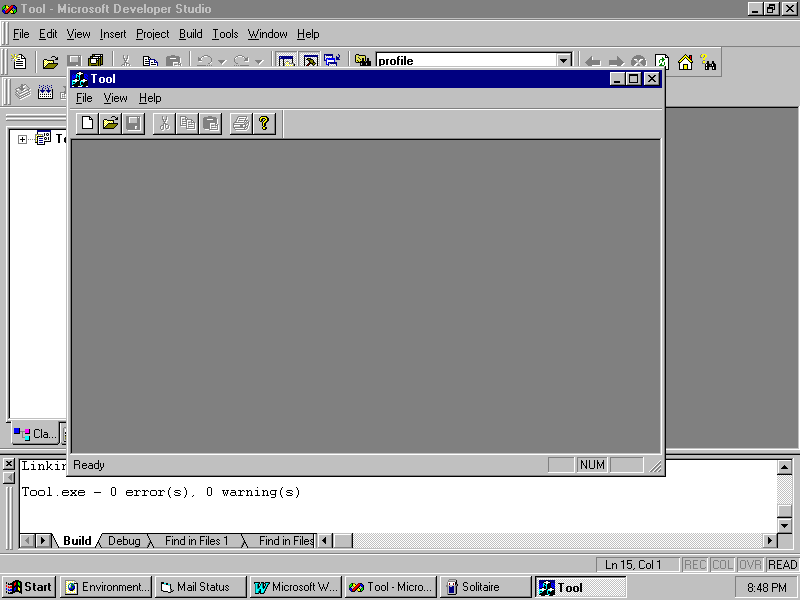
For example, when you create a standard AppWizard application with a toolbar, AppWizard creates the toolbar shown in Figure 10.1. This toolbar provides buttons for the commonly used commands in the File and Edit menus, as well as a button for displaying the About dialog box. But what if your application doesn't support these commands? It's up to you to modify the default toolbar to fit your application.
Fig. 10.1 The default toolbar provides buttons for commonly used commands.
Create a multiple document interface application with a toolbar by choosing File, New, selecting the Project tab, naming the application Tool, and accepting the defaults in every dialog box. If you like, you can click the Finish button in step 1 to speed up the process. AppWizard provides a docking toolbar by default. Build and run the application, and you should see a toolbar of your own, just like Figure 10.1.
Before moving on, play with this toolbar a little. On the View menu, you can toggle whether the toolbar is displayed or not. Turn it off, then on again. Now click and hold on the toolbar between buttons, and pull it down into the working area of your application. Let it go, and itís a floating palette. Drag it around and drop it at the bottom of the application, or one of the sidesóit will dock against any side of the main window. Watch the tracking rectangle change shape to show you it will dock if you drop it. Drag it back off again so that itís floating, and close it by clicking the small x in the upper-right corner. Bring it back with the View menu, and notice that it comes back right where you left it. All this functionality is yours free from AppWizard and MFC.
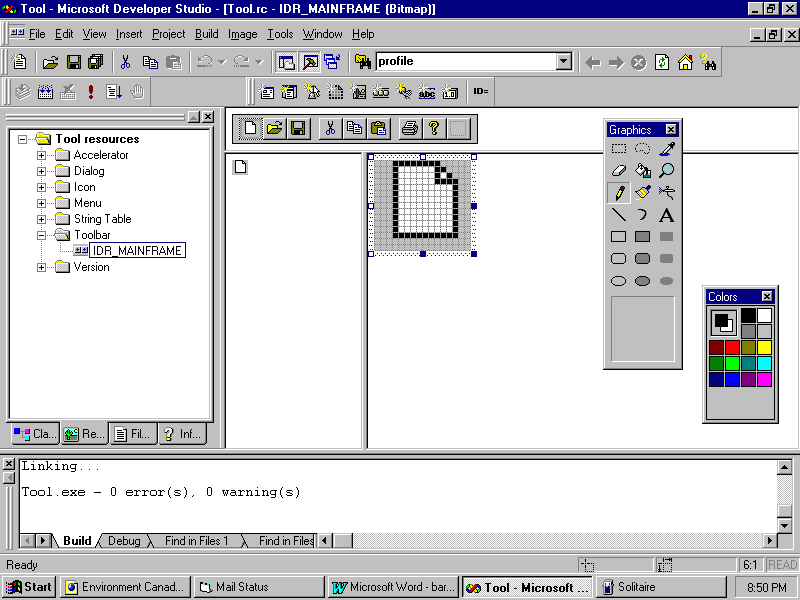
The first step in modifying the toolbar is to delete buttons you no longer need. To do this, first select the ResourceView tab to display your application's resources. Click the + next to Toolbar, and double-click the IDR_MAINFRAME toolbar resource to edit it, as shown in Figure 10.2.
Fig. 10.2 Use the toolbar editor to customize your application's toolbar.
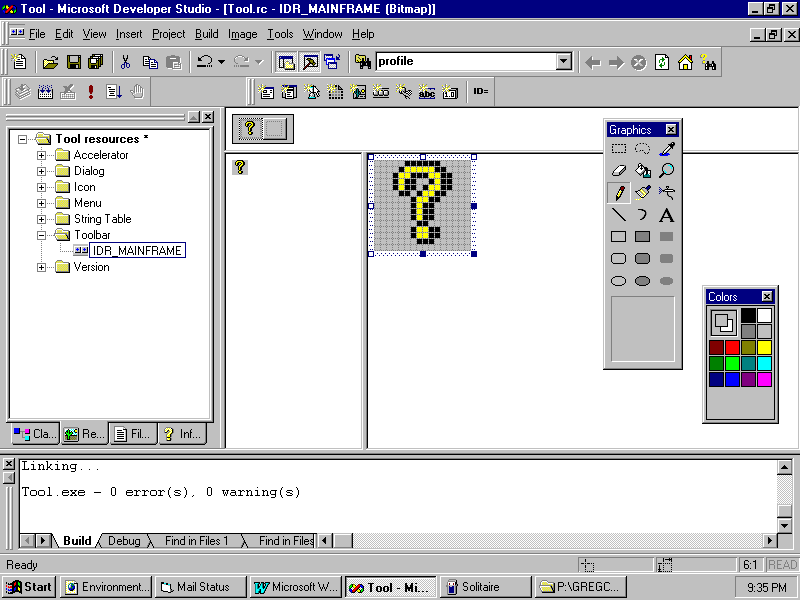
After you have the toolbar editor on the screen, deleting buttons is as easy as dragging the unwanted buttons from the toolbar. Just place your mouse pointer on the button, hold down the left mouse button, and drag the unwanted button away from the toolbar. When you release the mouse button, the toolbar button disappears. In the Tool application, delete all the buttons except the Help button with a yellow question mark. Figure 10.3 shows the edited toolbar with only the Help button remaining. The single blank button template is only a starting point for the next button you may want to create. If you leave it blank, it doesn't appear in the final toolbar.
Fig. 10.3 This edited toolbar has only a single button left (not counting the blank button template).
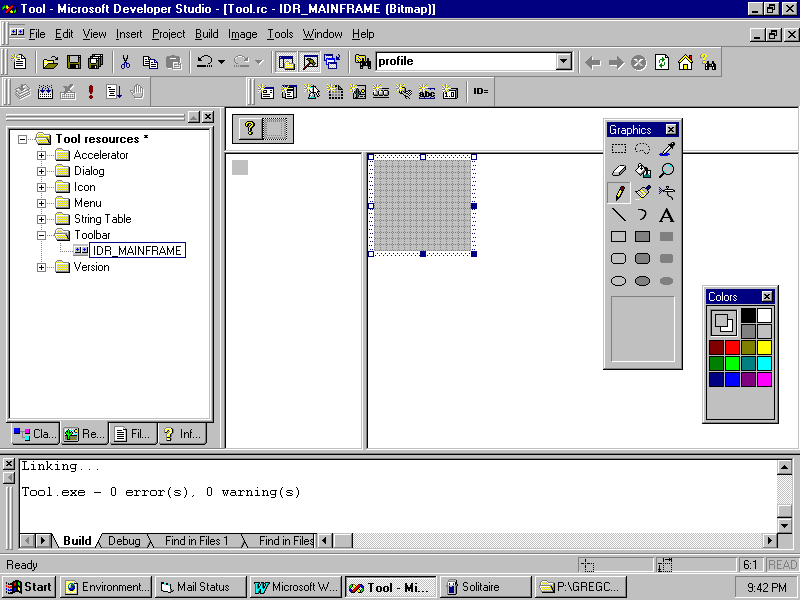
Adding buttons to a toolbar is a two step process: First, you draw the button's icon, and then you match the button with its command. To draw a new button, first click the blank button template in the toolbar. The blank button appears, enlarged, in the edit window, as shown in Figure 10.4.
Fig. 10.4 Click the button template to bring it up in the button editor.
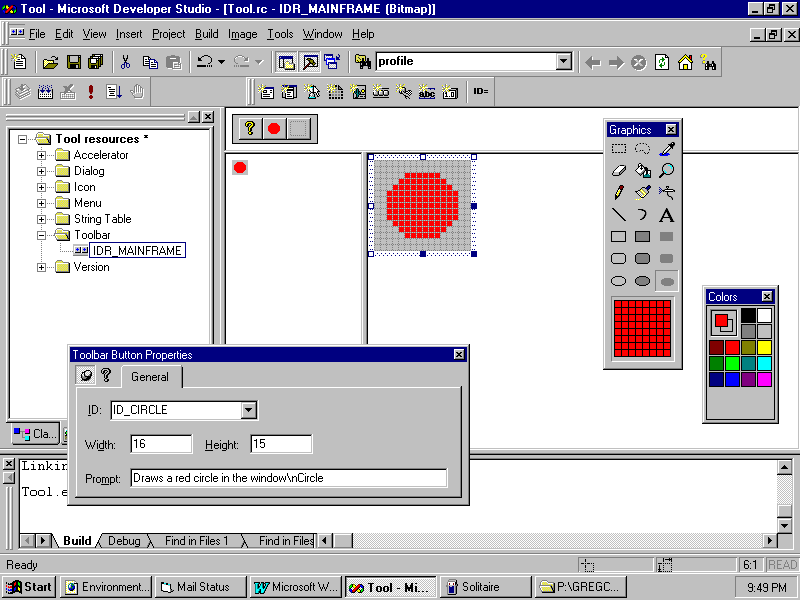
Suppose you want to create a toolbar button that draws a red circle in the application's window. Draw a red circle on the blank button (via the Ellipse tool), which takes care of creating the button's icon. Bring up the properties box and give the button an appropriate ID, which in this case might be something like ID_CIRCLE.
Now you need to define the button's ToolTip and description. The ToolTip appears whenever the user leaves the mouse pointer over the button for a second or two and acts as a reminder of the button's purpose. A ToolTip of "Circle" would be appropriate for the circle button. The description appears in the application's status bar. In this case, a description of "Draws a red circle in the window" might be good. Type these two text strings into the Prompt box. The description comes first, followed by the newline character (\n) and the ToolTip, as shown in Figure 10.5.
Fig. 10.5 After drawing the button, specify its properties.
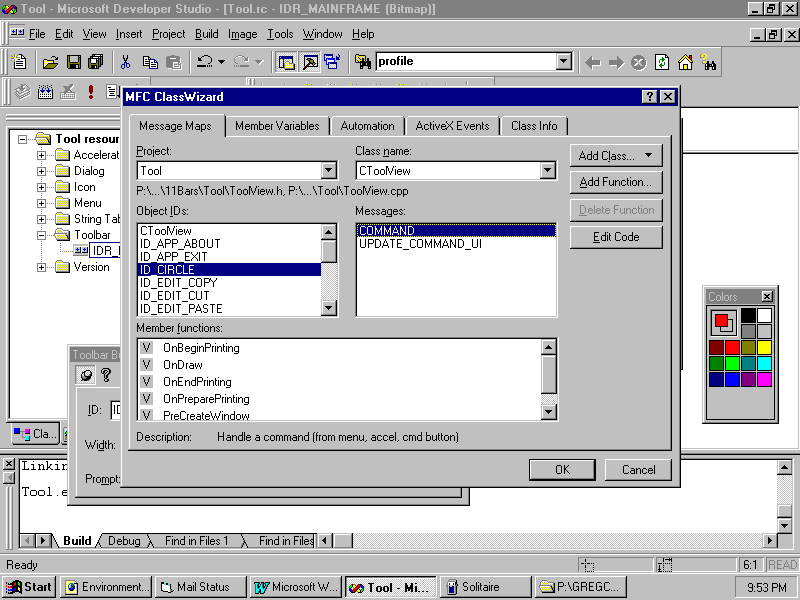
You've now defined a command ID for your new toolbar button. Usually, you use the command ID of an existing menu item that is already connected to some code. In those cases, simply choose the existing command ID from the drop-down box and your work is done. The prompt is taken from the properties of the menu item, and the message handler has already been arranged for the menu item. In this application, the toolbar button does not mirror a menu item, so you associate the ID with a message-handler function which MFC automatically calls when the user clicks the button.
To do this, follow these steps:
If you haven't defined a message-response function for a toolbar button, or if there is no instance of the class that catches the message, MFC disables the button when you run the application. For example, if the message is caught by the document or view in an MDI application and there is no open document, the button is disabled. The same is true for menu commandsóin fact, for all intents and purposes, toolbar buttons are menu commands.

Fig. 10.6 You can use ClassWizard to catch messages from your toolbar buttons.
Ordinarily, toolbar buttons duplicate menu commands, providing a quicker way for the user to select commonly used commands in the menus. In this case, the menu item and the toolbar button both represent the exact same command and you give both the same ID. Then, the same message-response function gets called whether the user selects the command from the menu bar or from the toolbar.
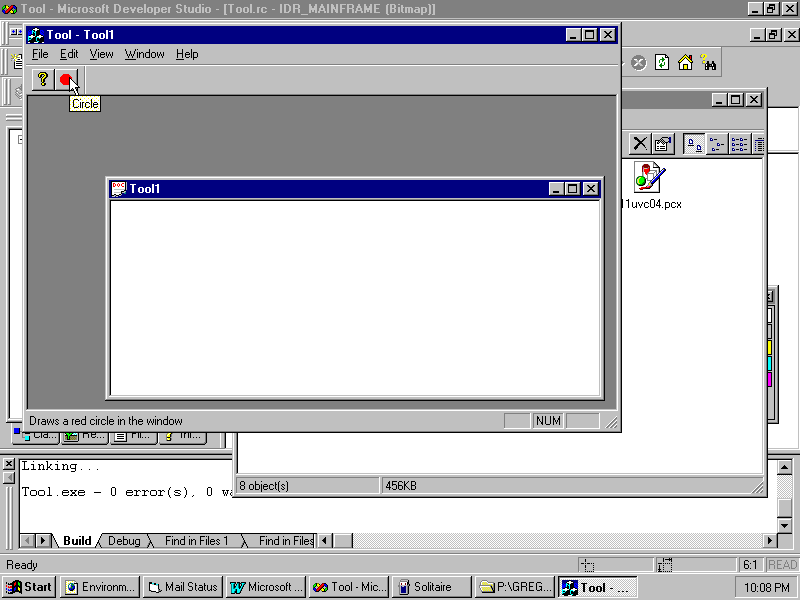
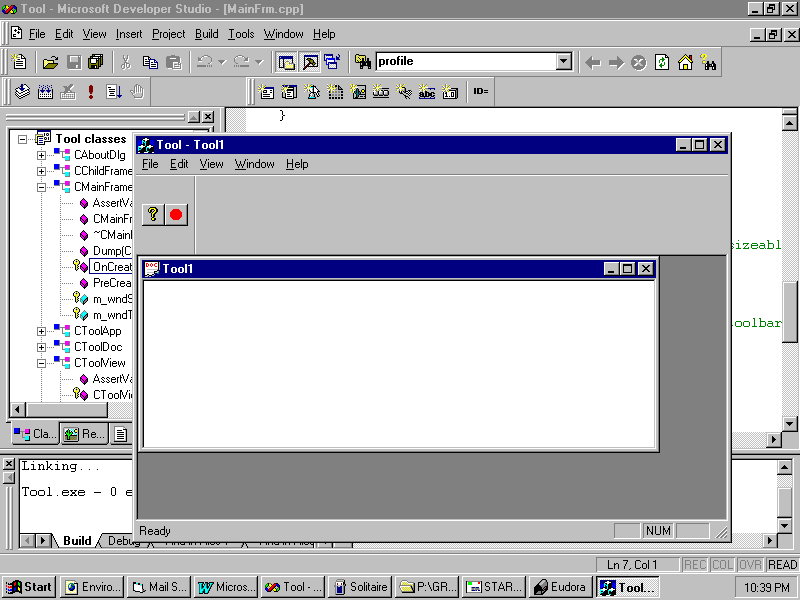
If you compile and run the application now, you'll see the window shown in Figure 10.7. In the figure, you can see the new toolbar button, as well as its ToolTip and description line. The toolbar looks a little sparse in this example, but you can add as many buttons as you like.
Fig. 10.7 The new toolbar button shows its ToolTip and description.
You can create as many buttons as you need; just follow the aforementioned procedures for each. After you have the buttons created, you're through with the toolbar resources and are ready to write the code that responds to the buttons. For example, in the previous example, a circle button was added to the toolbar and a message-response function, called OnCircle(), was added to the program. MFC calls that message-response function whenever the user clicks the associated button. However, right now, that function doesn't do anything, as shown in Listing 10.1.
![]()
Listing 10.1óAn Empty Message-Response Function
void CToolView::OnCircle()
{
    // TODO: Add your command
handler code here
}
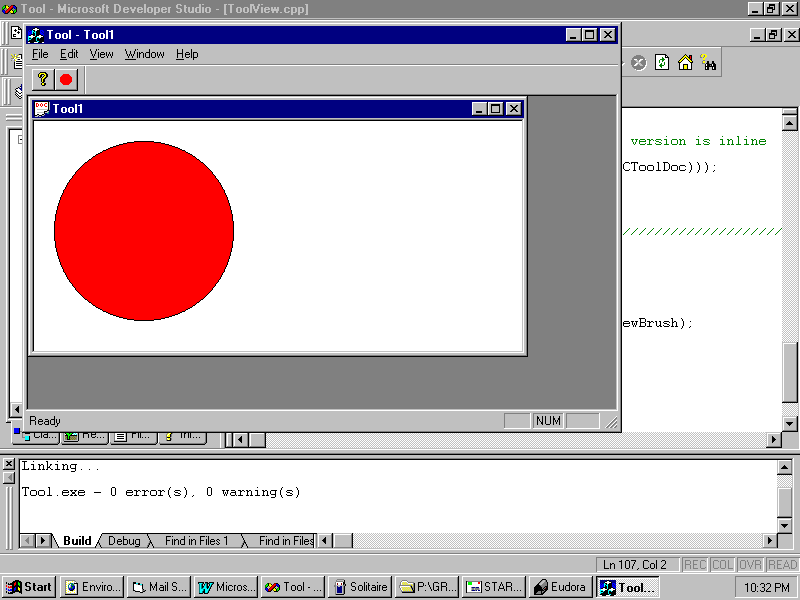
Although the circle button is supposed to draw a red circle in the window, you can see that the OnCircle() function is going to need a little help accomplishing that task. Add the lines shown in Listing 10.2 to the function so that circle button will actually do what it's supposed to do, as shown in Figure 10.8.
![]()
Listing 10.2óCToolView::OnCircle()
void CToolView::OnCircle()
{
CClientDC clientDC(this);
CBrush newBrush(RGB(255,0,0));
     CBrush* oldBrush =
clientDC.SelectObject(&newBrush);
clientDC.Ellipse(20, 20, 200, 200);
clientDC.SelectObject(oldBrush);
}
Fig. 10.8 After adding code to OnCircle(), the new toolbar button actually does something.
You can find the circle-drawing application in the CHAP11\TOOL directory of this book's CD-ROM.
The CToolBar Class's Member Functions
In most cases, after you have created your toolbar resource and associated its buttons with the appropriate command IDs, you don't need to bother any more with the toolbar. The code generated by AppWizard creates the toolbar for you, and MFC takes care of calling the buttons' response functions for you. However, there may be times when you want to change the toolbar's default behavior or appearance in some way. In those cases, you can call upon the CToolBar class's member functions, which are listed in Table 10.1 along with their descriptions. The toolbar is accessible from the CMainFrame class as the m_wndToolBar member variable. Usually you change the toolbar behavior in CMainFrame::OnCreate().
Table 10.1óMember Functions of the CToolBar Class
| Function | Description |
CommandToIndex() |
Gets the index of a button given its ID. |
Create() |
Creates the toolbar. |
GetButtonInfo() |
Gets information about a button. |
GetButtonStyle() |
Gets a button's style. |
GetButtonText() |
Gets a button's text label. |
GetItemID() |
Gets the ID of a button given its index. |
GetItemRect() |
Gets an item's display rectangle given its index. |
GetToolBarCtrl() |
Gets a reference to the CToolBarCtrl object represented by the CToolBar object. |
LoadBitmap() |
Loads the toolbar's button images. |
LoadToolBar() |
Loads a toolbar resource. |
SetBitmap() |
Sets a new toolbar button bitmap. |
SetButtonInfo() |
Sets a button's ID, style, and image number. |
SetButtons() |
Sets the IDs for the toolbar buttons. |
SetButtonStyle() |
Sets a button's style. |
SetButtonText() |
Sets a button's text label. |
SetHeight() |
Sets the toolbar's height. |
SetSizes() |
Sets the buttons' sizes. |
Normally, you don't need to call the toolbar's methods, but you can get some unusual results when you do, such as the extra high toolbar shown in Figure 10.9. (The buttons are the same size, but the toolbar window is bigger.) This toolbar resulted from a call to the toolbar object's SetHeight() member function. The CToolBar class's member functions enable you to perform this sort of toolbar trickery, but use them with great caution.
Fig. 10.9 You can use a toolbar object's member functions to change how the toolbar looks and acts.
Status bars are mostly benign objects that sit at the bottom of your application's window, doing whatever MFC instructs them to do. This consists of displaying command descriptions and the status of various keys on the keyboard, including the Caps Lock and Scroll Lock keys. In fact, status bars are so mundane from the programmer's point of view (at least they are in an AppWizard application) that they aren't even represented by a resource that you can edit like a toolbar. When you tell AppWizard to incorporate a status bar into your application, there's not much left for you to do.
Or is there? A status bar, just like a toolbar, must reflect the interface needs of your specific application. For that reason, the CStatusBar class features a set of methods with which you can customize the status bar's appearance and operation. Table 10.2 lists the methods along with brief descriptions.
Table 10.2óMethods of the CStatusBar Class
| Method | Description |
CommandToIndex() |
Gets an indicator's index given its ID. |
Create() |
Creates the status bar. |
GetItemID() |
Gets an indicator's ID given its index. |
GetItemRect() |
Gets an item's display rectangle given its index. |
GetPaneInfo() |
Gets information about an indicator. |
GetPaneStyle() |
Gets an indicator's style. |
GetPaneText() |
Gets an indicator's text. |
GetStatusBarCtrl() |
Gets a reference to the CStatusBarCtrl object represented by the CStatusBar object. |
SetIndicators() |
Sets the indicators' IDs. |
SetPaneInfo() |
Sets the indicators' IDs, widths, and styles. |
SetPaneStyle() |
Sets an indicator's style. |
SetPaneText() |
Sets an indicator's text. |
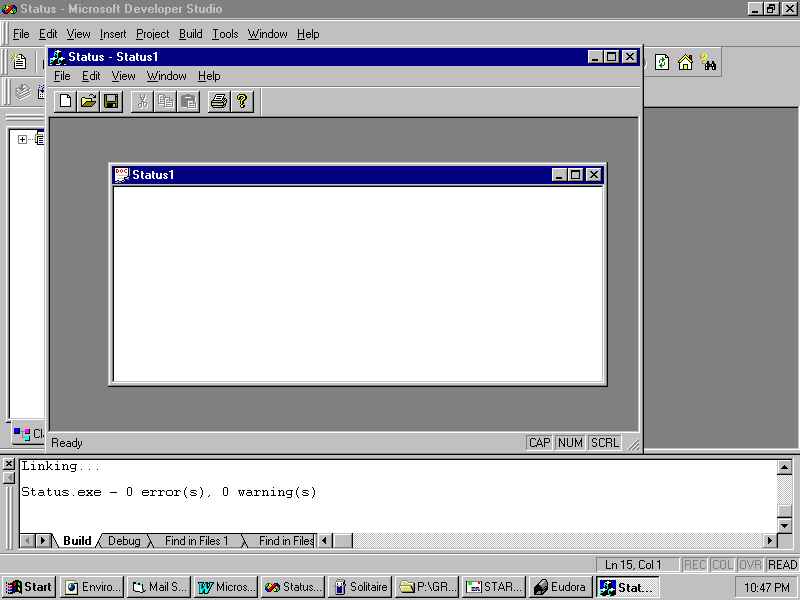
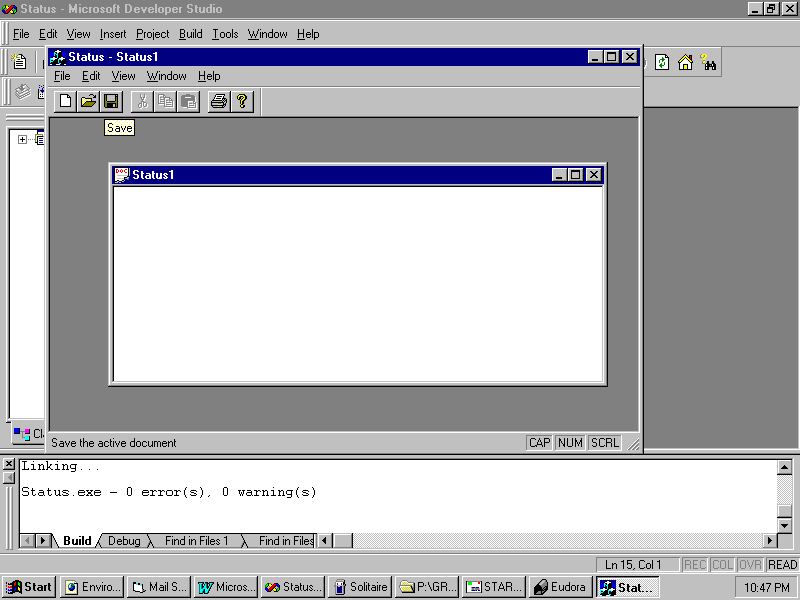
When you create a status bar as part of an AppWizard application, you get a window similar to that shown in Figure 10.10. (To make your own, create a project called Status and accept all the defaults, as you did for the Tool application.) The status bar has several parts, called panes, that display certain information about the status of the application and the system. These panes, which are marked in Figure 10.10, include indicators for the Caps Lock, Num Lock, and Scroll Lock keys, as well as a message area for showing status text and command descriptions. To see a command description, place your mouse pointer over a button on the toolbar (see Figure 10.11).
Fig. 10.10 The default MFC status bar contains a number of informative panes.
Fig. 10.11 The message area is used mainly for command descriptions.
The most common way to customize a status bar is to add new panes. To add a pane to a status bar, complete these steps:
The following sections cover these steps in detail.
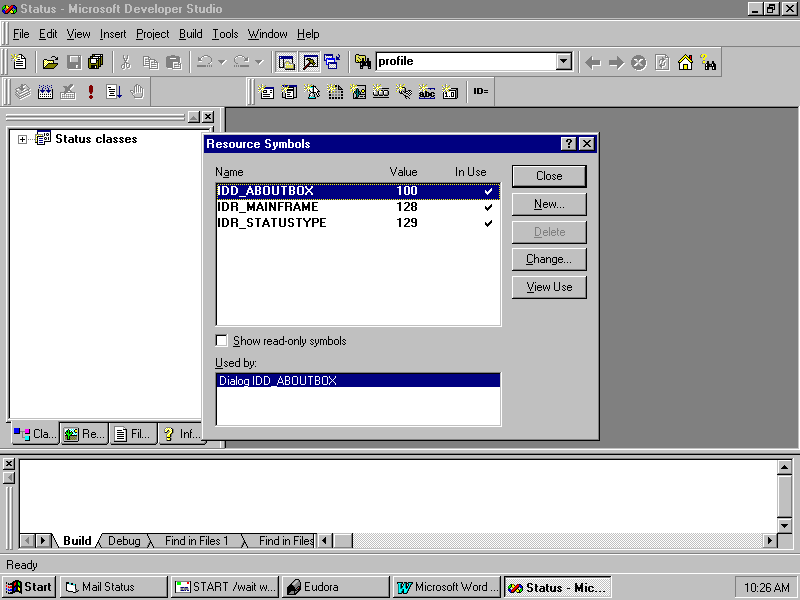
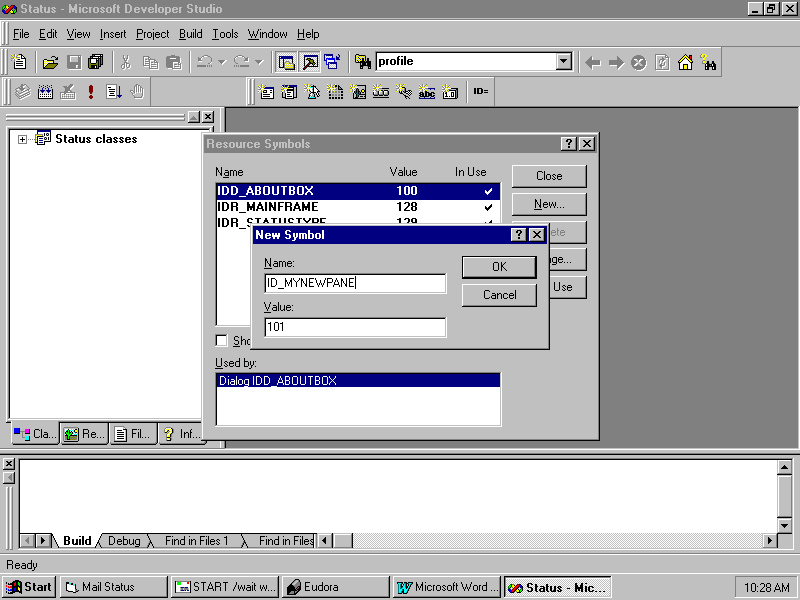
This step is easy, thanks to Visual C++'s symbol browser. To add the command ID, start by choosing View, Resource Symbols. When you do, you see the Resource Symbols dialog box (see Figure 10.12), which displays the currently defined symbols for your application's resources. Click the New button, and the New Symbol dialog box appears. Type the new ID, ID_MYNEWPANE, into the Name box (see Figure 10.13). Usually, you can just accept the value that MFC suggests for the ID.
Fig. 10.12 Use the Resource Symbols dialog box to add new command IDs to your application.
Fig. 10.13 Type the new IDs name and value into the New Symbol dialog box.
Click the OK and Close buttons to finalize your selections, and your new command ID is defined.
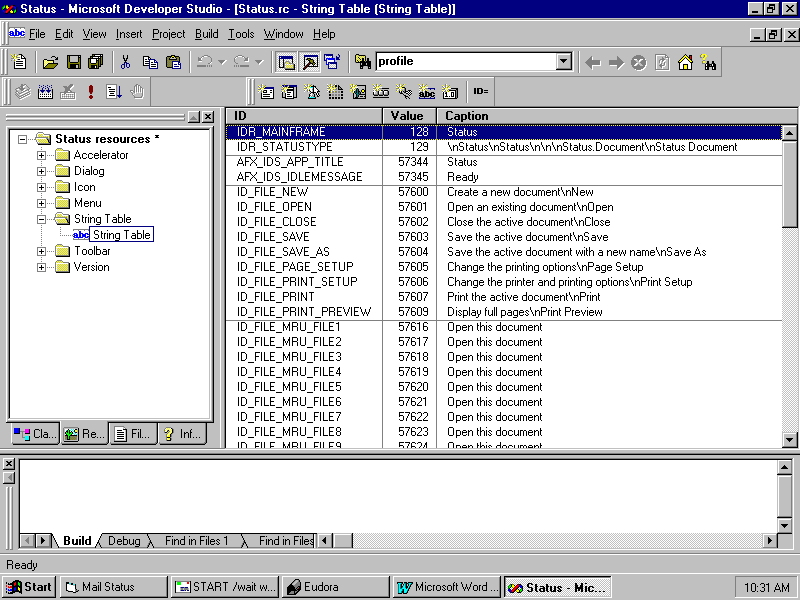
You have now defined a resource ID, but it is not being used. To represent a status bar pane, the ID must have a default string defined for it. To define the string, first go to the ResourceView window (by clicking the ResourceView tab) and double-click the String Table resource to open it in the string table editor, as shown in Figure 10.14.
Fig. 10.14 Define the new pane's default string in the string table.
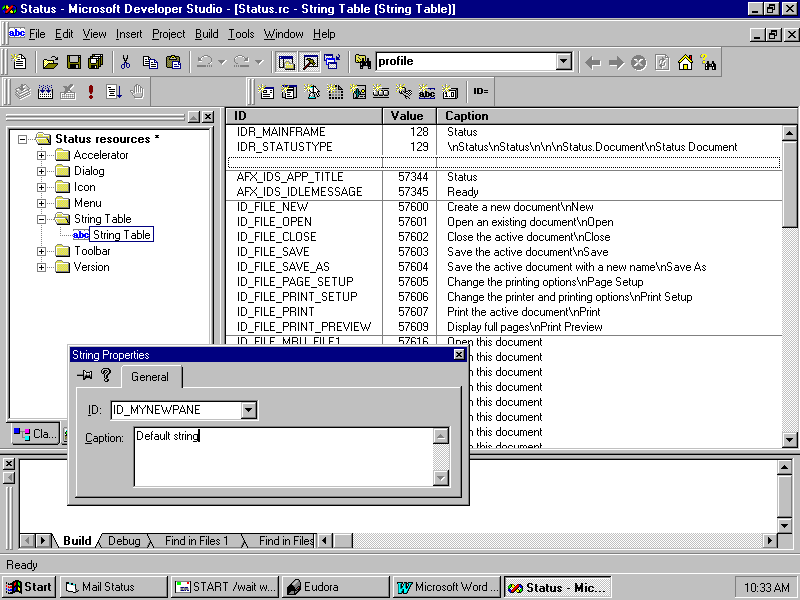
Now, choose Insert, New String to bring up the String Properties dialog box. Type the new pane's command ID into the ID box (or choose it from the drop-down list) and the default string (Default string in this case) into the Caption box (see Figure 10.15).
Fig. 10.15 Use the String Properties dialog box to define the new pane's default string.
Adding the ID to the Indicators Array
When MFC constructs your status bar, it uses an array of IDs to determine which panes to display and where to display them. This array of IDs is passed as an argument to the status bar's SetIndicators() member function, which is called in the CMainFrame class's OnCreate() function. You find this array of IDs, shown in Listing 10.3, near the top of the MainFrm.cpp file. One way to reach these lines in the source code editor is to switch to ClassView, expand CMainFrame, double-click OnCreate(), and scroll up one page. Alternatively, you could use FileView to open MainFrm.cpp and scroll down to this code.
![]()
Listing 10.3óMainFrm.cppóThe Indicator Array
static UINT indicators[] =
{
    ID_SEPARATOR,           // status line
indicator
ID_INDICATOR_CAPS,
ID_INDICATOR_NUM,
ID_INDICATOR_SCRL,
};
To add your new pane to the array, type the pane's ID into the array at the position in which you want it to appear in the status bar, followed by a comma. (The first pane, ID_SEPARATOR, should always remain in the first position.) Listing 10.4 shows the indicator array with the new pane added.
![]()
Listing 10.4óMainFrm.cppóThe Expanded Indicator Array
static UINT indicators[] =
{
ID_SEPARATOR, // status line indicator
ID_MYNEWPANE,
ID_INDICATOR_CAPS,
ID_INDICATOR_NUM,
ID_INDICATOR_SCRL,
};
Creating the Pane's Command-Update Handler
MFC does not automatically enable new panes when it creates the status bar. Instead, you must create a command-update handler for the new pane and enable the pane yourself. (You first learned about command-update handlers in Chapter 4, "Messages and Commands.") Also, for most applications, the string displayed in the pane is calculated on-the-flyóthe default string you defined in an earlier step is only a placeholder.
Normally you use ClassWizard to arrange for message to be caught, but ClassWizard does not help you catch status bar messages. You must add the handler entries to the message map yourself, and then add the code for the handler. You add entries to the message map in the header file and the map in the source file, and you add them outside the special AFX_MSG_MAP comments used by ClassWizard.
Double-click CMainFrame to open the header file, and scroll to the bottom. Edit the message map so that it resembles Listing 10.5. When you write your own applications, you will use a variety of function names to update status bar panes, but the rest of the delcaration will always be the same.
![]()
Listing 10.5óMainFrm.hóMessage Map
// Generated message map functions
protected:
//{{AFX_MSG(CMainFrame)
afx_msg int OnCreate(LPCREATESTRUCT lpCreateStruct);
// NOTE - the ClassWizard will add and remove member functions here.
          //    DO
NOT EDIT what you see in these blocks of generated code!
//}}AFX_MSG
afx_msg void OnUpdateMyNewPane(CCmdUI *pCmdUI);
DECLARE_MESSAGE_MAP()
Next, you add the handler to the source message map to actually associate the command ID with the handler. Open any CMainFrame function and scroll upwards until you find the message map, then edit it so that it looks like Listing 10.6.
![]()
Listing 10.6óMainFrm.cppóMessage Map
BEGIN_MESSAGE_MAP(CMainFrame, CFrameWnd)
//{{AFX_MSG_MAP(CMainFrame)
        // NOTE - the ClassWizard will add and remove mapping macros
here.
// DO NOT EDIT what you see in these blocks of generated code !
ON_WM_CREATE()
//}}AFX_MSG_MAP
ON_UPDATE_COMMAND_UI(ID_MYNEWPANE, OnUpdateMyNewPane)
END_MESSAGE_MAP()
You have now arranged that whenever the status bar pane ID_MYNEWPANE needs to be updated, the CMainFrame member function OnUpdateMyNewPane() will be called.
Now you're ready to write the new command-update handler. In the handler, you will enable the new pane and set its contents. Listing 10.7 shows the command-update handler for the new pane. As you can see, it uses a member variable called m_paneString. Update handlers should be very quickóthe job of making sure that m_paneString holds the right string should be tackled in a function that is called less often.
![]()
Listing 10.7óCMainFrame::OnUpdateMyNewPane()
void CMainFrame::OnUpdateMyNewPane(CCmdUI *pCmdUI)
{
pCmdUI->Enable();
pCmdUI->SetText(m_paneString);
}
Setting the Status Bar's Appearance
To add the last touch to your status bar demonstration application, you will want a way to set m_paneString. To initialize it, add this line to the CMainFrame constructor:
m_paneString = "Default string";
The value you entered in the string table is only to keep Developer Studio sure that the resource ID you created is in use. Right-click CMainFrame in ClassView and choose Add Member Variable to add m_paneString as a private member variable. The type should be CString.
To set up the status bar for the first time, add these lines to CMainFrame::OnCreate(), just before the return statement:
CClientDC dc(this);
SIZE size = dc.GetTextExtent(m_paneString);
int index = m_wndStatusBar.CommandToIndex(ID_MYNEWPANE);
m_wndStatusBar.SetPaneInfo(index,ID_MYNEWPANE, SBPS_POPOUT, size.cx);
These lines set the text string and the size of the pane. You set the size of the pane with a call to SetPaneInfo(), which needs the index of the pane and the new size. CommandToIndex() gets you the index of the pane, and GetTextExtent() gets you the size. As a nice touch, the call to SetPaneInfo() uses the SBPS_POPOUT style to create a pane that seems to stick out from the status bar, rather than being indented.
The user will change the string by making a menu selection. Open the IDR_STATUSTYPE menu in the resource editor and add a Change String item to the File menu. (Working with menus is discussed for the first time in Chapter 9, ìBuilding a Complete Application: ShowString.î) Let Developer Studio assign it the resource ID ID_FILE_CHANGESTRING.
Bring up ClassWizard and add a handler for this command; it should be caught by CMainFrame, because thatís where the m_paneString variable is kept. ClassWizard offers to call the handler OnFileChangestring() and you should accept this name. Click OK to close ClassWizard.
Insert a new dialog box into the application and call it IDD_PANEDLG. The title should be Change Pane String. Add a single edit box, stretched the full width of the dialog box, and leave the ID as IDC_EDIT1. Add a static text item just above the edit box with the caption New String:. With the dialog box open in the resource editor, bring up ClassWizard. Create a new class for the dialog box called CPaneDlg, and associate the edit control, IDC_EDIT1, with a CString member variable of the dialog class called m_paneString.
Adding dialog boxes to applications and associating them with classes is discussed in more depth in several earlier chapters, including Chapter 2, ìDialog Boxes and Controls,î and Chapter 10, ìBuilding a Complete Application: ShowString.î
Switch to ClassView, expand CMainFrame, and double-click OnFileChangeString() to edit it. Add the code shown in Listing 10.8.
![]()
Listing 10.8óCMainFrame::OnFileChangestring()
void CMainFrame::OnFileChangestring()
{
CPaneDlg dialog(this);
dialog.m_paneString = m_paneString;
    int result =
dialog.DoModal();
if (result == IDOK)
{
m_paneString = dialog.m_paneString;
CClientDC dc(this);
SIZE size = dc.GetTextExtent(m_paneString);
        int index =
m_wndStatusBar.CommandToIndex(ID_MYNEWPANE);
m_wndStatusBar.SetPaneInfo(index,
ID_MYNEWPANE, SBPS_POPOUT, size.cx);
}
}
This code displays the dialog box, and, if the user exits the dialog box by clicking the OK button, changes the text string and resets the size of the pane. The code is very similar to the lines you added to OnCreate(). Scroll up to the top of MainFrm.cpp and add this line:
#include "panedlg.h"
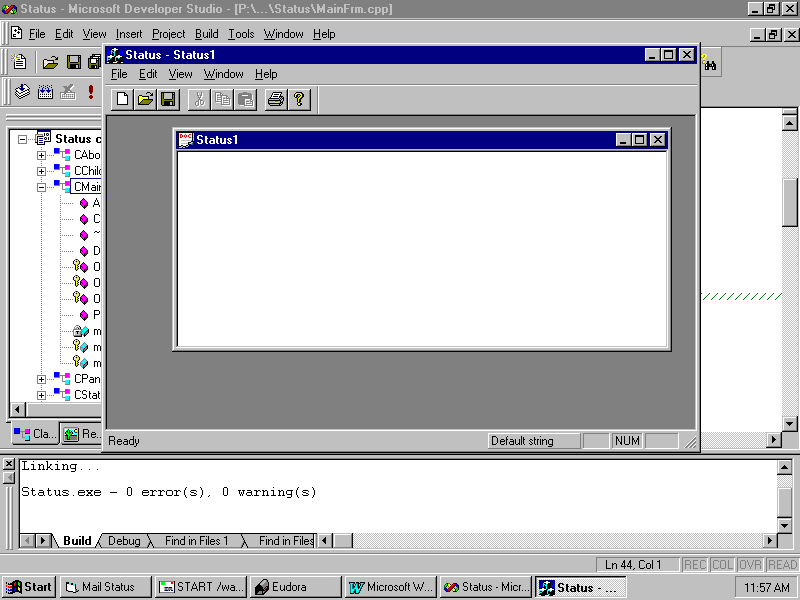
This tells the compiler what the CPaneDlg class is. Build and run the Status application, and you should see the window shown in Figure 10.16. As you can see, the status bar contains an extra panel displaying the text Default string. If you choose File, Change String, a dialog box appears into which you can type a new string for the panel. When you exit the dialog box via the OK button, the text appears in the new panel and the panel resizes itself to accommodate the new string (see Figure 10.17).
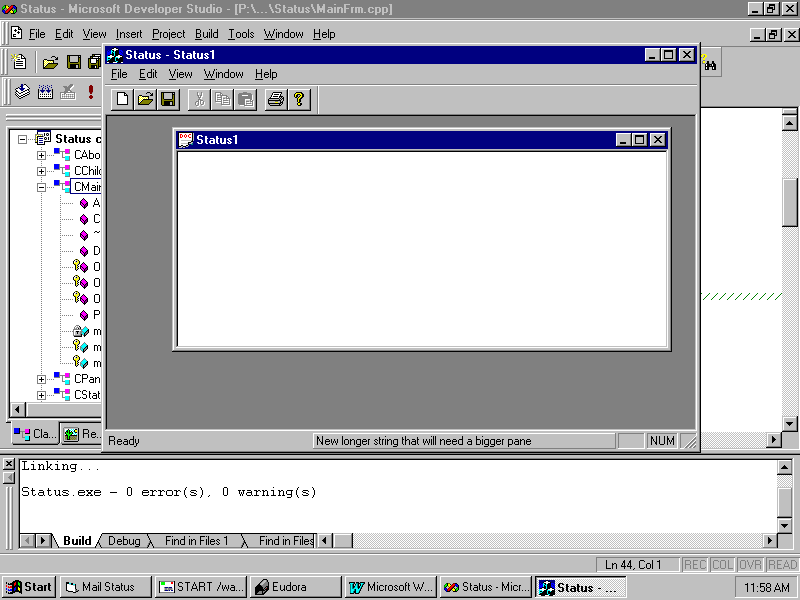
Fig. 10.16 The Status Bar Demo application shows how to add and manage a status bar panel.
Fig. 10.17 The panel resizes itself to fit the new string.
Users of Windows applications expect to find certain user-interface elements in place when they run a new application. Two of the most visible of these interface elements are the toolbar and the status bar, which have become standard parts of just about every Windows application. The toolbar provides the user with shortcut buttons for selecting menu commands, whereas the status bar keeps the user apprised of the application's state, as well as displays messages such as command descriptions.
AppWizard and MFC provide a terrific starting point for implementing these useful interface elements, and with a little effort you can make your application truly user-friendly.
For more information, refer to the following chapters:
© 1997, QUE Corporation, an imprint of Macmillan Publishing USA, a Simon and Schuster Company.
![]()