Creating a resource is the first step. Displaying a dialog box requires only a single function call.
You can use MFC's dialog box classes as the starting point for your own custom classes.
MFC features automatic data transfer to and from a dialog box.
Make sure that the user entered the information your application is expecting.
Controls are at the heart of any graphical user interface, enabling applications to present and retrieve information to and from the user.
MFC features a special class for every type of control.
You manipulate controls by calling the control class's member functions.
Windows programs have a graphical user interface. In the days of DOS, the program could simply print a prompt on-screen and direct the user to enter whatever value the program needed. With Windows, however, getting data from the user is not so simple, and most user input is obtained from dialog boxes. For example, a user can give the application details about a request by typing in edit boxes, choosing from list boxes, selecting radio buttons, checking or unchecking check boxes, and more.
This chapter builds several small applications to illustrate the use of dialog boxes in your programs.
Chances are that your Windows application will have several dialog boxes, each designed to retrieve a different type of information from your user. For each dialog box that appears on-screen, there are two entities you need to develop: a dialog box resource and a dialog box class.
The dialog box resource is used to draw the dialog box and its controls on the screen. The class holds the values of the dialog box, and it is a member function of the class that causes the dialog box to be drawn on the screen. They work together to achieve the overall effect: making communication with the program easier for your user.
You build a dialog box resource with the resource editor, adding controls to it and arranging them to make the control easy to use. Class Wizard then helps you to create a dialog box class, typically derived from the MFC class CDialog, and to connect the resource to the class. Usually each control on the dialog box resource corresponds to one member variable in the class. To display the dialog box, you call a member function of the class. To set the control values to defaults before displaying the dialog box, or to determine the values of the controls after the user is finished with the box, you use the member variables of the class.
The first step in adding a dialog box to your MFC application is creating the dialog box resource, which acts as a sort of template for Windows. When Windows sees the dialog box resource in your program, it uses the commands in the resource to construct the dialog box for you.
![]() In
this chapter you learn to work with dialog boxes by adding one to a simple application.
You can use the SDI application that you created in Chapter 1
or open it from the CD. You create a dialog box resource and a dialog box class for
the application, write code to display the dialog box, and write code to use the
values entered by the user.
In
this chapter you learn to work with dialog boxes by adding one to a simple application.
You can use the SDI application that you created in Chapter 1
or open it from the CD. You create a dialog box resource and a dialog box class for
the application, write code to display the dialog box, and write code to use the
values entered by the user.
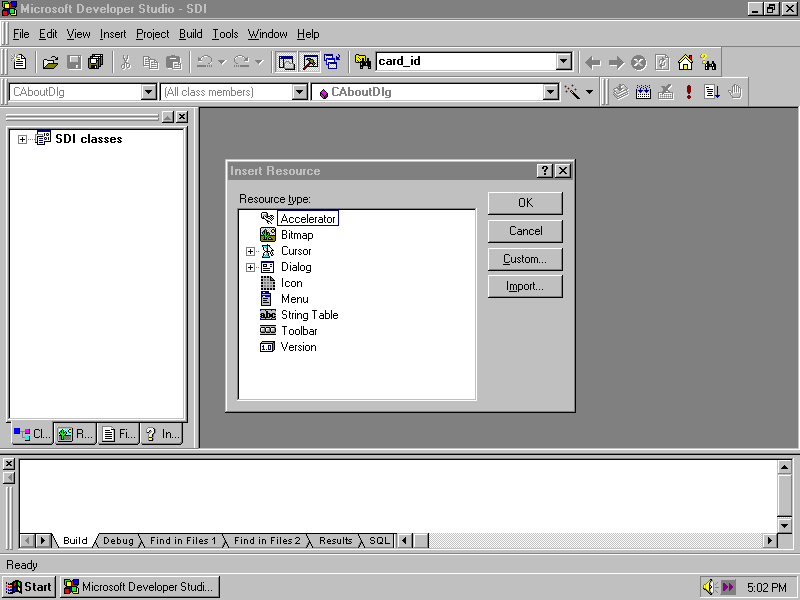
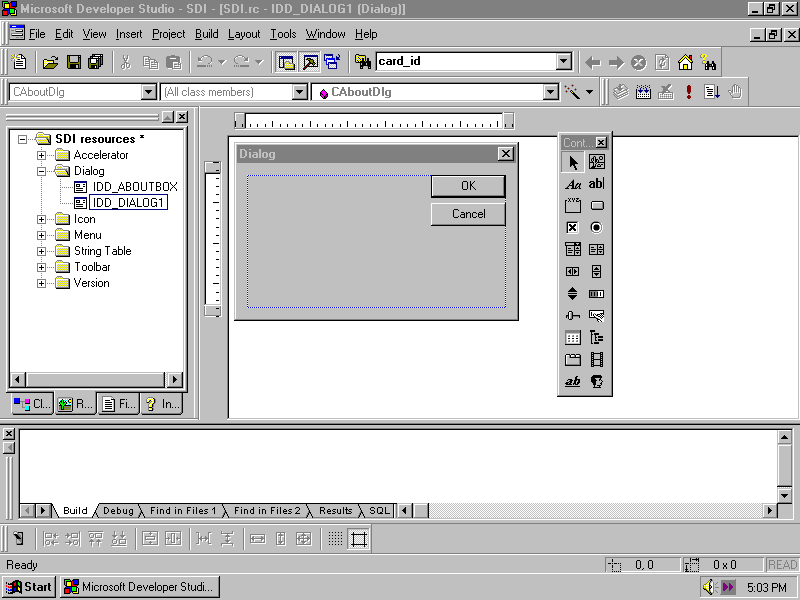
To create a dialog box resource, first open the application. Choose Insert, Resource from Developer Studio's menu bar. The Insert Resource dialog box, shown in Figure 2.1, appears. Double-click Dialog in the Resource Type box. The dialog box editor appears, as shown in Figure 2.2.
Fig. 2.1 Double-click Dialog on the Insert Resource dialog box.
Fig. 2.2 A brand new dialog box resource has a title, an OK button, and a Cancel button.
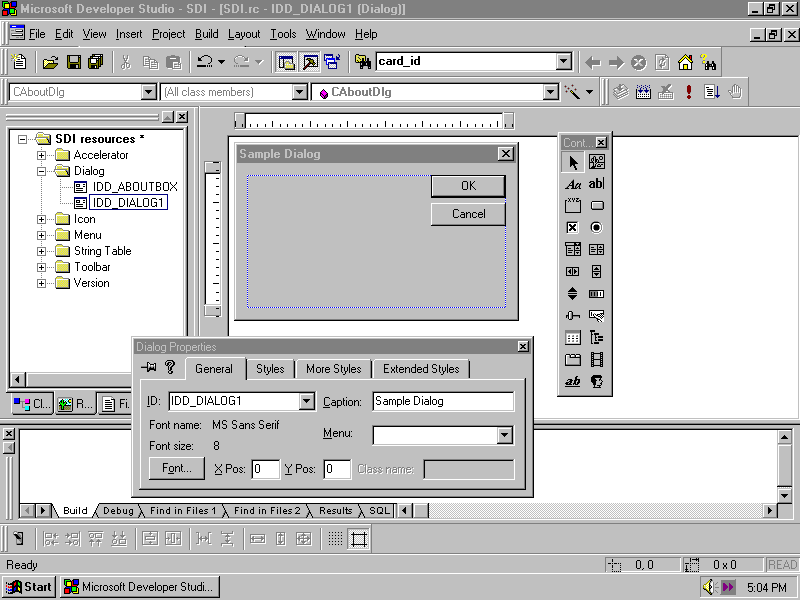
Bring up the Properties dialog box for the new dialog box by choosing View, Properties. Change the caption to Sample Dialog, as shown in Figure 2.3. You'll be using the Properties dialog box quite a lot as you work on this dialog box resource, so "pin" it to the screen by clicking the pushpin in the upper left corner.
Fig. 2.3 Use the Properties dialog box to change the title of the new dialog box.
The control palette shown at the far right of Figure 2.2 is used to add controls to the dialog box resource. Dialog boxes are built and changed with a very visual WYSIWYG interface. If you need a button on your dialog box, you grab one from the control palette, drop it where you want it, and change the caption from Button1 to Lookup, or Connect, or whatever you want the button to read. All the familiar Windows controls are available for your dialog boxes:
The sample application in this chapter is going to have a dialog box with a selection of controls on it, to demonstrate the way they are used.
Defining Dialog Box and Control IDs
Because dialog boxes are often unique to an application (with the exception of the common dialog boxes), you almost always create your own IDs for both the dialog box and the controls it contains. You can, if you like, accept the default IDs that the dialog box editor creates for you. However, these IDs are generic (for example, IDD_DIALOG1, IDC_EDIT1, IDC_RADIO1, and so on), and so you'll probably want to change them to something more specific. In any case, as you can tell from the default IDs, a dialog box's ID usually begins with the prefix IDD, and control IDs usually begin with the prefix IDC. You change these IDs in the Properties dialog box: click the control (or the dialog box background to select the entire background), and choose Edit, Properties; then change the resource ID to a descriptive name that starts with IDD for a dialog and IDC for a control.
Creating the Sample Dialog Box
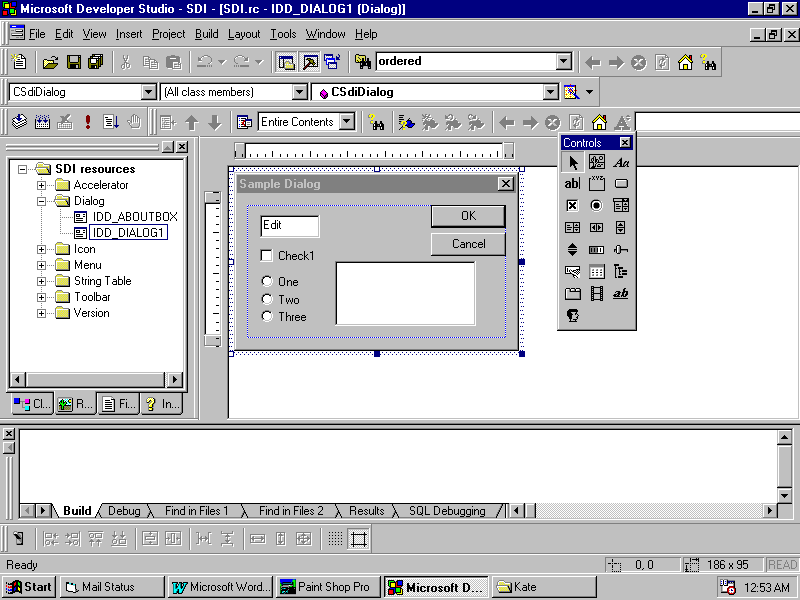
Click the Edit box button on the control palette, and then click in the upper-left corner of the dialog box to place the edit box. If necessary, grab a moving handle and move it until it is in roughly the same place as the edit box in Figure 2.4. Normally, you would change the ID from Edit1, but for this sample leave it unchanged.
Fig. 2.4 You can build a simple dialog box quickly in the resource editor.
If you aren't sure which control palette button inserts an edit box (or any other type of control,) just hold the pointer still over one of the buttons for a short time. A ToolTip will appear reminding you of the name of the control associated with the button. Move the pointer from button to button until you find the one for the edit box.

Add a check box and three radio buttons to the dialog box so that it resembles Figure 2.4. Change the captions on the radio buttons to One, Two, and Three. To align all these controls, click one, and then while holding down the Ctrl key, click each of the rest of them. Choose Layout, Align Controls, Left, and if necessary drag the stack of controls over with the mouse while they are all selected. Then choose Layout, Space Evenly, Down, to adjust the vertical spacing.
The commands on the Layout menu are also on the Dialog toolbar, which appears at the bottom of your screen while you are using the resource editor. The toolbar symbols are repeated on the menu to help you learn which button is associated with each menu item.
Click the One radio button again and bring up the Properties dialog box. Select the Group check box. This indicates that this is the first of a group of buttons. When you select a radio button, all the other buttons in the group are deselected.
Add a list box to the dialog box, to the right of the radio buttons, and resize it to match Figure 2.4. With the list box highlighted, choose View Properties to bring up the Properties dialog box. Select the Styles tab and make sure that the Sort box is not selected. When this box is selected, the strings in your list box are automatically presented in alphabetical order. For this application, they should be presented in the order that they are added.
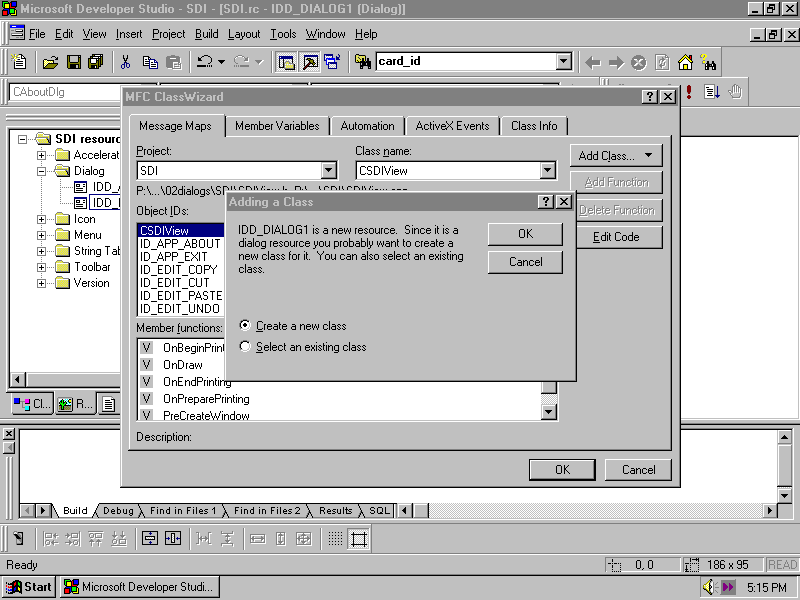
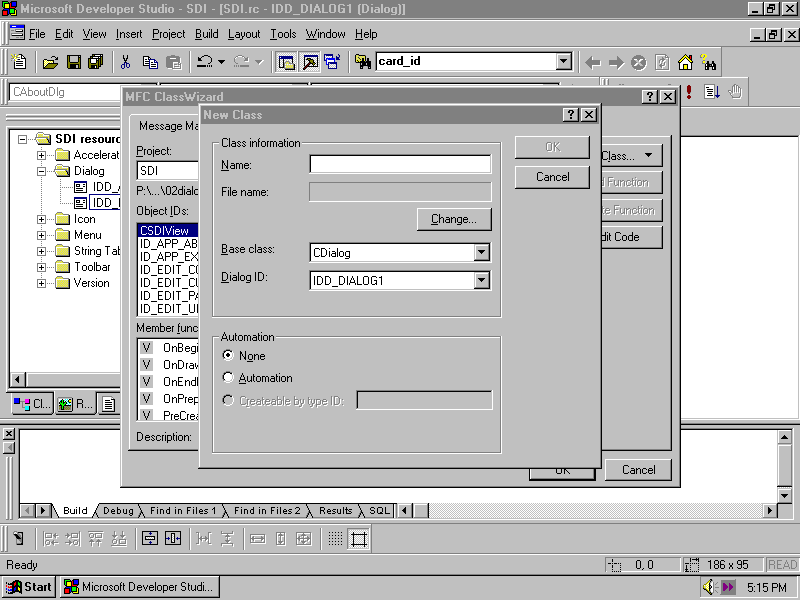
When the resource is complete, bring up ClassWizard by choosing View, ClassWizard. ClassWizard recognizes that this new dialog box resource does not have a class associated with it and offers to build one for you, as shown in Figure 2.5. Leave the Create a New Class radio button selected, and click OK. The New Class dialog box appears, as shown in Figure 2.6. Fill in the class name as CSdiDialog and click OK. ClassWizard creates a new class, prepares the source file (SdiDialog.cpp) and header file (SdiDialog.h), and adds them to your project.
Fig. 2.5 ClassWizard makes sure you don't forget to create a class to go with your new dialog box resource.
Fig. 2.6 Creating a dialog box class is simple with ClassWizard.
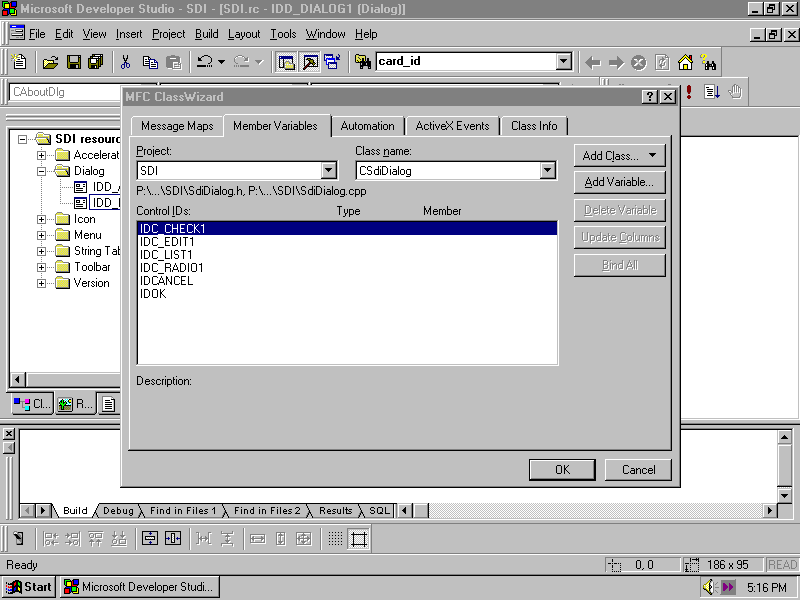
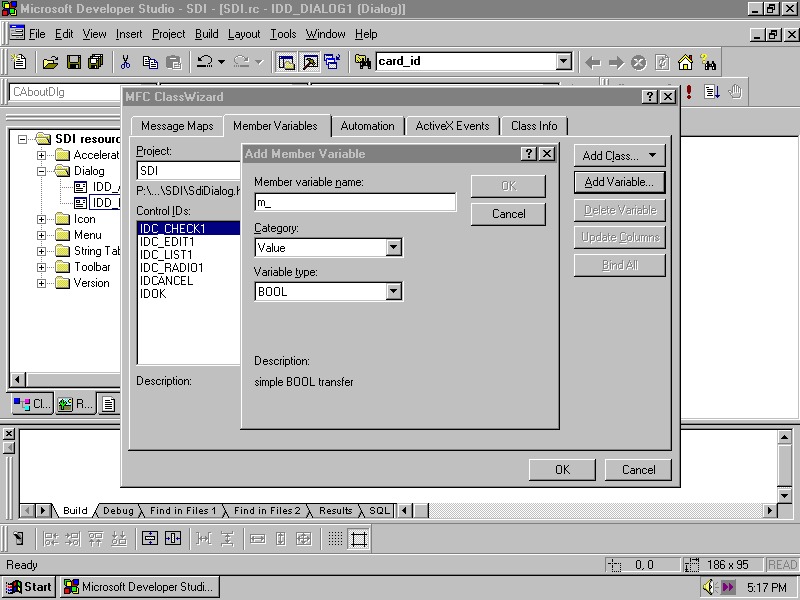
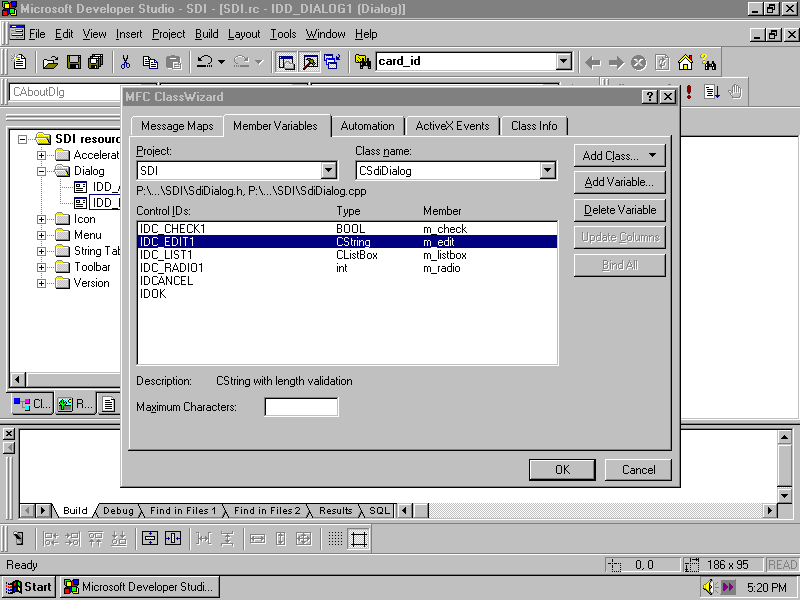
You connect the dialog box resources to your code with the Member Variables tab of ClassWizard, shown in Figure 2.7. Click IDC_CHECK1 and then click the Add Variables button. This brings up the Add Member Variable dialog box, shown in Figure 2.8.
Fig. 2.7 The Member Variables tab of ClassWizard connects dialog box controls to dialog box class member variables.
Fig. 2.8 You choose the name for the member variable associated with each control.
A member variable in the new dialog box class can be connected to a control's value, or to the control itself. This sample demonstrates both kinds of connection. For IDC_CHECK1, fill in the variable name as m_check, and make sure that the Category drop-down box has Value selected. If you open the Variable type drop-down box, you will see that the only possible choice is BOOL. Since a check box can be either selected or not selected, it can be connected only to a BOOL variable, which holds the value TRUE or FALSE.
Here are the data types that go with each control type:
Connect IDC_EDIT1 in the same way, to a member variable called m_edit of type CString as a Value. Connect IDC_LIST1 as a Control to a member variable called m_listbox of type CListBox. Connect IDC_RADIO1, the first of the group of radio buttons, as a Value to an int member variable called m_radio.
After you click OK to add the variable, ClassWizard offers, for some kinds of variables, the capability to validate the user's data entry. For example, when an edit control is selected, a field under the list of variables allows you to set the maximum number of characters the user can enter into the edit box (see Figure 2.9). Set it to 10 for m_edit. If the edit box is connected to a number (int or float), this area of ClassWizard is used to specify minimum or maximum values for the number entered by the user. The error messages asking the user to try again are generated automatically by MFC with no work on your part.
Fig. 2.9 Enter a number in the Maximum Characters field to limit the length of a user's entry.
Now that you have your dialog box resource built and your dialog box class written, you can create objects of that class within your program and display the associated dialog box element. The first step is to decide what will cause the dialog box to display. Typically it is a menu choice, but since adding menu items and connecting them to code are not covered until Chapter 9, "Building a Complete Application: ShowString," you can simply have the dialog box display when the application starts running. To display the dialog box, you call the DoModal() member function of the dialog box class.
Modeless Dialog Boxes
Most of the dialog boxes you will code will be modal dialog boxes. A modal dialog box is on top of all the other windows in the application: the user must deal with the dialog box and then close it before going on to other work. An example of this is the dialog box that comes up when the user chooses File, Open in any Windows application.
A modeless dialog box allows the user to click the underlying application and do some other work and then return to the dialog box. An example of this is the dialog box that comes up when the user chooses Edit, Find in many Windows applications.
Displaying a modeless dialog box is more difficult than displaying a modal one. The dialog box object, the instance of the dialog box class, must be managed carefully. Typically it is created with new and destroyed with delete when the user closes the dialog box with Cancel or OK. You have to override a number of functions within the dialog box class. In short, you should be familiar and comfortable with modal dialog boxes before you attempt to use a modeless dialog box. When you're ready, look at the Visual C++ sample called MODELESS that comes with Developer Studio. The fastest way to open this sample is by searching for MODELESS in InfoViewer. Searching in InfoViewer is covered in Reference C, "Developer Studio Menus and Commands."
Arranging to Display the Dialog Box
![]() Select
the ClassView in the project workspace pane, expand the SDI Classes item, and then
expand CSdiApp. Double-click the InitInstance() member
function. This function is called whenever the application starts. Scroll down to
the very end of the function, and just before the return at the end of the function,
add the lines in Listing 2.1.
Select
the ClassView in the project workspace pane, expand the SDI Classes item, and then
expand CSdiApp. Double-click the InitInstance() member
function. This function is called whenever the application starts. Scroll down to
the very end of the function, and just before the return at the end of the function,
add the lines in Listing 2.1.
Listing 2.1ñSDI.CPPñLines to Add at the End of
CSdiApp::InitInstance()
CSdiDialog dlg;
dlg.m_check = TRUE;
dlg.m_edit = "hi there";
CString msg;
if (dlg.DoModal() == IDOK)
{
msg = "You clicked OK. ";
}
else
{
msg = "You cancelled. ";
}
msg += "Edit box is: ";
msg += dlg.m_edit;
AfxMessageBox (msg);
This code first creates an instance of the dialog box class. It sets the check box and edit box to simple default values. (The list box and radio buttons are a little more complex and are added later in this chapter, in "Using a List Box Control" and "Using Radio Buttons.") The dialog box displays on-screen by calling its DoModal() function, which returns a number represented by IDOK if the user clicks OK and IDCANCEL if the user clicks Cancel. The code then builds a message and displays it with the AfxMessageBox function.
The CString class has a number of useful member functions and operator overloads. As you see here, the += operator tacks characters onto the end of a string. For more about the CString class, consult Appendix E, "Useful Classes."
At the very beginning of the file, add this directive:
#include "sdidialog.h"
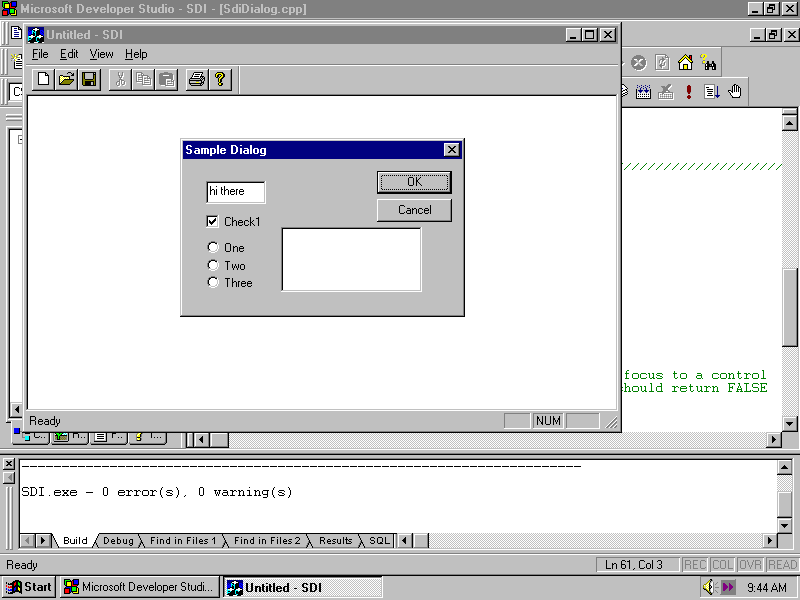
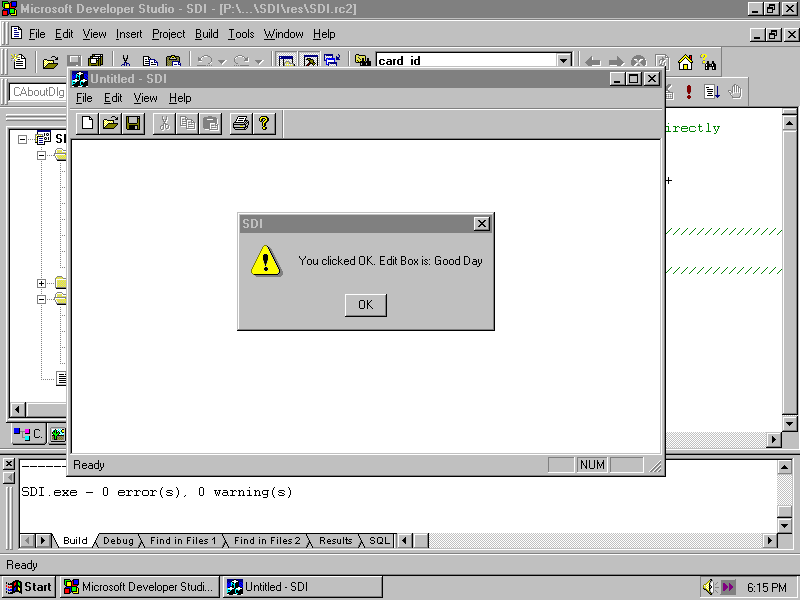
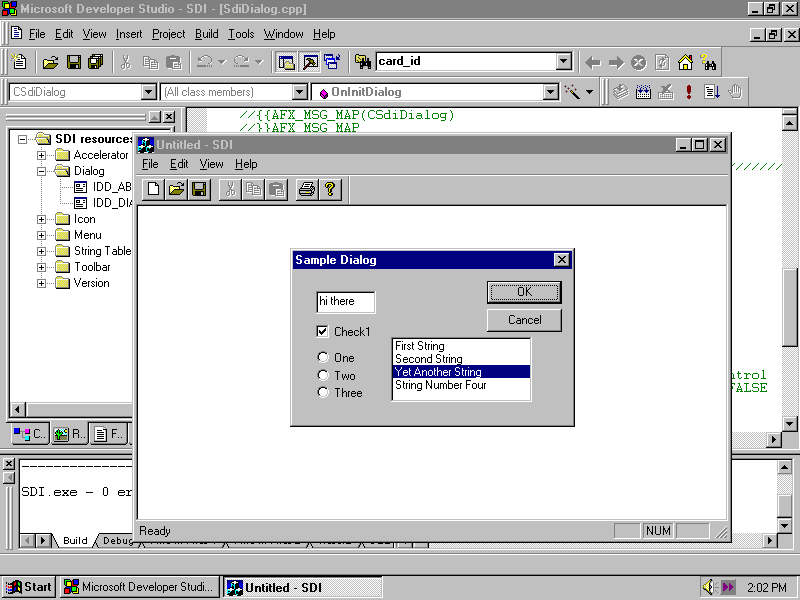
This makes sure that the compiler knows what a CSdiDialog class is when it compiles this file. Build the project by choosing Build, Build, or by clicking the Build button on the Build toolbar. Run the application by choosing Build, Execute, or by clicking the Execute Program button on the Build toolbar. You will see that the dialog box displays with the default values you just coded, as shown in Figure 2.10. Change them, and click OK. You should get a message box telling you what you did, like the one in Figure 2.11. Now the program sits there, ready to go, but since there is no more for it to do, you can close it by choosing File, Exit, or by clicking the X in the top-right corner.
Fig. 2.10 Your application displays the dialog box when it first runs.
Fig. 2.11 After you click OK, the application echoes the contents of the edit control.
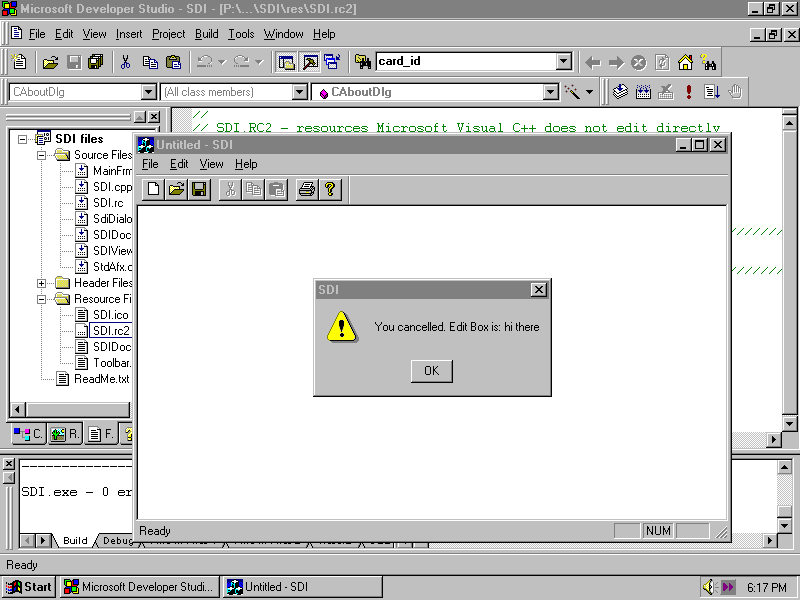
Run it again, change the contents of the edit box, and this time click Cancel on the dialog box. Notice in Figure 2.12 that the edit box is reported as still "hi there"ñthis is because MFC does not copy the control values into the member variables when the user clicks Cancel. Again just close the application after the dialog box is gone.
Fig. 2.12 When you click Cancel, the application ignores any changes you made.
Be sure to try entering more characters into the edit box than the 10 you specified with ClassWizard. You will find you cannot type more than 10 charactersñthe system just beeps at you. If you try to paste in something longer than 10 characters, only the first 10 characters appear in the edit box.
You may be wondering what's going on here. When you click OK on the dialog box, MFC arranges for a function called OnOK() to be called. This function is inherited from CDialog, the base class for CSdiDialog. Among other things it calls a function called DoDataExchange(), which ClassWizard wrote for you. Here's how it looks at the moment:
void CSdiDialog::DoDataExchange(CDataExchange* pDX)
{
CDialog::DoDataExchange(pDX);
//{{AFX_DATA_MAP(CSdiDialog)
DDX_Control(pDX, IDC_LIST1, m_listbox);
DDX_Check(pDX, IDC_CHECK1, m_check);
DDX_Text(pDX, IDC_EDIT1, m_edit);
DDV_MaxChars(pDX, m_edit, 10);
DDX_Radio(pDX, IDC_RADIO1, m_radio);
//}}AFX_DATA_MAP
}
The functions with names that start DDX all perform data exchange: their second parameter is the resource ID of a control, and the third parameter is a member variable in this class. This is the way that ClassWizard connected the controls to member variables: by generating this code for you. Remember that ClassWizard also added these variables to the dialog box class by generating code in the header file that declares them.
There are 34 functions whose names start DDX: one for each type of data that might be exchanged between a dialog box and a class. Each has the type in its name. For example, DDX_Check is used to connect a check box to a BOOL member variable. DDX_Text is used to connect an edit box to a CString member variable. ClassWizard chooses the right function name when you make the connection.
There are some DDX functions that are not generated by ClassWizard. For example, when you connect a list box as a Value, your only choice for type is CString. Choosing that causes ClassWizard to generate a call to DDX_LBString(), which connects the selected string in the list box to a CString member variable. There are cases when the integer index into the list box might be more useful, and there is a DDX_LBIndex() function that performs that exchange. You can add code to DoDataExchange(), outside the special ClassWizard comments, to make this connection. If you do so, remember to add the member variable to the class yourself. You can find the full list of DDX functions in the online documentation.
Functions with names that start DDV perform data validation. ClassWizard adds a call to DDV_MaxChars right after the call to DDX_Text that filled m_edit with the contents of IDC_EDIT1. The first parameter of the call is the member variable name and the second is the limit: how many characters can be in the string. If a user ever managed to get extra characters into a length-validated string, the DDV_MaxChars() function contains code that puts up a warning box and gets the user to try again. You can just set the limit and count on its being enforced.
Dealing with the list box is more difficult, because only while the dialog box is on-screen is the list box control a real window. You cannot call a member function of the list box control class unless the dialog box is on-screen. (This is true of any control that you access as a control rather than as a value.) This means that you must initialize the list box (fill it with strings) and use it (determine which string is selected) in functions that are called by MFC while the dialog box is on-screen.
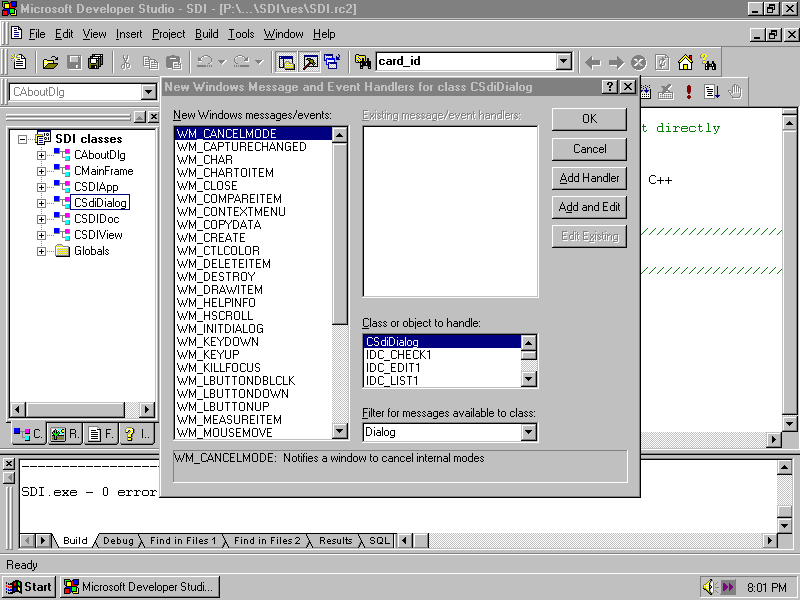
When it is time to initialize the dialog box, just before it displays on-screen, a CDialog function called OnInitDialog() is called. While the full explanation of what you are about to do will have to wait until Chapter 4, "Messages and Commands," follow the steps below to add the function to your class.
In ClassView, right-click CSdiDialog and choose Add Windows Message Handler. The New Windows Message and Event Handlers dialog box shown in Figure 2.13 appears. Choose WM_INITDIALOG from the list and click Add Handler. The message name disappears from the left list and appears in the right list. Click it and then click Edit Existing to see the code.
Fig. 2.13 The New Windows Message and Event Handlers dialog box helps you override OnInitDialog().
![]() Remove
the TODO comment and add calls to the member functions
of the list box so that the function is as shown in Listing 2.2.
Remove
the TODO comment and add calls to the member functions
of the list box so that the function is as shown in Listing 2.2.
Listing 2.2ñSDIDIALOG.CPPñCSdiDialog::OnInitDialog()
BOOL CSdiDialog::OnInitDialog()
{
CDialog::OnInitDialog();
m_listbox.AddString("First String");
m_listbox.AddString("Second String");
m_listbox.AddString("Yet Another String");
m_listbox.AddString("String Number Four");
m_listbox.SetCurSel(2);
return TRUE; // return TRUE unless you set the focus to a control
// EXCEPTION: OCX Property Pages should return FALSE
}
This function starts by calling the base class version of OnInitDialog() to do whatever behind-the-scenes work MFC does when dialog boxes are initialized. Then it calls the list box member function AddString() which, as you can probably guess, adds a string to the list box. The strings will be displayed to the user in the order that they were added with AddString(). The final call is to SetCurSel(), which sets the current selection. As you see when you run this program, the index you pass to SetCurSel() is zero-based, which means that item 2 is the third in the list, counting: 0, 1, 2.
Typically the strings of a list box are not hardcoded like this. To set them from elsewhere in your program, you have to add a CStringArray member variable to the dialog box class and a function to add strings to that array. The OnInitDialog() would use the array to fill the list box. Alternatively, you can use another one of MFC's collection classes or even fill the list box from a database. For more about CStringArray and other MFC collection classes, consult Appendix E, "Useful Classes." Database programming is covered in Chapter 22, "Database Access."
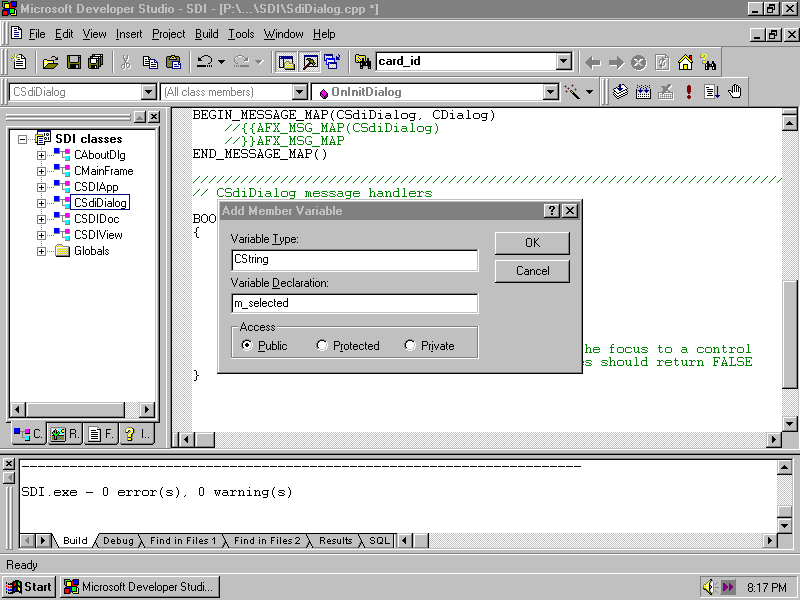
In order to have the message box display some indication of what was selected in the list box, you have to add another member variable to the dialog box class. This member variable will be set as the dialog box closes and can be accessed after it is closed. In ClassView, right-click CSdiDialog and choose Add Member Variable. Fill in the dialog box, as shown in Figure 2.14, and click OK. This adds the declaration of the CString called m_selected to the header file for you. (If the list box allowed multiple selections, you would have to use a CStringArray to hold the list of selected items.) Strictly speaking, the variable should be private, and you should either add a public accessor function or make CSdiApp::InitInstance() a friend function to CSdiDialog in order to be truly object oriented. Here you take an excusable shortcut. The general rule still holds: member variables should be private.
Fig. 2.14 Add a CString to your class to hold the string that was selected in the list box.
Object-oriented concepts like accessor functions, friend functions, and the reasoning behind private member variables.
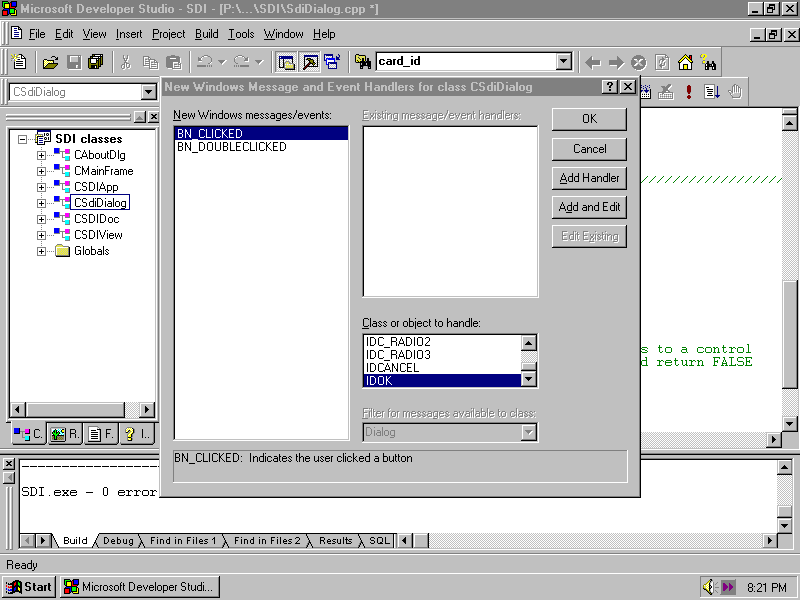
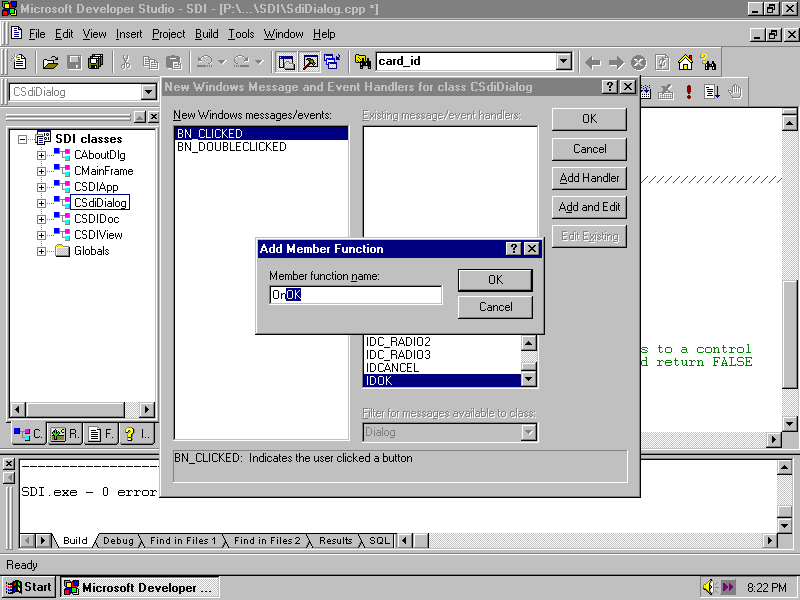
This new member variable is used to hold the string that was selected by the user. It is set when the user clicks OK or Cancel. To add a function that is called when the user clicks OK, follow these steps:
Fig. 2.15 Add a function to handle the user's clicking OK on your dialog box.
In the right-hand list box, select BN_CLICKED. You are adding a function to "handle" the user's clicking the OK button once.
Fig. 2.16 ClassWizard suggests a very good name for this event handler: do not change it.
Accept the suggested name, OnOK(), by clicking OK.
![]()
Listing 2.3ñSDIDIALOG.CPPñCSdiDialog::OnOK()
void CSdiDialog::OnOK()
{
int index = m_listbox.GetCurSel();
if (index != LB_ERR)
{
m_listbox.GetText(index, m_selected);
}
else
{
m_selected = "";
}
CDialog::OnOK();
}
This code calls the list box member function GetCurSel(), which returns a constant represented by LB_ERR if there is no selection or if more than one string has been selected. Otherwise it returns the zero-based index of the selected string. The GetText() member function fills m_selected with the string at position index. After filling this member variable, this function calls the base class OnOK() function to do the other processing required.
In a moment you will add lines to CSdiApp::InitInstance() to mention the selected string in the message box. Those lines will execute whether the user clicks OK or Cancel, so you need to add a function to handle the user's clicking Cancel. Simply follow the numbered steps for adding OnOK, except that you choose ID_CANCEL from the top-right box and agree to call the function OnCancel. The code, as shown in Listing 2.4, resets m_selected since the user canceled the dialog box.
![]()
Listing 2.4ñSDIDIALOG.CPPñCSdiDialog::OnCancel()
void CSdiDialog::OnCancel()
{
m_selected = "";
CDialog::OnCancel();
}
Add these lines to CSdiApp::InitInstance() just before the call to AfxMessageBox():
msg += ". List Selection: ";
msg += dlg.m_selected;
Build the application, run it, and test it. Does it work as you expect? Does it resemble Figure 2.17?
Fig. 2.17 Your application now displays strings in the list box.
You may have already noticed that when the dialog box first appears on-screen, none of the radio buttons are selected. You can arrange for one of them to be selected by default: simply add two lines to CSdiDialog::OnInitDialog(). These lines set the second radio button and saves the change to the dialog box:
m_radio = 1;
UpdateData(FALSE);
You may recall that m_radio is the member variable to which the group of radio buttons is connected. It is a zero-based index into the group of buttons, indicating which one is selected. Button 1 is the second button. The call to UpdateData() refreshes the dialog box controls with the member variable values. The parameter indicates the direction of transfer: UpdateData(TRUE) would refresh the member variables with the control values, wiping out the setting of m_radio you just made.
Unlike list boxes, a group of radio buttons can be accessed after the dialog box
is no longer on-screen, so you won't need to add code to OnOK()
or OnCancel(). But you have a problem: how to convert
the integer selection into a string to tack on the end of msg.
There are lots of approaches, ![]() including the Format()
function of CString, but in this case, since there are
not many possible selections, a switch statement is
readable and quick. At the end of CSdiApp::InitInstance(),
add the lines in Listing 2.5 just before the call to AfxMessageBox().
including the Format()
function of CString, but in this case, since there are
not many possible selections, a switch statement is
readable and quick. At the end of CSdiApp::InitInstance(),
add the lines in Listing 2.5 just before the call to AfxMessageBox().
Listing 2.5ñSDIDIALOG.CPPñLines to Add to CSdiApp::InitInstance()
msg += "\r\n";
msg += "Radio Selection: ";
switch (dlg.m_radio)
{
case 0:
msg += "0";
break;
case 1:
msg += "1";
break;
case 2:
msg += "2";
break;
default:
msg += "none";
break;
}
The first new line adds two special characters to the message. Return, represented by \r, and new line, represented by \n, combine to form the Windows end-of-line marker. This adds a line break after the part of the message you have built so far. The rest of msg will appear on the second line of the message box. The switch statement is an ordinary piece of C++ code, which was also present in C. It executes one of the case statements, depending on the value of dlg.m_radio.
Once again, build and test the application. Any surprises? It should resemble Figure 2.18. You are going to be building and using dialog boxes throughout this book, so take the time to understand how this application works and what it does. You may want to step through it with the debugger and watch it in action: you can read all about debugging in Appendix C, "Debugging.î
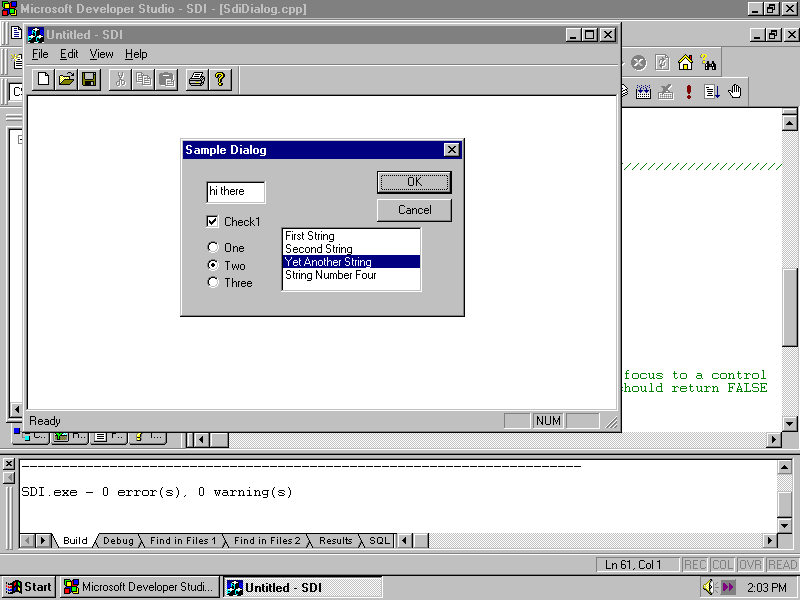
Fig. 2.18 Your application now selects button Two by default.
To add a dialog box to your application, you need to build a dialog box resource and a dialog box class and to connect them with ClassWizard. Then your application calls member functions of the dialog box class, or of the individual controls to use the dialog box. You may have to catch messages in order to gain full control of your dialog box.
Almost every sample application in this book features one or more dialog boxes. Some of the chapters that show you the power of dialog boxes include the following:
© 1997, QUE Corporation, an imprint of Macmillan Publishing USA, a Simon and Schuster Company.
![]()