Debugging is a vital part of programming. Whenever a program doesn't do what you expect, even if it doesn't blow up, you should turn to the debugger to see what's really going on. Some of the philosophies and techniques of debugging have been explained elsewhere in this book, especially in Chapter 24, "Improving Your Application's Performance." This appendix concentrates on the nuts and bolts of how to use the debugger: the menus, toolbars, and windows that were not covered in Reference B, "The Developer Studio Interface."
What's a breakpoint? What's the difference between Go and Restart? You'll see.
There's a lot of information available to you when you're debugging an application. Get a handle on it all.
The system will tell you what's happening if you just ask it to.
In case of an error, get your objects to describe themselves so you can see what's wrong.
Probably the most important word in debugging is breakpoint. A breakpoint is a spot in your program, a single line of code, where you would like to pause. Perhaps you are wondering how many times a loop gets executed, or whether control transfers inside a certain if statement, or whether a function even gets called. Setting a breakpoint on a line will make execution stop when that line is about to be executed. At that point you may want the program to be off and running again, or to move through your code a line or so at a time. You may want to know the values of some of your variables, or see how control transferred to this point by examining the call stack.
When it's time to move along, there are a number of ways you might like execution to resume. These are explained in the following list:
Most of the information made available to you by the debugger is in the form of new windows. These are discussed in the following sections.
Developer Studio has a powerful debugger with a rich interface. There are menu items, toolbar buttons, and windows (output areas) that are used only when debugging.
Menu Items
The user interface for debugging starts with items on some ordinary menus that are used only in debugging and were not discussed in Reference B, "The Developer Studio Interface." These include:
These are not the only menu items you will use, of course. For example, the Edit, Go To dialog box can be used to scroll the editor to a specific breakpoint as easily as a line, bookmark, or address. Many of the menu items you already learned about are useful during debugging.
Once you have started debugging, the Build menu disappears and a Debug menu appears. The items on that menu are as follows:
As you can see, some of the items from the Build, Start Debug cascading menu are also on the Debug menu, along with many other items. The individual items will be discussed in the sections that follow.
Setting Breakpoints
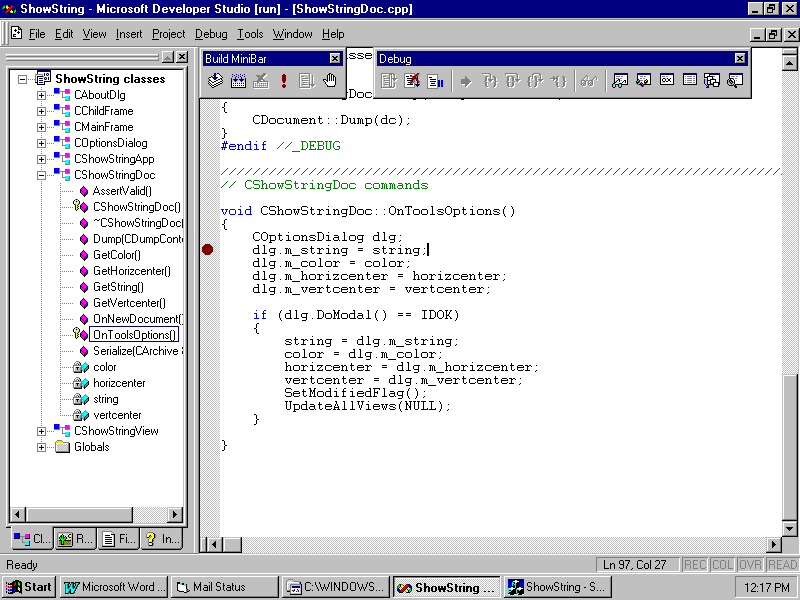
Probably the simplest way to set a simple breakpoint is to place the cursor on the line of code where you would like to pause. Then, toggle a breakpoint by pressing F9 or by clicking the Insert/Remove breakpoint button on the Build Mini-bar, which looks like an upraised hand (you're supposed to think "Stop!"). A red dot appears in the margin to indicate you have placed a breakpoint here, as shown in Figure C.1.
Fig. C.1 The F9 key toggles a breakpoint on the line containing the cursor.
The application being debugged throughout this reference chapter is ShowString, as built in Chapter 9, "Building a Complete Application: ShowString."

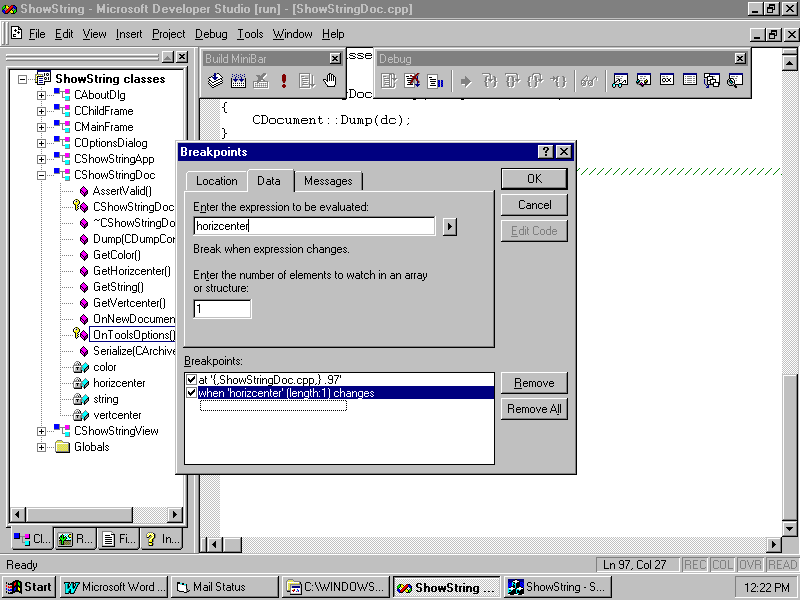
Choosing Edit, Breakpoints displays a tabbed dialog box to set simple or conditional breakpoints. For example, you may want to pause whenever a certain variable's value changes. Searching through your code for lines that change that variable's value and setting breakpoints on them all is tiresome. Instead, use the Data tab of the Breakpoints dialog box, shown in Figure C.2. When the value of the variable changes, a message box tells you why execution is pausing, then you can look at code and variables as described below.
Fig. C.2 You can arrange for execution to pause whenever a variable or expression changes value.
You can also set conditional breakpoints, such as "break on this line when i exceeds 100," that spare you from mindlessly clicking Go, Go, Go until you have been through a loop 100 times.
Examining Variable Values
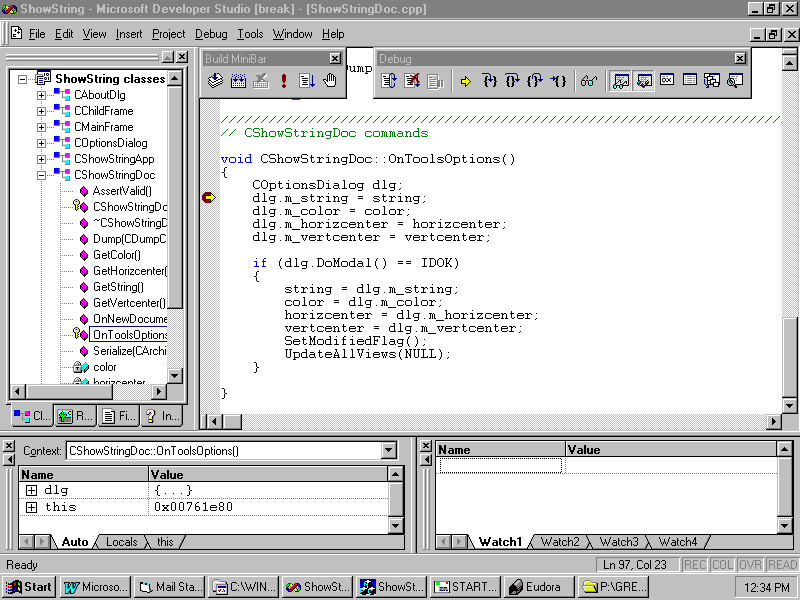
When you set a breakpoint and debug the program, everything proceeds normally until the breakpoint line of code is about to execute. Then Developer Studio comes up on top of your application, with some extra windows in the display and a yellow arrow in the red margin dot that indicated your breakpoint, as shown in Figure C.3. This shows you the line of code that is about to execute.
Fig. C.3 A yellow arrow indicates the line of code about to execute.
Move the mouse over a variable name, like color or horizcenter. A DataTip appears, telling you the current value of this variable. You can check as many local variables as you want like this, then continue executing and check them again. But there are other ways to examine variable values.
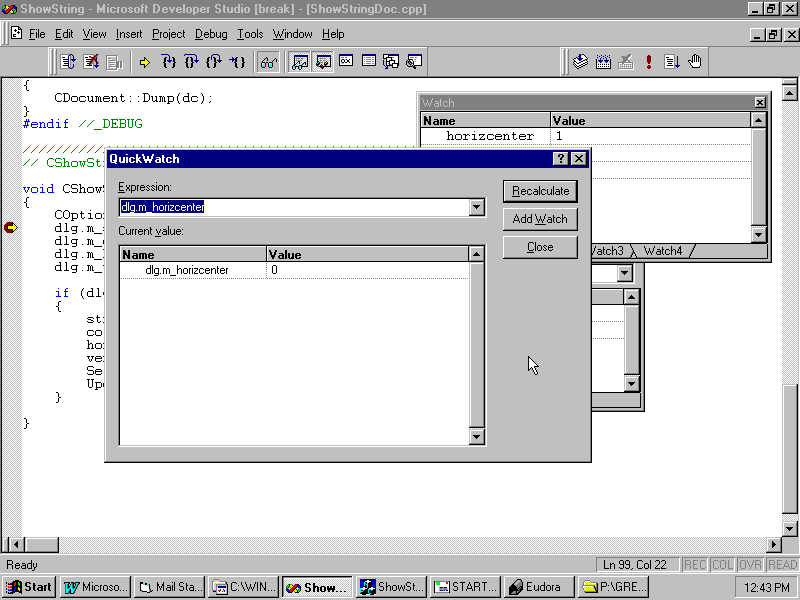
You could click on the variable and choose Debug, QuickWatch, or click the QuickWatch button (a pair of glasses) on the toolbar. This brings up the QuickWatch window, which shows you the value of a variable or expression and lets you add it to the watch window if you wish. You're probably wondering why anyone uses this feature now that DataTips will show you a variable's value without even clicking. DataTips can't handle expressions, even simple ones like dlg.m_horizcenter, but QuickWatch can, as you see in Figure C.4. You can also change a variable's value with this dialog box, to recover from horrible errors and see what happens.
Fig. C.4 The QuickWatch dialog box evaluates expressions. You can add them to the Watch window by clicking Add Watch.
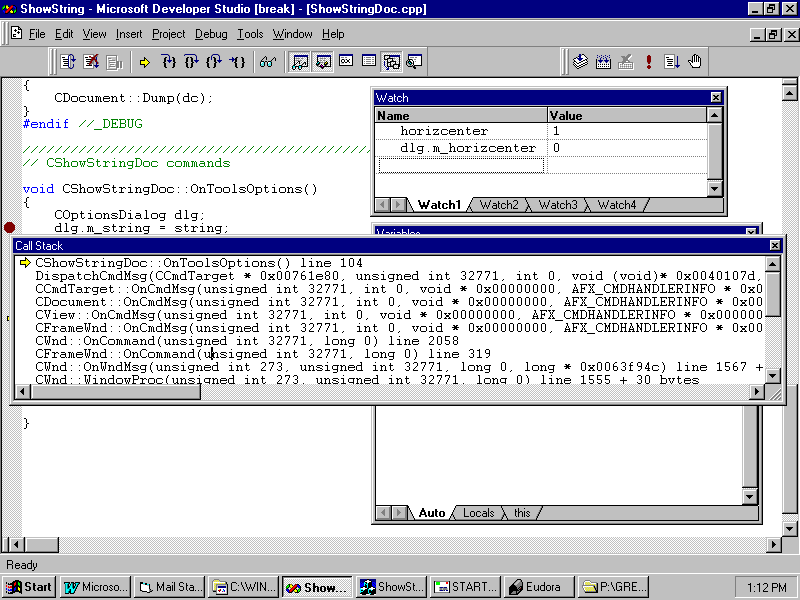
Figure C.5 shows a debug session after running forward a few lines from the original breakpoint (You'll see how to do that in a moment.) The Watch and Variable windows have been undocked to show more clearly which is which, and two watches have been added: one for horizcenter and one for dlg.m_horizcenter. The program is paused immediately after the user clicked OK on the Options dialog, and in this case the user changed the string, the color, and both kinds of centering.
Fig. C.5 The Watch window and the Variable window make it easy to know the values of all your variables.
The Watch window simply shows the values of the two variables that were added to it. horizcenter is still true (1), because the line of code that sets it has not yet been executed. dlg.m_horizcenter is false (0), because the user deselected the check box associated with the member variable. (Dialogs, controls, and associating controls with member variables are all discussed in Chapter 2, "Dialog Boxes and Controls.")
The Variables window has a lot more information in it, which sometimes makes it harder to use. The local variable dlg, and the pointer to the object for whom this member function was invoked, this, are both in the Variables window in tree form: click on a + to expand the tree and on a - to collapse it. In addition, the return value from DoModal, 1, is displayed.
At the top of the Variables window is a drop-down box labeled Context. Dropping it down shows how control got here: it lists the names of a series of functions. The top entry is the function in which the line about to be executed is contained, CShowStringDoc::OnToolsOptions(). The second entry is the function that called this one, DispatchCmdMsg, which dispatches command messages. Chapter 4, "Messages and Commands," introduces commands and messages and discusses the way that control passes to a message-handling function like OnToolsOptions. Here, the debugger gives proof of this process right before your eyes. Double-click on any function name in the drop-down box and the code for that function is displayed, you can look at variables local to that function, and so on.
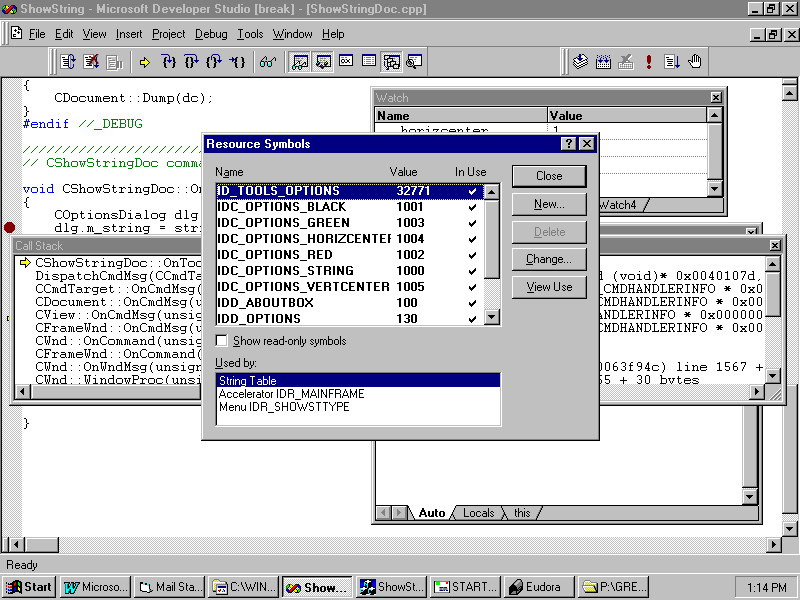
The Call Stack window, shown in Figure C.6, is a little easier to examine than the drop-down box in the Variables window, and it shows the same information. As well as the function names, you can see the parameters that were passed to each function. You may notice the number 32771 recurring in most of the function calls. Choose View, Resource Symbols and you'll see that 32771 means ID_TOOLS_OPTIONS, the resource ID associated with the menu item Tools, Options in ShowString (see Figure C.7.)
Fig. C.6 The Call Stack window shows how you got here.
Fig. C.7 The number 32771 corresponds to ID_TOOLS_OPTIONS.
Stepping Through Code
Double-clicking a function name in the call stack or the context drop-down box of the Variables window doesn't make any code execute: it simply gives you a chance to examine the local variables of the functions that called the function that is now executing. After you've looked at all the variables you want to look at, it's time to move on. While there are items on the Debug menu to Step Over, Step Into, and so on, most developers use the toolbar buttons or the keyboard shortcuts. The Debug can be seen in Figures C.1, C.3, and C.5. Pause your mouse over each button to see the command it is connected to and a reminder of the keyboard shortcut. For example, the button showing an arrow going down into a pair of brace brackets is Step Into, and the shortcut key is F11.
As you move through code, the yellow arrow in the margin moves with you, to show which line is about to execute. Whenever the program is paused you can add or remove breakpoints, examine variables, or resume execution. These are the mechanics of debugging.
Other Debug Windows
Three debug windows have not yet been discussed: Memory, Registers, and Disassembly. These windows provide a level of detail rarely required in ordinary debugging. With each release of Visual C++, the circumstances under which these windows are needed dwindle. For example, the Registers window used to be the only way to see the value just returned from a function call. Now that information is in the Variables window in a more accessible format.
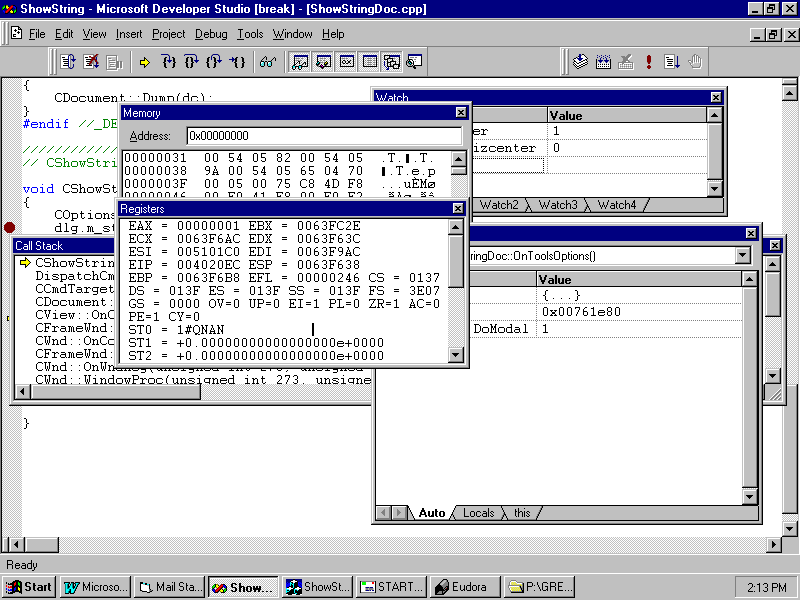
The Memory Window
This window, shown in Figure C.8, shows you the hex values in every byte of the memory space from 0x00000000 to 0xFFFFFFFF. It's a very long list, which makes the dialog box hard to scroll inóuse the Address box to enter an address that interests you. Typically, these addresses are copied (through the clipboard, not by hand) from the Variables window. It is a handy way to look through a large array or to track down subtle platform-dependent problems.
Fig. C.8 You can examine raw memory, though you'll rarely need to.
The Registers Window
If you are debugging at the assembler level, it may be useful to examine the registers. Figure C.9 shows the Registers window. This shot was taken at the same point of execution as Figure C.5, and you can see that the EAX register contains the value 1, which is the return value from DoModal().
Fig. C.9 All the registers are available to examine or change.
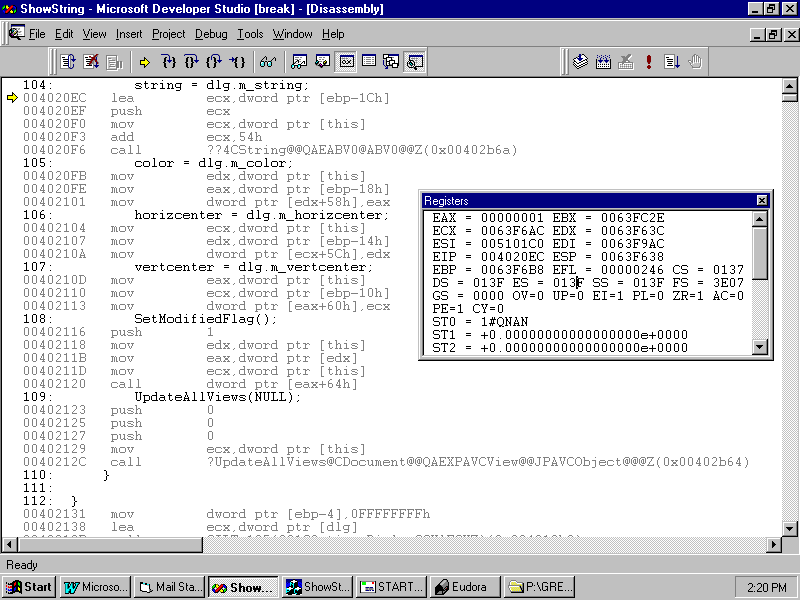
The Disassembly window
By default, the Disassembly window comes up full screen, replacing the C++ code in the main working area. You can see the assembly language statements generated for your C++ code, as shown in Figure C.10. Debugging at the assembly level is beyond the scope of this book.
Fig. C.10 You can debug the assembler that was generated for you.
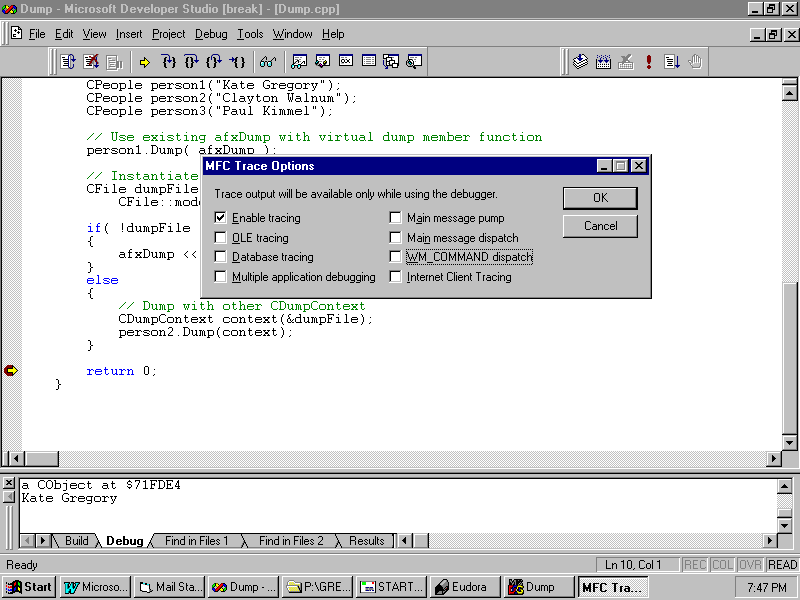
The MFC Tracer utility is a stand-alone application with an integrated menu item in the Developer Studio. To run it, choose Tools, MFC Tracer. Figure C.11 shows the Tracer dialog that appears.
Fig. C.11 A standalone utility simplifies setting trace flags.
Tracer doesn't do very much: it's just an easy way to set trace flags that govern the kind of debug output you get. Try setting all the flags on and running ShowString, simply starting it up and shutting it down. Turn off a few flags and see how the output you get changes.
With all the trace flags on, your application will be slow. Use Tracer to set only the ones you're interested in, while you're interested in them. It's much easier than changing a variable on the fly.
All MFC classes have a Dump() member function. When things go wrong, some error-handling code calls this function to show you the contents of the object. You can write Dump() functions for your objects, too.
MFC classes inherit Dump() from Cobject, where it is defined like this:
virtual void Dump(CDumpContext& dc ) const;
The keyword virtual suggests you should override the method in your derived classes, and const indicates that Dump() will not modify the object state.
Like trace and assert statements, the Dump() member function disappears in a release build. This saves users seeing output they can't deal with, and makes a smaller, faster, release version for you. You have to make this happen yourself for any Dump() function you write, with conditional compilation.
In the header file, declare Dump() like this:
class CNewClass : public CObject
{
public:
// other class stuff
#ifdef _DEBUG
virtual void Dump( CDumpContext& dc) const
#endif
// ...
};
And in the implementation file, the definition, which includes a code body, might look like this:
#include ìcnewclass.hî
#ifdef _DEBUG
void CNewClass::Dump( CDumpContext& dc ) const
{
CObject::Dump( dc ); // Dump parent;
// perhaps dump individual members, works like cout
     dc << ìmember: ì << /* member here
*/ endl;
}
#endif
As you see in the code for the Dump() function, writing the code is much like writing to standard output with the cout object, or serializing to an archive. You are provided with a CDumpContext object called dc, and you send text and values to that object with the << operator. If this is unfamiliar to you, read Chapter 8, "Persistence and File I/O."
A Sample Using CDumpContext, CFile, and axfDump
The sample application in this section uses the MFC debugging class CDumpContext and the global axfDump object. The debug window output from this demo and the output CFile code are in Listing C.1. To run this application yourself, create a console application as described in Chapter 28, "Future Explorations," and create an empty C++ source file called Dump.cpp. Enter this code, build, and run a debug version of the project.
The Dump project is on the CD in the RefC folder.
Listing C.1óDump.CppóDemonstrates the MFC Debugging Class CDumpContext and CFile
#include <afx.h>
// _DEBUG
defined for debug build
class CPeople : public CObject
{
public:
    //
constructor
CPeople( const char * name );
// destructor
virtual ~CPeople();
#ifdef _DEBUG
virtual void Dump(CDumpContext& dc) const;
#endif
private:
CString * person;
};
// constructor
    CPeople::CPeople( const
char * name) : person( new CString(name)) {};
// destructor
CPeople::~CPeople(){ delete person; }
#ifdef
_DEBUG
void CPeople::Dump( CDumpContext& dc ) const
{
CObject::Dump(dc);
dc << person->GetBuffer( person->GetLength() + 1);
}
#endif
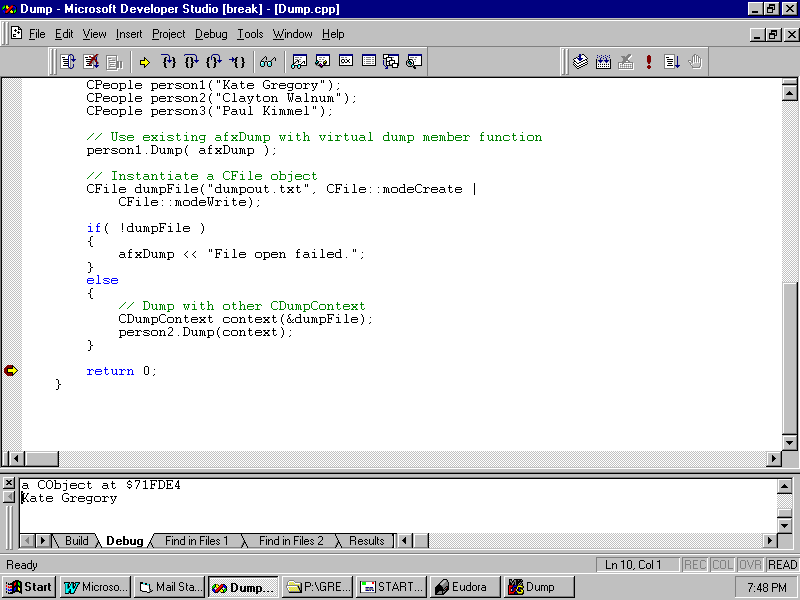
int main()
{
CPeople person1("Kate Gregory");
CPeople person2("Clayton Walnum");
CPeople person3("Paul Kimmel");
// Use existing afxDump with virtual dump member function
        person1.Dump( afxDump
);
// Instantiate a CFile object
CFile dumpFile("dumpout.txt", CFile::modeCreate |
CFile::modeWrite);
if( !dumpFile )
{
afxDump << "File open failed.";
}
else
{
// Dump with other CDumpContext
CDumpContext context(&dumpFile);
person2.Dump(context);
}
        return
0;
}
This single file contains a class definition, all the code for the member functions of the class, and a main() function to run as a console application. Each of these parts of the file is explained in the next few paragraphs. The class is a simple wrapper around a CString pointer, which allocates the CString with new in the constructor and deletes it in the destructor. It's so simple it's actually useless for anything other then demonstrating the Dump() function.
First, the <afx.h> header file is included, which contains the CObject class definition and provides access to afxDump.
Next, this code defines a class CPeople derived from CObject. Notice the placement of the override of the virtual Dump() method and the conditional compiler wrap. (Any calls to Dump() should be wrapped in just the same way.)
After the constructor and destructor comes the code for CPeople::Dump(). Notice how it, too, is wrapped in conditional compiler directives. The call to CObject::Dump() takes advantage of the work done by the MFC programmers, dumping information all objects keep.
Finally, the main() function excercises this little class. It creates three instances of the CPeople class, and dumps the first one.
For the second CPeople object, this code creates and opens a CFile object by passing a text string to the constructor. If the open succeeds, it creates a CDumpContextObject from the file, and passes this context to Dump rather than the usual afxDump().
If you run this program, you will see output like that in Figure C.12. The file dumpout.txt will contain these lines:
a CObject at $71FDE4
Kate Gregory
Fig. C.12 Using the afxDump context sends your output to the Debug window.
The first line of the output, both to the debug window and to the file, came from CObject::Dump() and gives you the object type and the address. The second line is from your own code and is simply the CString kept within each CPeople.
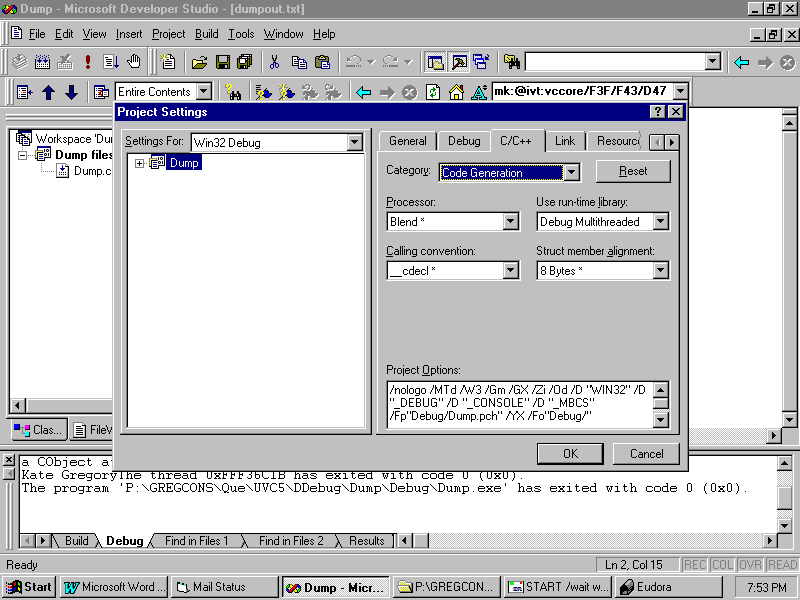
If you get error messages when linking a Debug version of this product that refer to _beginthreadex and _endthreadex, you need to change some settings. By default, console applications are single-threaded, but MFC is multi-threaded. By including afx.h and bringing in MFC, this application is making itself incompatible with the single-threaded default. To fix this, choose Project Settings and click the C/C++ tab. From the drop-down box at the top of the dialog box, choose Code Generation. In the drop-down box labelled Use Runtime Library, choose Debug Multithreaded. (The completed dialog is shown in Figure C.13.) Click OK, and rebuild the project. You should usually change the settings for Release as well, but since the calls to Dump() aren't surrounded by tests of _DEBUG, this code won't compile a Release version anyway.
Fig. C.13 To use MFC in a console application, change to the multithreaded runtime library.
Now that you've seen the basic tools of debugging in action, you'll be ready to put them to work in your own applications. You'll find errors quickly, understand other people's code, and see with your own eyes just how message-routing and other behind-the-scenes magic really occurs. If you find yourself actually enjoying debugging, don't worry: no one else has to know!
© 1997, QUE Corporation, an imprint of Macmillan Publishing USA, a Simon and Schuster Company.
![]()