|
To access the contents, click the chapter and section titles.
Sams Teach Yourself Visual J++ 6 in 21 Days
(Publisher: Macmillan Computer Publishing)
Author(s): Rick Leinecker
ISBN: 0672313510
Publication Date: 11/01/98

Day 6
Menus
Today, you’ll learn how to add menus to your programs. The two types of menus I’ll teach you to add are pull-down menus and pop-up menus. Menus are different for applets and applications. You’ll learn how to add menus for both.
Today you’ll learn about the following:
- • How to create menus
- • How to respond to menu events in applets
- • How to perform advanced menu operations, such as disabling menu choices
- • How to create menus for applications
- • How to respond to menu events in applications
- • Advanced menu methods in applications
- • A demo program
- • How to create and respond to pop-up menus in applets
- • How to create pop-up menus and respond to events in applications
Menus are one of the most common user-interface items that programs have. They give users a clear, easy, and understandable way to interact with a program.
Creating Applet Menus
In this section, you’ll learn how to create menu bars and menu items for applets. When you do this, though, you need to have created a Frame window. It’s to the Frame windows that you’ll add the menus. You can’t add menu bars to normal applet windows. Before we go too much further, I’d like to review the basic creation and showing of a Frame window, because we’ll be using that knowledge throughout this entire section. The following example shows how we’ll be creating our Frame windows, setting the size, and then making them invisible. Before we set the size of the Frame window and set it to visible, we’ll do all our menu stuff as shown in the source code comment with the init() method.
Frame m_Frame = new Frame( "Menu Tester" );

public void init()
{
    // Here's where we'll do our menu creation stuff…

    m_Frame.setSize( 300, 200 );
    m_Frame.setVisible( true );
}
The first thing we’ll do is to create a MenuBar object. The MenuBar constructor takes no arguments. It simply creates an empty MenuBar object. The following line shows how to do this:
MenuBar menu = new MenuBar();
After your MenuBar is created, you need to add it to the Frame window using the Frame class’s setMenuBar() method. The following example shows how to do that for the MenuBar we just created:
m_Frame.setMenuBar( menu );
If all you did was create a frame, create an empty menu bar, and then add a MenuBar to the Frame, you wouldn’t see a whole lot when you ran your program. In your Frame window where you would normally expect to see a menu bar, you’d see just a thin gray object about three pixels high. That’s because there would be nothing in your menu bar—no menu bar items and no menu entries. You can see what I’m talking about in Figure 6.1. Notice that something does appear where the menu bar should be, but it’s barely visible.
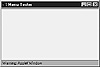
Figure 6.1 The empty menu bar is barely visible.
I’m going to clarify something before we go any further. I will refer to the entire structure that goes along the top of the Frame window as the menu bar (the class that contains it is the MenuBar class). Each item you see in the menu bar, such as File, Options, or Actions, I’ll call a menu item. Each menu item will contain what I call menu entries. For instance, if you take a look at your Visual J++ IDE, you’ll see the menu bar. In the menu bar, before you pull down any menu, you’ll see the items File, Edit, View, Project, Build, Debug, Tools, Window, and Help. These are the menu items. When you click on one of these items, you will see what I’ll refer to as menu entries. So if you click on the File menu item, you’ll see the entries New Project, Open Project, Close All, and so forth. If you click on the Edit menu item, you’ll see the menu entries Undo, Redo, Cut/Copy, and so forth.
Now that we’ve got the menu bar created, we need to add menu items. To create menu items ourselves, we use the Menu class. There are three Menu class constructors. The first constructor takes no arguments. The second one takes an argument with a string that specifies the label. This is the one we’ll be using while we get you up to speed on menus. The third constructor takes a third argument, which is a Boolean flag that indicates whether the menu is a tear-off menu.
There are two steps, then, to adding menu items to your menu bar: create a Menu object and then add the Menu object to your menu bar. The following example creates and adds three menu items to the menu bar:
// menu is an already-instantiated MenuBar object
Menu file = new Menu( "File" );
menu.add( file );
Menu options = new Menu( "Options" );
menu.add( options );
Menu actions = new Menu( "Actions" );
menu.add( actions );
You might be wondering whether you must add the menu items to your menu bar before you call the Frame class’s setMenuBar() method. The answer is no. You can either create the menu bar, add all the menu items, and then call the Frame’s setMenuBar() method, or create the menu bar, call the Frame class’s setMenuBar() method, and then add all your menu items. Either way is fine.
To complete the picture, we need to add menu entries to our menu items. It’s easy to do. You simply use the Menu class’s add() method to add the menu entries. The add() method takes a single string argument. This string argument will be the label of your menu entry. There’s one other add() method that takes a menu item as an argument. We won’t talk about that right now, though. The following example shows the resulting code after we’ve added menu entries to the three menu items that we created in the preceding step:
// menu is an already-instantiated MenuBar object

Menu file = new Menu( "File" );
menu.add( file );
file.add( "Open" );
file.add( "Close" );

Menu options = new Menu( "Options" );
menu.add( options );
options.add( "Set to Red" );
options.add( "Set to Green" );
options.add( "Set to Blue" );

Menu actions = new Menu( "Actions" );
menu.add( actions );
actions.add( "Go Home" );
actions.add( "Go to Work" );
After we’ve added the menu entries, the program will look complete. The menu bar will have the three menu items, and each menu item will have menu entries. You can see the program running in Figure 6.2.
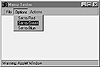
Figure 6.2 With the menu items and the menu entries added, this program looks complete.
The following steps sum up how to create and add menus to frame windows:
- 1. Create a MenuBar object.
- 2. For each menu item, create a Menu object and use the MenuBar’s add() method to add this Menu object.
- 3. For each Menu object, add the menu entries with the add() method.
- 4. Use the Frame class’s setMenuBar() method to add the populated menu bar to the frame window.
|


)
)
)
)