One of the newest types of graphical objects is the tabbed dialog box, also known as a property sheet. A property sheet is a dialog box with two or more pages. Windows 95 is loaded with property sheets, which organize the many options that can be modified by the user. You flip the pages by clicking labeled tabs located at the top of the dialog box. By using such dialog boxes to organize complex groups of options, Windows 95 enables users to more easily find the information and settings that they need. As you've probably guessed, Visual C++ 5.0 supports the Windows 95 property sheets, with the classes CPropertySheet and CPropertyPage.
Similar to property sheets are wizards, which use buttons to move from one page to another (rather than using tabs). You've seen a lot of wizards, too. These special types of dialog boxes guide the user step by step through complicated processes. For example, when you use AppWizard to generate source code for a new project, the wizard guides you through the entire process. To control the wizard, you click buttons labeled Back, Next, and Finish.
Property sheets contain property pages, which are much like dialog boxes.
MFC provides classes that enable you to easily manipulate property pages and property sheets.
Creating a property sheet is only half the battle. You also have to get the sheet up on the screen for the user.
Wizards are a special type of property sheet. They guide users through complex tasks.
Every wizard contains buttons that enable the user to navigate through the wizard.
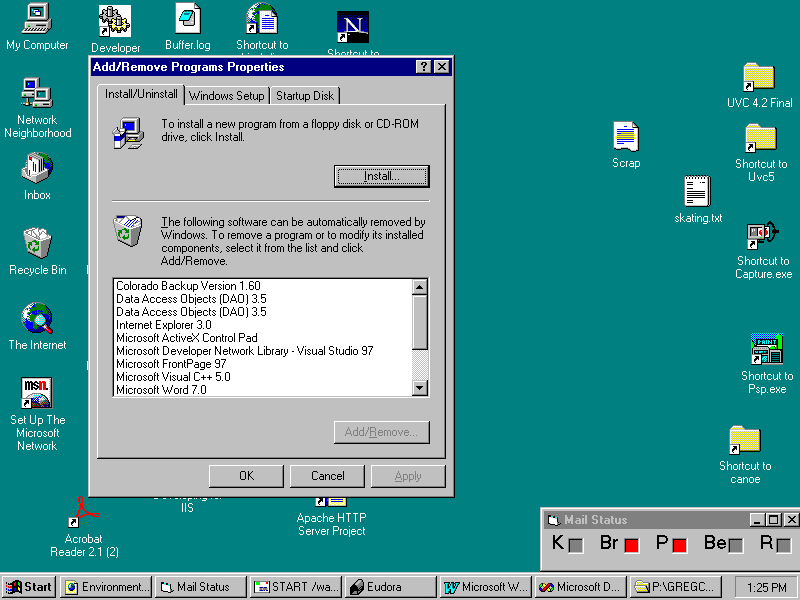
Finding a sample property sheet in Windows 95 is as easy as finding sand at the beach. Just click virtually any Properties command or double-click an icon in the Control Panel. For example, Figure 12.1 shows the dialog box that you see when you double-click the Control Panel's Add/Remove Programs icon. This is a property sheet that contains three pages labeled Install/Uninstall, Windows Setup, and Startup Disk. Each page contains commands and options related to the page's title topic.
Fig. 12.1 The Add/Remove Programs Properties sheet contains three tabbed pages.
Many people forget the difference between a property sheet and a property page. A property sheet is a window that contains property pages. Property pages are windows that hold controls. They appear on the property sheet's pages.

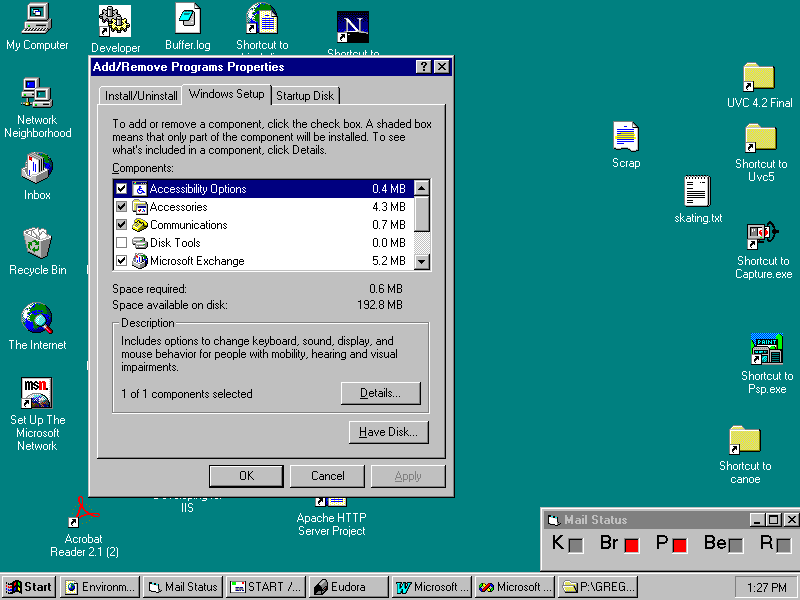
In Figure 12.1, you can see programs installed on your computer that Windows can automatically uninstall. There's also an Install button that leads to other dialog boxes that help you install new programs from floppy disk or CD-ROM. On the other hand, the Windows Setup page (Figure 12.2) helps you add or remove files from the Windows system. To get to this page, you need only click the Windows Setup tab. The Startup Disk page, of course, houses yet another set of options.
Fig. 12.2 Click the Windows Setup tab to move to the Windows Setup page.
As you can see, property sheets are a great way to organize many types of related options. Gone are the days of dialog boxes so jam-packed with options that you needed a college-level course just to figure them out. In the sections that follow, you will learn to program your own tabbed property sheets using MFC's CPropertySheet and CPropertyPage classes.
Now that you've had an introduction to property sheets, it's time to learn how to build an application that uses these handy specialized dialog boxes. You are about to build the Property Sheet Demo application, which demonstrates the creation and manipulation of property sheets. Follow these steps to create the basic application and modify its resources.
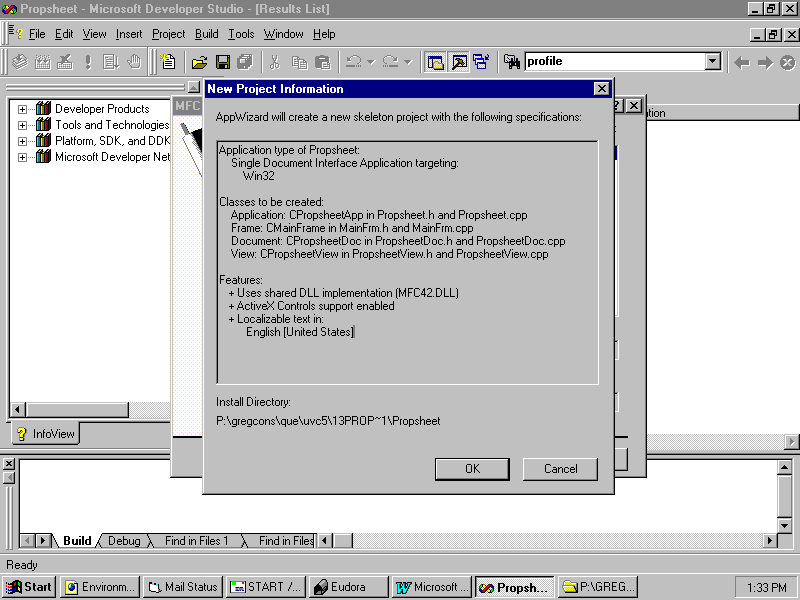
First, use AppWizard to create the basic files for the Property Sheet Demo program, selecting the options listed in the following table. When you're done, the New Project Information dialog box appears; it should look like Figure 12.3. Click the OK button to create the project files.
| Dialog Box Name | Options to Select |
| New, Project tab | Name the project Propsheet and then set the project path to the directory into which you want to store the project's files. Make sure MFC AppWizard (exe) is highlighted. Leave the other options set to their defaults. |
| Step 1 | Select Single Document. |
| Step 2 of 6 | Leave set to defaults. |
| Step 3 of 6 | Leave set to defaults. |
| Step 4 of 6 | Turn off all application features. |
| Step 5 of 6 | Leave set to defaults. |
| Step 6 of 6 | Leave set to defaults. |
Fig. 12.3 Your Project Information dialog box should look like this.
Now you are going to edit the resources in the application generated for you by AppWizard, removing unwanted menus and accelerators, editing the About box, and most importantly adding a menu item that will bring up a property sheet. Follow these steps:
Fig. 12.4 The ResourceView tab displays the ResourceView window.
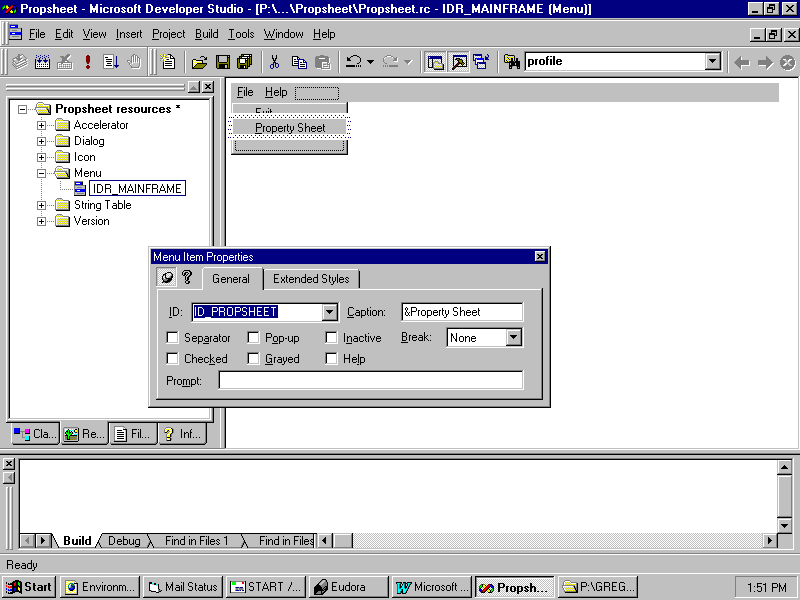
In the ResourceView window, click the plus sign next to Propsheet resources to display the application's resources. Click the plus sign next to Menu and then double-click the IDR_MAINFRAME menu ID. Visual C++'s menu editor appears, displaying the IDR_MAINFRAME menu generated by AppWizard.
Fig. 12.5 Add a Property Sheet command to the File menu.
Click the + next to Accelerator in the ResourceView window and highlight the IDR_MAINFRAME accelerator ID. Press your Delete key to delete all accelerators from the application.
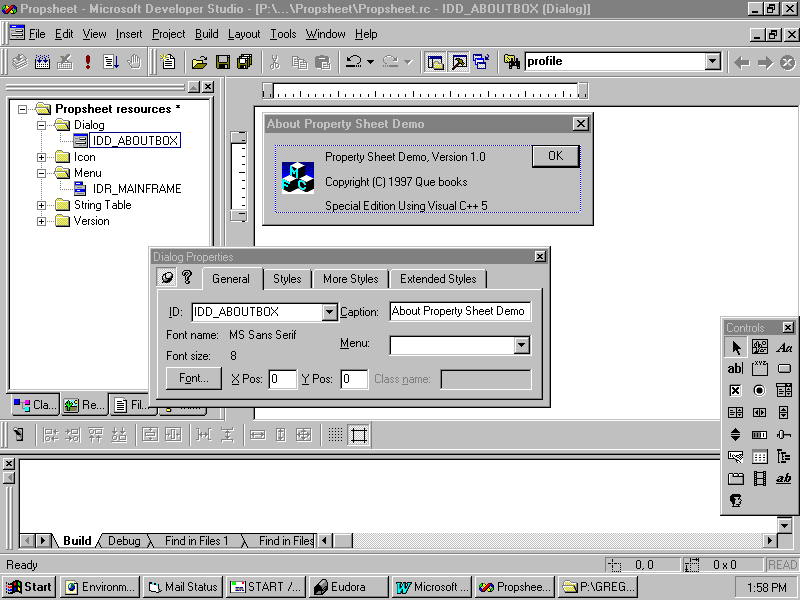
Fig. 12.6 The About box should look like this.
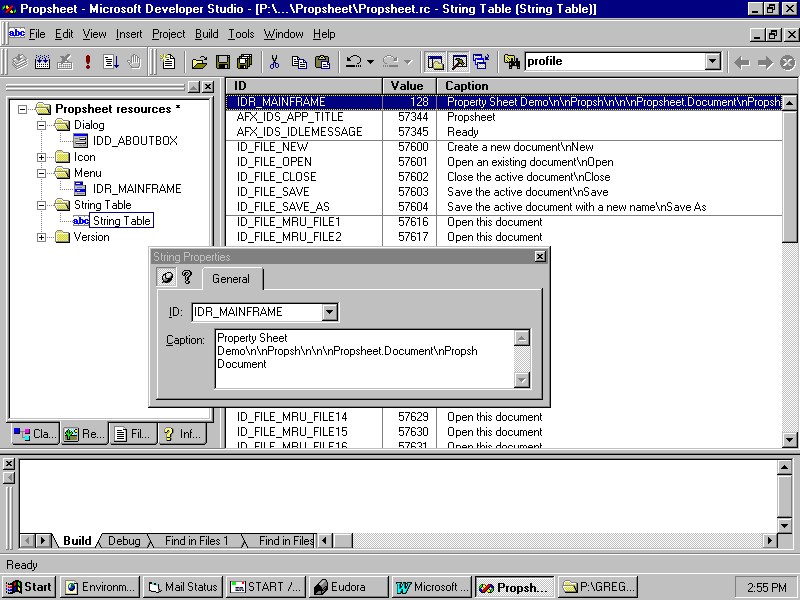
Click the + next to String Table in the ResourceView window. Double-click the String Table ID to bring up the string table editor.
Fig. 12.7 The first segment of the IDR_MAINFRAME string appears in your main window's title bar.
Now that you have the application's basic resources the way you want them, it's time to add the resources that define the application's property sheet. This means creating dialog box resources for each page in the property sheet. Follow these steps:
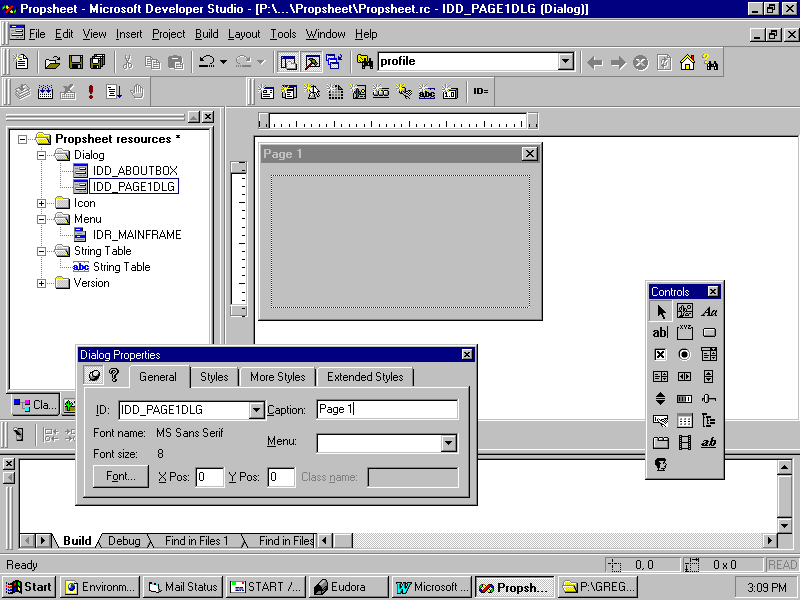
This dialog box, when it is set up properly, will represent the first page of the property sheet.
Fig. 12.8 Change the caption and resource ID of the new dialog box.
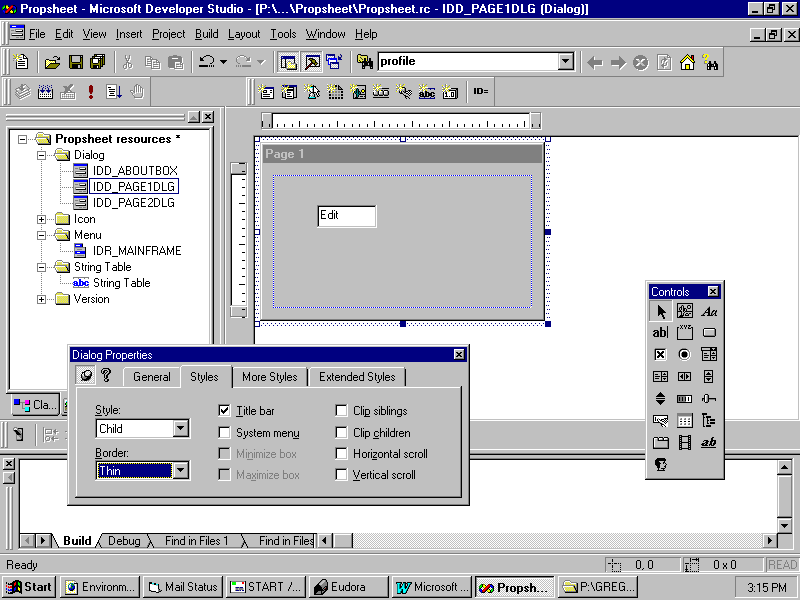
Click the Styles tab of the dialog box's property sheet. In the Style drop-down box, select Child, and in the Border drop-down box, select Thin. Turn off the System Menu check box. Your properties dialog box should resemble Figure 12.9.
The Child style is necessary because the property page will be a child window of the property sheet. The property sheet itself will provide the container for the property pages.
Fig. 12.9 A property page uses styles different from those used in regular dialog boxes.
Add an edit box to the property page, as shown in Figure 12.10. In most applications you would change the resource ID from IDC_EDIT1, but for this demonstration application, leave it unchanged.
Fig. 12.10 A property page can hold whatever controls you like.
Create a second property page by following steps 1 through 5 again. For this property page, use the ID IDD_PAGE2DLG, a caption of Page 2, and add a check box rather than an edit control, as shown in Figure 12.11.
Fig. 12.11 The second property page should look like this.
You now have all your resources created. Next, associate your two new property-page resources with C++ classes so that you can control them in your program. You also need a class for your property sheet, which will hold the property pages that you've created. Follow these steps to create the new classes:
You've now associated the property page with an object of the CPropertyPage class, which means that you can use the object to manipulate the property page as needed. The CPropertyPage class will be especially important when you learn about wizards.
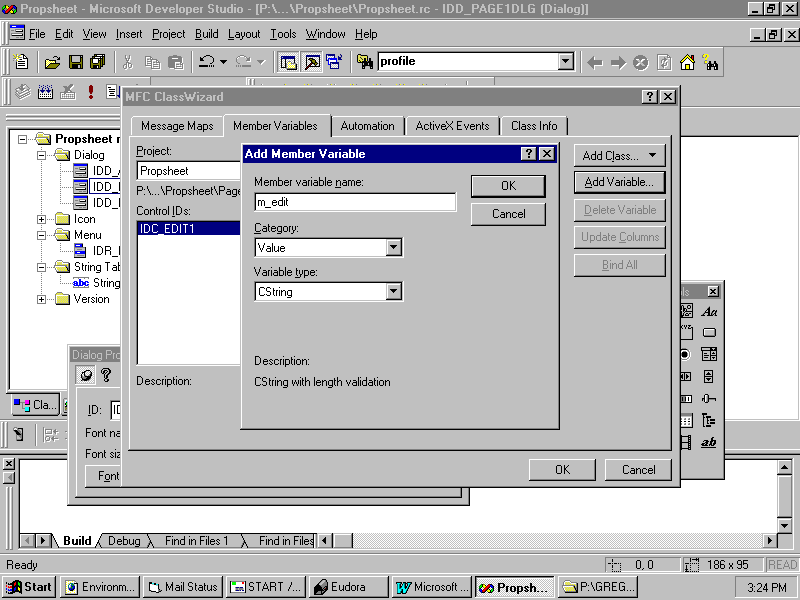
Fig. 12.12 ClassWizard makes it easy to connect controls on a dialog box to member variables of the class representing the dialog box.
Click OK on the MFC ClassWizard Properties sheet to finalize the creation of the CPage1 class.
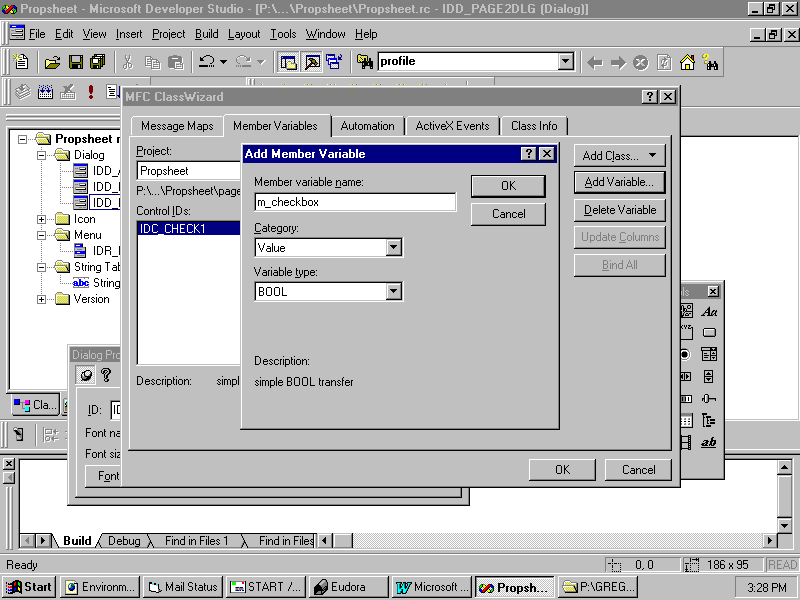
Fig. 12.13 The second property page needs a Boolean member variable called m_checkbox.
At this point you have done all the resource editing, and there is no need to have so many windows open. Choose Window, Close All from the menu bar and close the properties box. You will now create a property sheet class that displays the property pages already created. Follow these steps:
At this point, you have three new classesóCPage1, CPage2, and CPropSheetóin your program. The first two classes are derived from MFC's CPropertyPage class, and the third is derived from CPropertySheet. Although ClassWizard has created the basic source-code files for these new classes, you still have to add code to the classes to make them work the way you want. Follow these steps to complete the Property Sheet Demo application:
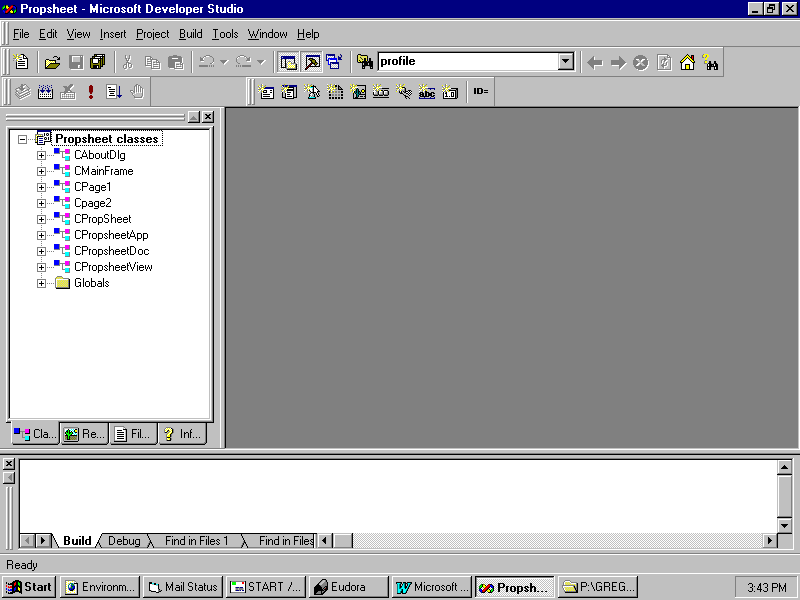
Fig. 12.14 The ClassView window lists the classes that make up your project.
Double-click CPropSheet to open the header file for your property sheet class. Because the name of this class (CPropSheet) is so close to the name of the application as a whole (PropSheet,) you will find two classes in this file: CPropSheetApp, generated by AppWizard, and CPropSheet, generated by ClassWizard when you created the new class.
If the new class for the property sheet was in a file of its own, you would have to add #include statements to any file that used the CPropSheet class. Keep this in mind when you create your own property sheets.
#include "page1.h"
#include "page2.h"
These lines give the CPropSheet class access to the CPage1 and CPage2 classes, so that the property sheet can declare member variables of these property page classes.
CPage1 m_page1;
CPage2 m_page2;
These lines declare the class's data members, which are the property pages that will be displayed in the property sheet.
AddPage(&m_page1);
AddPage(&m_page2);
This will add the two property pages to the property sheet whenever the sheet is constructed. The second constructor is right below the first: add the same lines there.
protected:
CString m_edit;
BOOL m_check;
These lines declare two data members of the view class to hold the selections made in the property sheet by the user.
m_edit = "Default";
m_check = FALSE;
These lines initialize the class's data members so that, when the property sheet appears, these default values can be copied into the property sheet's controls. After the user changes the contents of the property sheet, these data members will always hold the last values from the property sheet, so those values can be restored to the sheet when needed.
Listing 12.1 CPropsheetView::OnDraw()
void
CPropsheetView::OnDraw(CDC* pDC)
{
CPropsheetDoc* pDoc = GetDocument();
ASSERT_VALID(pDoc);
pDC->TextOut(20, 20, m_edit);
if (m_check)
pDC->TextOut(20, 50, "TRUE");
else
pDC->TextOut(20, 50, "FALSE");
}
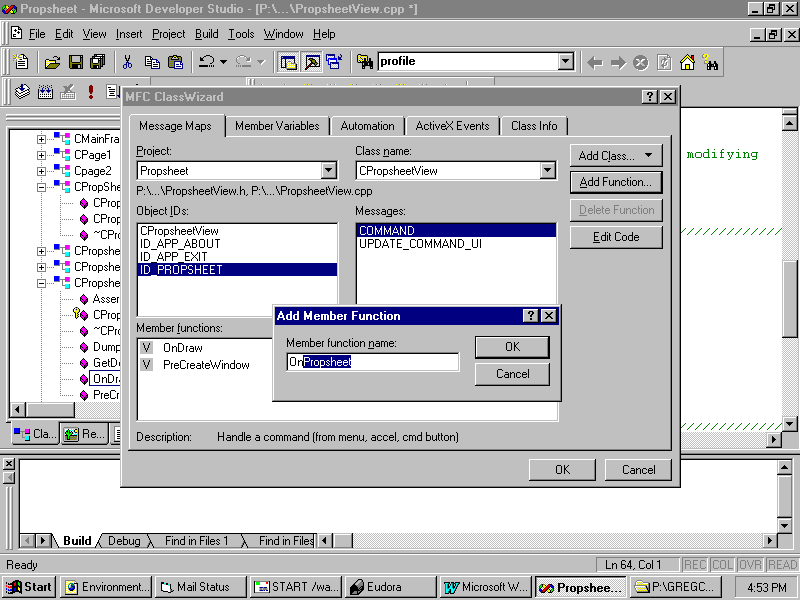
Bring up ClassWizard, click the Message Maps tab, and make sure that CPropsheetView is selected in the Class Name box. Select IDD_PROPSHEET in the Object IDs box. This is the ID of the new item you added to the File menu. Click Add Function to add a function that will handle the command message generated when a user choose this menu item. Name the function OnPropsheet(), as shown in Figure 12.15.
The OnPropsheet() function is now associated with the Property Sheet command that you previously added to the File menu. That is, when the user selects the Property Sheet command, MFC calls OnPropsheet(), where you can respond to the command.
Fig. 12.15 Use ClassWizard to add the OnPropsheet() member function.
Click the Edit Code button to jump to the OnPropsheet() function, and then add the lines shown in Listing 12.2.
Listing 12.2 CPropsheetView::OnPropsheet()
void CPropsheetView::OnPropsheet()
{
    CPropSheet propSheet("Property
Sheet", this, 0);
propSheet.m_page1.m_edit = m_edit;
propSheet.m_page2.m_checkbox = m_check;
    int result =
propSheet.DoModal();
if (result == IDOK)
{
m_edit = propSheet.m_page1.m_edit;
m_check = propSheet.m_page2.m_checkbox;
Invalidate();
}
}
The code segment in Listing 12.2, which is discussed in more detail a little later in this chapter, creates an instance of the CPropSheet class, and sets the member variables of each of its pages. It displays the sheet using the familiar DoModal function first discussed in Chapter 2, "Dialog Boxes and Controls." If the user clicks OK, it updates the view member variables to reflect the changes made on each page, and forces a redraw with a call to Invalidate.
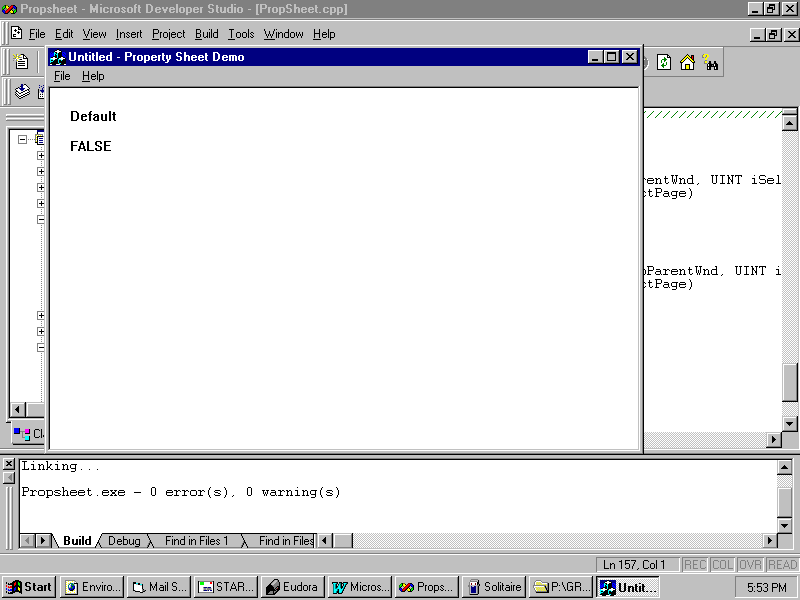
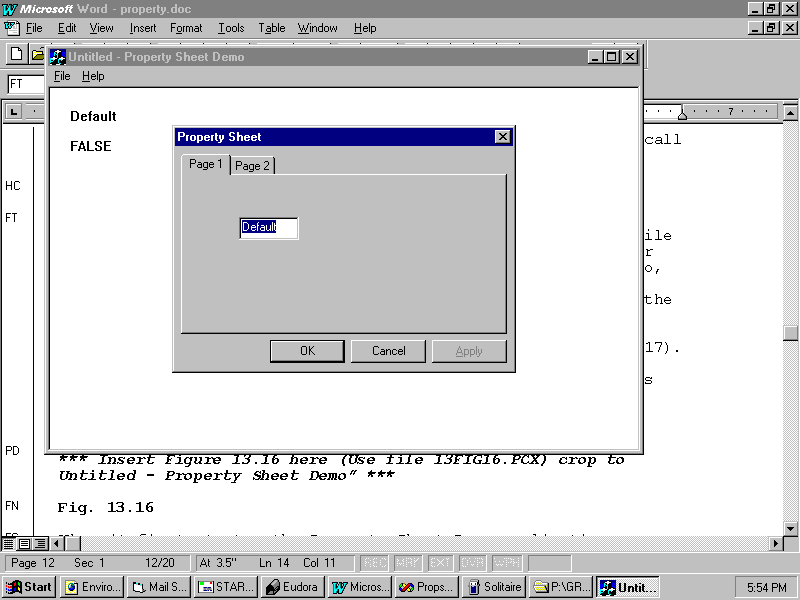
You've now finished the complete application. Click the Build button on the Build mini-bar (or choose Build, Build) to compile and link the application. Run it by choosing Build, Execute or clicking the Execute button on the Build mini-bar. When you do, you see the window shown in Figure 12.16. As you can see, the window displays two values, which are the default values for the controls in the application's property sheet. You can change these values using the property sheet. Choose File, Property Sheetóthe property sheet appears on the screen (Figure 12.17). The property sheet contains two pages, each of which holds a single control. When you change the settings of these controls and click the property sheet's OK button, the application's window displays the new values. Try it!
Fig. 12.16 When it first starts, the Property Sheet Demo application displays default values for the property sheet's controls.
Fig. 12.17 The application's property sheet contains two pages.
In order to add a property sheet to one of your own applications, you will follow steps very similar to those you followed in the previous section to create the demo application. Those steps are:
After you have written your application and have defined the resources and classes that represent the property sheet (or sheets; you can have more than one), you need a way to enable the user to display the property sheet when it's needed. In Property Sheet Demo, this is done by associating a menu item with a message-response function. However you handle the command to display the property sheet, though, the process of creating the property sheet is the same. First, you must call the property sheet class's constructor, which Property Sheet Demo does like this:
CPropSheet propSheet("Property Sheet", this, 0);
Here, the program is creating an instance of the CPropSheet class. This instance (or object) is called propSheet. The three arguments are the property sheet's title string, a pointer to the parent window (which, in this case, is the view window), and the zero-based index of the first page to display. Because the property pages are created in the property sheet's constructor, creating the property sheet also creates the property pages.
After you have the property sheet object created, you can initialize the data members that hold the values of the property page's controls, which Property Sheet Demo does like this:
propSheet.m_page1.m_edit = m_edit;
propSheet.m_page2.m_checkbox = m_check;
Now it's time to display the property sheet on the screen, which you do just as if it were a dialog box, by calling the property sheet's DoModal() member function:
int result =
propSheet.DoModal();
DoModal() doesn't take any arguments, but it does return a value indicating which button the user clicked to exit the property sheet. In the case of a property sheet or dialog box, you'll usually want to process the information entered into the controls only if the user clicked the OK button, which is indicated by a return value of IDOK. If the user exits the property sheet by clicking the Cancel button, the changes are ignored and the view or document member variables are not updated.
Here's a piece of information that surprises most people: a wizard is just a special property sheet. Instead of tabs on each sheet that allow the user to fill in the information in any order, or to skip certain pages entirely, a wizard has Back, Next, and Finish buttons to move the user through a process in a certain order. This forced sequence makes wizards terrific for guiding your application's users through the steps needed to complete a complex task. You've already seen how AppWizard in Visual C++ makes it easy to start a new project. You can create your own wizards that are suited to whatever application you want to build. In the following sections, you'll see how easy it is to convert a property sheet to a wizard.
Running the Wizard Demo Application
![]()
In the CHAP13\WIZ folder of this book's CD-ROM, you'll find the Wizard Demo application. This application was built in much the same way as the Property Sheet Demo application that you created earlier in this chapter. This chapter will not present step-by-step instructions to build Wizard Demo. You should be able to build it yourself if you wish, using the general steps presented earlier and the code snippets shown here.
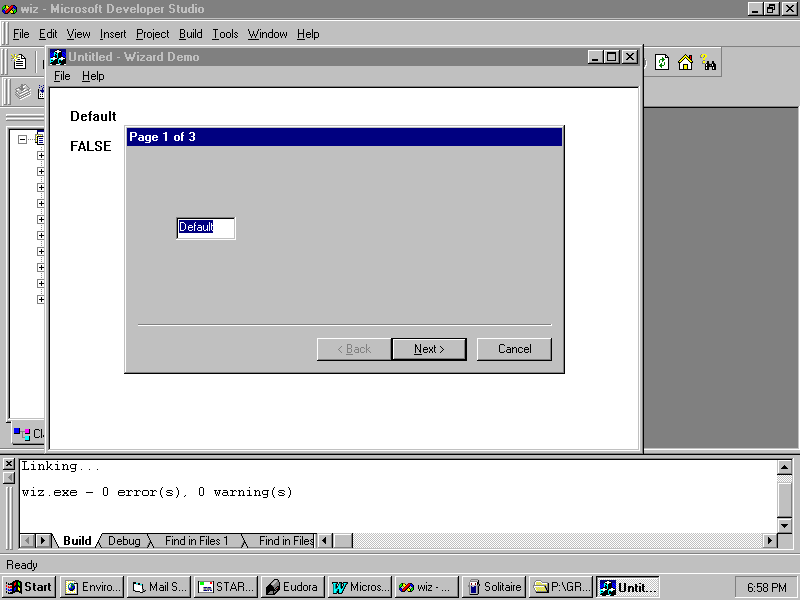
When you run the Wizard Demo application, the main window appears, looking very much like the Property Sheet Demo main window. The File menu now includes a Wizard itemóchoosing File Wizard brings up the wizard shown in Figure 12.18.
Fig. 12.18 The Wizard Demo application displays a wizard rather than a property sheet.
The wizard isn't too fancy, but it does demonstrate what you need to know in order to program more complex wizards. As you can see, this wizard has three pages. On the first page is an edit control and three buttons called Back, Next, and Cancel. The Back button is disabled, because there is no previous page to go back to. The Cancel button enables the user to dismiss the wizard at any time, canceling whatever process the wizard was guiding the user through. The Next button causes the next page in the wizard to be displayed.
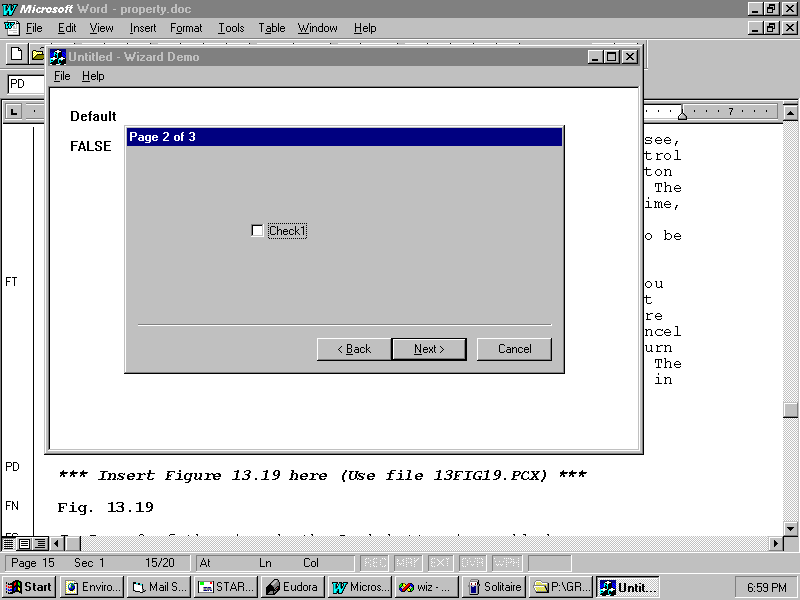
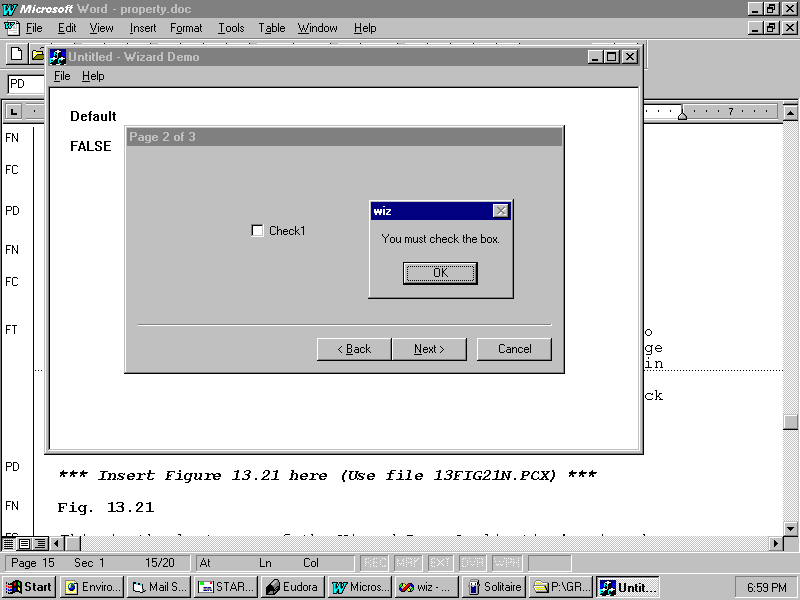
You can change whatever is displayed in the edit control if you like. However, the magic really starts when you click the Next button, which displays Page 2 of the wizard, as shown in Figure 12.19. Page 2 contains a check box and the Back, Next, and Cancel buttons. Now, the Back button is enabled, so that you can return to Page 1 if you want to. Go ahead and click the Back button. The wizard tells you that the check box must be checked, as shown in Figure 12.20. As you'll soon see, this feature of a wizard enables you to verify the contents of a specific page before allowing the user to advance to another step.
Fig. 12.19 In Page 2 of the wizard, the Back button is enabled.
Fig. 12.20 You must select the check box before the wizard will let you leave Page 2.
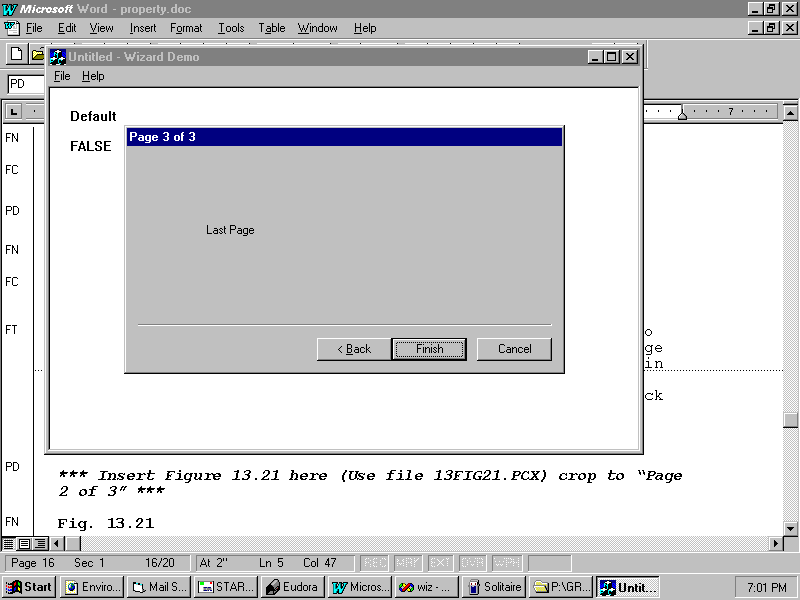
After checking the check box, you can click the Back button to move back to Page 1 or click the Next button to advance to Page 3. Assuming you advance to Page 3, you see the display shown in Figure 12.21. Here, the Next button has changed to the Finish button, because you are on the wizard's last page. If you click the Finish button, the wizard disappears.
Fig. 12.21 This is the last page of the Wizard Demo Application's wizard.
Creating Wizard Pages
As far as your application's resources go, you create wizard pages exactly as you create property sheet pages; by creating dialog boxes and changing the dialog box styles. (The dialog titlesóPage 1 of 3, Page 2 of 3, and Page 3 of 3óare hardcoded onto each dialog box. You associate each dialog box resource with an object of the CPropertyPage class. Then, in order to take control of the pages in your wizard and keep track of what the user is doing with the wizard, you override the OnSetActive(), OnWizardBack(), OnWizardNext(), and OnWizardFinish() functions of your property page classes. Read on to see how to do this.
Displaying a Wizard
The File, Wizard command is caught by CWizView's OnFileWizard() function. It is very similar to the OnPropSheet function in the Property Sheet demo, as you can see from Listing 12.4. The first difference is the call to SetWizardMode() before the call to DoModal(). This function call tells MFC that it should display the property sheet as a wizard rather than as a conventional property sheet. The only other difference is that the user arranges for property sheet changes to be accepted by clicking Finish, not OK, so this code checks for ID_WIZFINISH rather than IDOK as a return from DoModal().
Listing 12.4 CWizView::OnFileWizard()
void CWizView::OnFileWizard()
{
     CWizSheet
wizSheet("Sample Wizard", this, 0);
wizSheet.m_page1.m_edit = m_edit;
wizSheet.m_page2.m_check = m_check;
wizSheet.SetWizardMode();
int result = wizSheet.DoModal();
if (result == ID_WIZFINISH)
{
m_edit = wizSheet.m_page1.m_edit;
m_check = wizSheet.m_page2.m_check;
Invalidate();
}
}
Setting the Wizard's Buttons
MFC automatically calls the OnSetActive() member function immediately upon displaying a specific page of the wizard. So, when the program displays Page 1 of the wizard, the CPage1 class's OnSetActive() function gets called. You add code to this function that makes the wizard behave as you wish. CPage1::OnSetActive() looks like Listing 12.5.
Listing 12.5ó CPage1::OnSetActive()
BOOL CPage1::OnSetActive()
{
CPropertySheet* parent = (CPropertySheet*)GetParent();
parent->SetWizardButtons(PSWIZB_NEXT);
     return
CPropertyPage::OnSetActive();
}
OnSetActive() first gets a pointer to the wizard's property sheet window, which is the page's parent window. Then the program calls the wizard's SetWizardButtons() function, which determines the state of the wizard's buttons. SetWizardButtons() takes a single argument, which is a set of flags indicating how the page should display its buttons. These flags are PSWIZB_BACK, PSWIZB_NEXT, PSWIZB_FINISH, and PSWIZB_DISABLEDFINISH. Because the call to SetWizardButtons() in Listing 12.4 includes only the PSWIZB_NEXT flag, only the Next button in the page will be enabled.
Because the CPage2 class represents Page 2 of the wizard, its call to SetWizardButtons() enables both the Back and Next buttons, by combining the appropriate flags with the bitwise or operator (|), like this:
parent->SetWizardButtons(PSWIZB_BACK | PSWIZB_NEXT);
Because Page 3 of the wizard is the last page, the CPage3 class calls SetWizardButtons() like this:
parent->SetWizardButtons(PSWIZB_BACK | PSWIZB_FINISH);
This set of flags enables the Back button and provides a Finish button instead of a Next button.
Responding to the Wizard's Buttons
In the simplest case, MFC takes care of everything that needs to be done in order to flip from one wizard page to the next. That is, when the user clicks a button, MFC springs into action and performs the Back, Next, Finish, or Cancel command. However, you'll often want to perform some action of your own when the user clicks a button. For example, you may want to verify that the information that the user entered into the currently displayed page is correct. If there's a problem with the data, you can force the user to fix it before moving on.
To respond to the wizard's buttons, you override the OnWizardBack(), OnWizardNext(), and OnWizardFinish() member functions. Use the Message Maps tab of ClassWizard to do this: you will find the names of these functions in the Messages window when a property page class is selected in the Class name box. When the user clicks a wizard button, MFC calls the matching function in which you can do whatever is needed to process that page. An example is the way the wizard in the Wizard Demo application won't let you leave Page 2 until you've checked the check box. This is accomplished by overriding the functions shown in Listing 12.6.
Listing 12.6 Responding to Wizard Buttons
LRESULT CPage2::OnWizardBack()
{
CButton *checkBox = (CButton*)GetDlgItem(IDC_CHECK1);
if (!checkBox->GetCheck())
{
MessageBox("You must check the box.");
return -1;
}
     return
CPropertyPage::OnWizardBack();
}
LRESULT CPage2::OnWizardNext()
{
UpdateData();
if (!m_check)
{
MessageBox("You must check the box.");
return -1;
}
return CPropertyPage::OnWizardNext();
}
These functions demonstrate two ways to examine the check box on Page 2. OnWizardBack() gets a pointer to the page's check box by calling the GetDlgItem() function. With the pointer in hand, the program can call the check-box class's GetCheck() function, which returns a 1 if the check box is checked. OnWizardNext() calls UpdateData() to fill all the CPage2 member variables with values from the dialog box controls, then looks at m_check. In both functions, if the box is not checked, the program displays a message box and returns -1 from the function. Returning -1 tells MFC to ignore the button click and not change pages. As you can see, it is simple to arrange for different conditions to leave the page in the Back or Next directions.
Whether you're creating property sheets or wizards, Visual C++'s many classes enable you to get the job done easily. Property sheets are great for organizing many options and controls, whereas wizards (which are a special type of property sheet) are best used for guiding the user step-by-step through a complex task. To learn more about related topics, check out the following chapters:
© 1997, QUE Corporation, an imprint of Macmillan Publishing USA, a Simon and Schuster Company.
![]()