by Jamie Costa
JavaBeans adds to the Java platform the ability to create a complete application by simply linking together a set of self-contained components. Microsoft's Visual Basic and Borland's Delphi are both examples of applications that allow users to build full-blown applications by combining independent components. The success and popularity of these two applications alone speaks volumes to the success of this style of application building.
Just as with other models, there is no restriction on the size or complexity of a JavaBeans component. In principle, JavaBeans components (or just Beans) can range from widgets and controls to containers and applications. The philosophy behind JavaBeans is to provide easy-to- implement functionality for the former, while allowing enough flexibility for the latter. In the spirit of this philosophy, you'll see how to create and use fairly simple Beans. However, after you finish reading this chapter, you'll have learned enough to create larger and more complex Beans, if you choose to do so.
JavaBeans provides a platform-neutral component architecture. Examples of non-platform-neutral component architectures include COM/OLE for the Windows platform and OpenDoc for the Macintosh platform. A component written to be placed into an OpenDoc container, like ClarisWorks for example, can't be used inside a COM/OLE container like Microsoft Word. Since JavaBeans is architecture-neutral, Beans can be placed into any container for which a bridge exists between JavaBeans and the container's component architecture. Thus, a JavaBeans component could be used in both Microsoft Word and Claris Works. In order to accomplish this seemingly impossible feat, the JavaBeans specification adopts features common with the other popular component models. In particular, these features include the following:
NOTE: If you are familiar with component models already, you don't necessarily need to read this section. You can jump right into the next section, "How to Get Started."
In order for a component to be useful, it has to have a set of properties that define its state. For example, if you were to design a component that displayed some text, one of the properties of that component might be the foreground color of the font. Another property might be the type and size of the font. Taken as a whole, the set of properties that make up a component also define its state. For example, if the properties of one component completely match that of another, they are in the same state.
Properties are often used to define not only the appearance, but the behavior of components. This is because a component need not have any appearance at all. For example, a component in a spreadsheet might calculate the interest earned on some earnings column. If that component is not capable of displaying the data, then it probably shouldn't have any properties associated with appearance. It is very likely, however, that it will have a property that defines the current interest rate.
Properties can range from Boolean values, to strings, to arrays, to other components. They can also be interdependent. Following the same example above, a component that displays the earnings column might want to be notified if the interest rate property of the other component changes.
The API, so to speak, of a component is the collection of methods or functions that it contains that other components and containers can call. There has to be some way for a container to modify a component's properties, notify it of an event (see below), or execute some functionality.
Different component models differ in how they make the properties and methods of their components available to other components. Since there are entire books written on how this is implemented for different models, suffice it to say that this is a common feature of component models. This topic will be discussed as it relates to JavaBeans in the section on Introspection.
A component by itself is a lonely component. Even though some components might have extensive functionality and a lot of properties, in the true spirit of a component, it should only be useful when used in conjunction with other components. So if two components are sitting together in a container, how do they talk? How does one let the other know when it has done something the other really ought to know about?
The method by which most components communicate is through event transmission. One component (or the container) undergoes some action causing it to generate an event. For example, an event is generated when you click a button. Depending on the model, the component will notify the container, the interested components, or both of the events. At the same time, the objects in the environment also act on events delivered to them. For example, the file dialog displays itself when it hears that you just clicked a "Browse" button.
It is important for components to be able to remember their state. This is so common that you may not even recognize it. When you open an application and it remembers the size and position of its window when it was last closed, it is maintaining (to some degree) a persistent state.
Also important is the ability to store and retrieve components. JavaSoft likes to call this packaging. This is especially important in a distributed environment where the components are likely to be served up over a network.
All good programmers recognize the importance of the design phase in programming. Thus, you'll start out by addressing how to design a Bean. As you will learn later on, the way in which you design your Bean directly affects the way it behaves in containers. For example, the names you choose for the methods should follow specific design specifications. If you start from the very beginning with these rules in mind, allowing your Bean to participate in Introspection does not require any additional programming on your part. Don't worry so much right now what Introspection is; you'll get into that later.
Designing a Bean consists of the following steps:
You'll start by designing some Beans. For the sake of a simple example, assume that you are developing two Beans; one Bean allows text to be entered into it and the other displays some text. You can imagine how these Beans might be useful. By placing these two beans into a container, you can use one to enter text that the other will then display. What types of properties do you think these Beans need to have? What events are these Beans interested in hearing about? What events do these Beans generate? Do these Beans expose all of their properties and events, or just some? At this point, you may not know the answers to these questions. The process is the important concept here, the details will become clearer as you progress through the chapter. Regardless, the first thing any Bean needs is a name. In this chapter, the example Beans will be called TextDisplayer and TextReader.
The TextDisplayer and TextReader Beans definitely need to have a property defining the text they hold. For the sake of example, say that the TextDisplayer Bean also contains properties defining the background color, the font, and the font color. The TextReader Bean also contains a property that defines how many columns of characters it can display. Table 38.1 lists the TextDisplayer Bean's properties and the Java types that will be used to implement them. Table 38.2 lists the TextReader Bean's properties and the Java types that will be used for them.
| Property Name | Java Type |
| OutputText | java.lang.String |
| BGColor | java.awt.Color |
| TextFont | java.awt.Font |
| FontColor | java.awt.Color |
| Property Name | Java Type |
| InputText | java.lang.String |
| Width | int |
Our TextDisplayer Bean must respond to an event specifying that its text should change. Specifically, it must update its OutputText property and redraw itself. The TextReader Bean doesn't need to respond to any events, but it must generate (or fire) an event when the user changes its InputText property. This type of event is called a PropertyChangeEvent, for obvious reasons.
Since these Beans are particularly simple, you don't need to hide anything from the Beans' container or the other Beans interested in them. JavaBeans provides a mechanism for you that will use the names of your methods to extract the names and types of your properties and events. Rest assured that you will learn how this works as you go along. Later in the chapter, you'll learn how to explicitly define what information in a Bean is exposed to its environment.
You want to keep this example simple, so assume that your Beans do not need any prototypical information ( you'll define default values for all their properties) and that they do not have their own Customization dialog. What this means is that your Beans have a predefined state when they're instantiated and that they use the standard PropertyEditors for their properties. If you were designing a Bean that displays an HTML page, for example, specifying default values may not be possible. You would need to know what file to display when the Bean is instantiated. Table 38.3 below shows your TextDisplayer Bean's properties and the default values it will hold. Likewise, Table 38.4 is for the TextReader Bean.
| Property Name | Default Value |
| TextOutput | "TextDisplayer" |
| BGColor | java.awt.Color.white |
| TextFont | Courier, normal, 12 |
| FontColor | java.awt.Color.black |
| Property Name | Default Value |
| TextInput | "" (an empty string) |
| Width | 40 |
public class TextDisplayer extends Canvas implements PropertyChangeListener {
   // default constructor for this Bean.  This is the constructor that an
   // application builder (like Visual Basic) would use.
   public TextDisplayer() {
      this( "TextDisplayer", Color.white, new Font( "Courier", Font.PLAIN, 12 ),
            Color.black );
   }

   // custom constructor for this Bean.  This is the constructor you would likely
   // use if you were going to do all your coding from scratch.
   public TextDisplayer( String OutputText, Color BGColor, Font TextFont,
                         Color FontColor ) {
      super(); // call the Canvas's constructor.
      this.OutputText = OutputText;
      this.BGColor = BGColor;
      this.TextFont = TextFont;
      this.FontColor = FontColor;

      setFont( TextFont );        // set the Canvas's font.
      setBackground( BGColor );   // set the Canvas's background color.
      setForeground( FontColor ); // set the Canvas's foreground color.
   }

   // this Bean's properties.
   protected String OutputText;
   protected Color BGColor, FontColor;
   protected Font TextFont;
}
You might have noticed that you have specified that your Bean implement an interface called PropertyChangeListener. This is so that the TextDisplayer Bean can update its OutputText property by receiving an event. How that works will be discussed in more detail later in the chapter. The preliminary code needed to instantiate your TextReader Bean is shown in Listing 38.2.
public class TextReader extends TextField {
   // default constructor for this Bean.  This is the constructor that an
   // application builder (like Visual Basic) would use.
   public TextReader() {
      this( "", 40 );
   }

   // custom constructor for this Bean.  This is the constructor that you would
   // likely use if you were doing your coding from scratch.
   public TextReader( String InputText, int Width ) {
      super( InputText, Width );
      this.InputText = InputText;
      this.Width = Width;
      setEditable( true );
   }

   // this Bean's properties.
   protected String InputText;
   protected int Width;
}
If you look at Figure 38.1, you will notice that the TextDisplayer Bean displayed itself with a white background and black text. It did so because that's how you set its properties. If you had set the FontColor property to red, it would have displayed the text in red. If the properties of a component cannot be changed by other Beans, the usefulness of the Bean is reduced, as well as the reusability. For example, if you used the TextDisplayer Bean in an accounting package, you would need to change the Bean's FontColor property to red to indicate a negative value. So how do you let other Beans know that they can set (or read) this property? If you're coding from scratch, you can look at the documentation for the Bean. But what if you're in an application builder? Luckily, there's a way to do this without incurring any extra coding on your part. You'll see how that works a little later.
There are two types of properties supported by JavaBeans: single-value and indexed. In addition, properties may also be bound or constrained. A single-value property is a property for which there is only one value. As the name suggests, an indexed property has several values, each of which has a unique index. If a property is bound, it means that some other Bean is dependent on that property. In the continuing example, the TextReader Bean's InputText property is bound to our TextDisplayer Bean; the TextReader must notify the TextReader after its InputText field changes. A property is constrained if it must check with other components before it can change. Note that constrained properties cannot change arbitrarily--one or more components may not allow the updated value.
All properties are accessed by calling methods on the owning Bean's object. Readable properties have a getter method which is used to read the value of the property. Writable properties have a setter method which is used to change the value of a property. These methods are not constrained to simply returning the value of the property; they can also perform calculations and return some other value. All of the properties our Beans have are single-value.
At this point you're ready to start talking about Introspection. The method by which other components learn of your Bean's properties depends on a few things. In general, though, this process is called Introspection. In fact, the class java.beans.Introspector is the class that provides this information for other components. The Introspector class traverses the class hierarchy of a particular Bean. If it finds explicit information provided by the Bean, it uses that. However, it uses design patterns to implicitly extract information from those Beans that do not provide information. Note that this is what happens for your Beans. Specific design rules should be applied when defining accessor methods so that the Introspector class can do its job. If you choose to use other names, you can still expose a Bean's properties, but it requires you to supply a BeanInfo class. More about what a BeanInfo class is, is in the section on Introspection. Here are the design patterns you should use:
public void set<PropertyName>( <PropertyType> value );
public <PropertyType> get<PropertyName>();
public boolean is<PropertyName>();
Note that the last pattern is an alternative getter method for Boolean properties only. Setter methods are allowed to throw exceptions if they so choose. The accessor methods for the TextDisplayer Bean are shown in Listing 38.3. Notice that all the accessor methods have been declared as synchronized. Even though nothing serious could happen in this Bean, you should always assume that your Beans are running in multithreaded environments. Using synchronized accessor methods helps prevent race conditions from forming. You can check the TextReader.java file on your CD-ROM to see the accessor methods for the TextReader Bean.
public synchronized String getOutputText() {
   return( OutputText );
}

public synchronized void setOutputText( String text ) {
   OutputText = text;
   resizeCanvas();
}

public synchronized Color getBGColor() {
   return( BGColor );
}

public synchronized void setBGColor( Color color ) {
   BGColor = color;
   setBackground( BGColor );   // set the Canvas's background color.
   repaint();
}

public synchronized Font getTextFont() {
   return( TextFont );
}

public synchronized void setTextFont( Font font ) {
   TextFont = font;
   setFont( TextFont );        // set the Canvas's font.
   resizeCanvas();
}

public synchronized Color getFontColor() {
   return( FontColor );
}

public synchronized void setFontColor( Color color ) {
   FontColor = color;
   setForeground( FontColor ); // set the Canvas's foreground color.
   repaint();
}
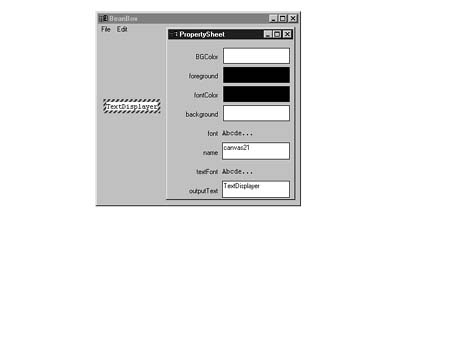
Figure 38.2 shows you what the property sheet of Sun's BeanBox shows for your
TextDisplayer Bean. Notice that you can see the properties of the parent
class, too. Your Bean inherits from java.awt.Canvas, which inherits from
java.awt.Component, which inherits from java.lang.Object. The additional
properties that you see are from the java.awt.Component class. This illustrates
the principal drawback of using the automatic JavaBeans Introspection methods. In
your own Beans, this might be the motivation for providing a BeanInfo class.
Again, more on that in the section on Introspection.
FIG. 38.2
The PropertySheet of Sun's BeanBox showing the Bean's exposed properties. Notice
the properties of the parent class.
All indexed properties must be Java integers. Indexed properties can be read individually or as an entire array. The design patterns for indexed properties are as follows:
public <PropertyType> get<PropertyName>( int index );
public void set<PropertyName>( int index, <PropertyType> value );
public <PropertyType>[] get<PropertyName>();
public void set<PropertyName>( <PropertyType>[] value );
To illustrate, assume there is a Meal property that consists of an array of Courses:
public Course getMeal( int course);
public void setMeal( int course, Course dish );
public Course[] getMeal();
public void setMeal( Course[] dishes );
As the programmer, you can decide which of your Bean's properties other components can bind to. In order to provide bound properties in your Beans, you must define the following methods:
public void addPropertyChangeListener( PropertyChangeListener l );
public void removePropertyChangeListener( PropertyChangeListener l );
If order to provide this functionality on a per-property basis, the following design pattern should be used:
public void add<PropertyName>Listener( PropertyChangeListener l );
public void remove<PropertyName>Listener( PropertyChangeListener l );
Beans wishing to bind to other components' properties should implement the PropertyChangeListener interface, which consists of the following method:
public void propertyChange( PropertyChangeEvent evt );
Whenever a bound property in a Bean is updated, it must call the propertyChange() method in all of the components that have registered with it. The class java.beans.PropertyChangeSupport is provided to help you with this process. The code in Listing 38.4 shows you what is required in the TextReader Bean to allow its InputText property to be bound.
   // setter method for the InputText property.
   public synchronized void setInputText( String newText ) {
      String oldText = InputText;
      InputText = newText;
      setText( InputText );
      changeAgent.firePropertyChange( "inputText", new String( oldText ),
                                      new String( newText ) );
   }

   // these two methods allow this Bean to have bound properties.
   public void addPropertyChangeListener( PropertyChangeListener l ) {
      changeAgent.addPropertyChangeListener( l );
   }

   public void removePropertyChangeListener( PropertyChangeListener l ) {
      changeAgent.removePropertyChangeListener( l );
   }


   protected PropertyChangeSupport changeAgent = new PropertyChangeSupport( this );
The process for providing constrained properties in your code is also fairly straightforward. You must define the following methods in your Bean:
public void addVetoableChangeListener( VetoableChangeListener l );
public void removeVetoableChangeListener( VetoableChangeListener l );
Just as with bound properties, you can make individual properties constrained using the following design pattern:
public void add<PropertyName>Listener( VetoableChangeListener l );
public void remove<PropertyName>Listener( VetoableChangeListener l );
Beans wishing to constrain other components' properties should implement the VetoableChangeListener interface, which consists of the following method:
public void vetoableChange( PropertyChangeEvent evt );
Whenever a constrained property in a Bean is updated, it must call the vetoableChange() method in all of the components that have registered with it. There is also a support class to help make this process easier. You should use the class java.beans.VetoableChangeSupport to help manage your vetoable properties. The code in Listing 38.5 shows you what is required in the TextReader Bean to allow its Width property to be constrained.
   // setter method for the Columns property.
   public synchronized void setWidth( int newWidth )
   throws PropertyVetoException {
      int oldWidth = Width;
      vetoAgent.fireVetoableChange( "width", new Integer( oldWidth ),
                                    new Integer( newWidth ) );
      // no one vetoed, so change the property.
      Width = newWidth;
      setColumns( Width );
      Component p = getParent();
      if ( p != null ) {
         p.invalidate();
         p.layout();
      }
      changeAgent.firePropertyChange( "width", new Integer( oldWidth ),
                                      new Integer( newWidth ) );
   }

   // these two methods allow this Bean to have constrained properties.
   public void addVetoableChangeListener( VetoableChangeListener l ) {
      vetoAgent.addVetoableChangeListener( l );
   }

   public void removeVetoableChangeListener( VetoableChangeListener l ) {
      vetoAgent.removeVetoableChangeListener( l );
   }   protected VetoableChangeSupport vetoAgent = new VetoableChangeSupport( this );
In this particular example, we chose to make the Width property bound and constrained. A property does not have to be bound to be constrained. For example, to make the Width property constrained, but not bound, we would remove the following line from Listing 38.5:
changeAgent.firePropertyChange( "width", new Integer( oldWidth ),
                                      new Integer( newWidth ) );
The whole idea behind the JavaBeans component model is to provide a way to create reusable components. In order to do this, Beans must be able to communicate with the other Beans in their environment and with their container. This is accomplished by means of Listener interfaces. You've already seen some of this with the PropertyChangedEvent from the last section. What follows is more detail about how this works.
Beans use the same event-handling scheme as AWT. This means that if your Bean needs to hear about events coming from another Bean, it must register itself with that Bean. In order to do this, it must implement the Listener interface for the event of interest. At the same time, if your Bean is no longer interested in hearing about some other Bean's event, it must unregister itself with that Bean. Any event which a Bean wants to fire must inherit from the java.util.EventObject class. For very simple events, the java.util.EventObject class itself could be used; however, as with java.lang.Exception, using child classes provides clarity and is preferred. All Listener interfaces must inherit from the java.util.EventListener interface, and the same subclassing convention applies. The event handling method of a Listener interface should follow the following design pattern for Introspection:
void <EventOccuranceName>( <EventObjectType evt );
Note that <EventObjectType> must inherit from java.util.EventObject. Here is an example of an event handler for a DinnerServedListener interface:
void dinnerServed( DinnerServedEvent evt ); // DinnerServedEvent inherits from java.util.EventObject.
There is no restriction preventing an event handler method from throwing an exception. In addition, any one Listener interface can have any number of related event handlers.
There are two types of Events that components can listen for: multicast events and unicast events.
Multicast events are the most common types of events. The PropertyChangeEvent, that you have already been exposed to, is a multicast event because there can be any number of listeners. In that example, you had addPropertyChangeListener() and removePropertyChangeListener() methods which allowed other components to register with the Bean as being interested in hearing when a bound property changed. The process is the same for any other type of multicast event and the registration methods should follow the following design pattern for Introspection:
public synchronized void add<ListenerType>( <ListenerType> listener );
public synchronized void remove<ListenerType>( <ListenerType> listener );
The synchronized is not actually part of the design pattern. It is included as a reminder that race conditions can occur, especially with the event model, and precautions must be taken.
Unicast events don't occur nearly as often as their counterpart, but they're just as useful. Unicast events can have only one listener. If additional components attempt to listen to the unicast event, a java.util.TooManyListenersException will be thrown. The following design pattern should be used when declaring unicast events:
public synchronized void add<ListenerType>( <ListenerType> listener ) throws
                                  java.util.TooManyListenersException;
public synchronized void remove<ListenerType>( <ListenerType> listener );
In some cases, it may be necessary to build an event adaptor class that can transfer an event to a component. This comes into play especially for an application builder, since the application doesn't know until runtime how the components will be linked together or how they will interact with each other's events.
An event adaptor intervenes in the normal event-handling scheme by intercepting the events which are normally meant for another component. For example, assume a user places a button and a textbox in an application builder. If the user wishes to specify that the textbox fill with the words "Pressed" when the button is pressed, the application builder can use an event adaptor to call a method containing the user-generated code needed to do it. Here's how it will eventually work:
Sometimes it helps to see some code. Listing 38.6 contains some psuedocode you can examine to see how an event adaptor is written. The code in the example builds off of the procedure listed above. You won't be able to compile this code (notice the class keywords have been changed to pseudoclass) but it serves as an example you can build off of in your own Beans.
// this pseudoclass example uses a unicast mechanism to keep things simple.

public interface SomeEventListener extends java.util.EventListener {
   public someEvent( java.util.EventObject e );
}

public pseudoclass button extends java.awt.Button {
   public void synchronized addSomeEventListener( SomeEventListener l )
                                throws java.util.TooManyListenersException {
      if ( listener != null ) {
         listener = l;
      } else throw new java.util.TooManyListenersException;
   }

   private void fireSomeEvent() {
      listener.someEvent( new java.util.EventObject( this ) );
   }

   private SomeEventListener listener = null;
}

public pseudoclass eventAdaptor implements SomeEventListener {
   public eventAdaptor( TargetObject target ) {
      this.target = target;
   }

   someEvent( java.util.EventObject e ) {
      // transfer the event to the user generated method.
      target.userDefinedMethod();
   }

   private TargetObject target;
}

public pseudoclass TargetObject {
   public TargetObject() {
      adaptor = new eventAdaptor( this );
   }

   public userDefinedMethod() {
     // user generated code goes here.
   }

   private eventAdaptor adaptor;

}
You've already seen in the sections above and, in the two Beans you designed, how to use design patterns to facilitate automatic Introspection. You also saw that the automatic Introspection mechanism isn't perfect. If you look back at Figure 38.2, you'll see an example of this. Introspection is probably the most important aspect of JavaBeans, since without it a container can't do anything with a Bean other than display it. As you become proficient at designing your own Beans, you'll find that you sometimes need to provide additional Introspection information for the users of your Beans. In the case of your Beans, this is to hide the parent class's properties to clear up ambiguities.
The java.beans.Introspector class, as discussed earlier in the chapter, is the class that does all the pattern analysis to expose the properties, methods, and events that a component has. As a first step, though, this class looks to see if there is a BeanInfo class defined for the Bean it's inspecting. If it finds one, it doesn't do any pattern analysis on the areas of the Bean for which the BeanInfo class supplies information. This means that you can selectively choose which information you wish to provide, and which information you wish to be derived from analysis. To show how this is done, you'll design a BeanInfo class for our TextDisplayer Bean.
The first thing you need to do is define what information you'll provide and what you'll leave up to the Introspector class to analyze. For the sake of example, say that you'll choose to provide the properties of your Bean and you'll let the Introspector class use analysis to expose the events and methods. Table 38.5 shows the names of the TextDisplayer Bean's properties and the user-friendly names you'd like to display. With that information defined, you can start working on your BeanInfo class, TextDisplayerBeanInfo.class. Notice how you simply appended "BeanInfo" to the class name. That's an Introspection design pattern; the Introspector class looks for BeanInfo information by appending "BeanInfo" to the class name of the Bean it's currently analyzing.
| Property Name | User-Friendly Name |
| OutputText | "Text String" |
| BGColor | "Background Color" |
| TextFont | "Text Font" |
| FontColor | "Text Color" |
In order to make your life easier as a programmer, Sun has provided a prebuilt class, java.beans.SimpleBeanInfo, that returns a null value for all the BeanInfo methods. That way, you can inherit from that class and override only the methods you choose. Listing 38.7 shows the BeanInfo class for the TextDisplayer Bean. Notice how you only override the getPropertyDescriptors() method. The parent class returns null for all the other methods in the java.beans.BeanInfo interface.
import java.beans.*;

public class TextDisplayerBeanInfo extends SimpleBeanInfo {
   // override the getPropertyDescriptors method to provide that info.
   public PropertyDescriptor[] getPropertyDescriptors() {
      PropertyDescriptor[] properties = new PropertyDescriptor[4];

      try {
         properties[0] = new PropertyDescriptor(
                    "Text String", BeanClass, "getOutputText", "setOutputText" );
         properties[1] = new PropertyDescriptor(
                       "Text Color", BeanClass, "getFontColor", "setFontColor" );
         properties[2] = new PropertyDescriptor(
                          "Text Font", BeanClass, "getTextFont", "setTextFont" );
         properties[3] = new PropertyDescriptor(
                     "Background Color", BeanClass, "getBGColor", "setBGColor" );
      } catch( IntrospectionException e ) {
         return( null ); // exit gracefully if we get an exception.
      }

      return( properties );
   }

   private Class BeanClass = TextDisplayer.class;
}
Take a second to look at the try/catch clause in Listing 38.7. Notice how you
return a null value if you catch a java.beans.IntrospectionException. If
you catch this exception, it usually means that you've provided an incorrect getter
or setter method name. You should always return a null value if you catch
this exception so that the Introspector class can still analyze your Bean.
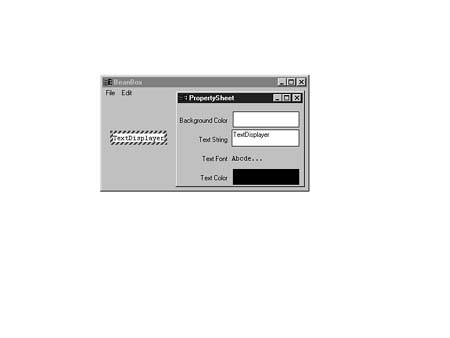
You should be able to extend this example to override the other methods in the java.beans.BeanInfo
interface. Figure 38.3 shows the PropertySheet window of Sun's BeanBox for
our TextDisplayer Bean. Notice how the user-friendly names for the properties
have been used and the parent class's properties are gone. Sweet success!
FIG. 38.3
The PropertySheet window of sun's BeanBox showing the user-friendly names
for the properties in the TextDisplayer Bean.
So far you have seen how to create a Bean; how to expose its properties, methods, and events; and how to tweak the Introspection process. You may have noticed from the figures that the properties of a Bean have what is called a PropertyEditor. For example, look at Figure 38.3. In the PropertySheet window, next to the "Text String" label, there's a TextField AWT component already filled with the value of the OutputText property. You didn't supply any code for this component, so how did Sun's BeanBox know to provide it? The answer is that the BeanBox application asked the java.beans.PropertyEditorManager what the default PropertyEditor was for an object of type java.lang.String, and displayed it.
Just because PropertyEditors and Customizers require a GUI environment doesn't mean a Bean can't function without one. For example, a Bean designed to run on a server might not use (or need) a GUI environment at all. The java.beans.Beans class and the java.beans.Visibility interface allow Beans to have different behavior in GUI and non-GUI environments.
The class java.beans.PropertyEditorManager provides default PropertyEditors for the majority of the Java class types. So, if you use only native Java datatypes and Objects, you're all set. But what if you design a Bean that has a property for which there's no default PropertyEditor? You'll run into this problem any time you design a custom property type. For those cases where there is no default PropertyEditor, you have to provide your own. Actually, you could redesign all the default PropertyEditors, too, if you choose, but you would only do this in extremely rare cases, so this won't be discussed here. What this means is that you have to provide an additional class, by appending "Editor" to the class name, that the PropertyEditorManager can use. In most cases, you provide a subclass of java.awt.Component. The property sheet for your component will then pop up your custom PropertyEditor to allow your custom property to be edited. You won't actually design a custom PropertyEditor here because the majority of Beans won't require it, but an explanation of how to do it will be included. The requirements of a PropertyEditor are listed below.
The natural question you might be asking yourself at this point is, "Can I provide my own property sheet?" The answer is yes, and for complex Beans this is absolutely imperative. Property sheets by nature are simple and relatively unuser-friendly. What's discussed next is how to override the property sheet mechanism to provide your own customization dialogs.
All application builders have to implement some method of customizing the Beans placed into their containers. Thus, the PropertyEditor mechanism and the idea of a property sheet were born. But what about the special cases where a Bean can be customized several different ways, or there are dozens of properties? The solution to this problem is called customizers. Bean developers can optionally supply customizer classes with their Beans to be used in place of standard property sheets. Even though the property sheet mechanism works just fine for the TextReader Bean, you'll create a customizer class anyway, to learn how it's done.
In order to implement a customizer class, a Bean must also provide a BeanInfo class. The class name of a Bean's customizer class is determined from a call to the getBeanDescriptor() method of the java.beans.BeanInfo interface. This is a little bit different than what you've encountered so far. There is no default Introspection design pattern for customizers; you must provide a BeanInfo class, even if the only information it provides is a BeanDescriptor. In fact, this is what you do for the TextReaderBeanInfo.class shown in Listing 38.8. Notice how the class inherits from java.beans.SimpleBeanInfo; the parent class implements the java.beans.BeanInfo class and you simply override the getBeanDescriptor() method so that it returns something meaningful.
import java.beans.*;

public class TextReaderBeanInfo extends SimpleBeanInfo {
   // override the getBeanDescriptor method to provide a customizer.
   public BeanDescriptor getBeanDescriptor() {
      return( new BeanDescriptor( BeanClass, CustomizerClass ) );
   }

   private Class BeanClass = TextReader.class;
   private Class CustomizerClass = TextReaderCustomizer.class;
}
Although there isn't a design pattern for it, it's customary to name a customizer class by postfixing "Customizer" to the class name. Notice you named the TextReader customizer TextReaderCustomizer.class. This is a good habit to get into.
The programmer has a tremendous amount of freedom when designing customizer classes. There are only two restrictions: The class must inherit from java.awt.Component, so that it can be placed in a Panel or Dialog, and it must implement the java.beans.Customizer interface. The customizer class is given a reference to the target component through a call to the setObject() method. After this point, what the customizer class does is its business, for the most part. Remember, though, that you'll be required (by the compiler) to acknowledge constrained properties because their accessor methods might throw propertyVetoExceptions! Finally, the java.beans.Customizer interface includes functionality for PropertyChangeListeners. Since the Bean's container may register itself as a listener with the customizer class, any property updates should be followed by a call to firePropertyChange(). The easiest way to do this is by using a java.beans.PropertyChangeSupport class as was done when discussing bound properties earlier.
public class TextReaderCustomizer extends Panel implements Customizer {
   public TextReaderCustomizer() {
      setLayout( new BorderLayout() );
   }

   public void setObject( Object target ) {
      component = (TextReader)target;
      // generate the User Interface (code removed for clarity)
   }

   public boolean handleEvent( Event event ) {
      if ( event.id == Event.KEY_RELEASE && event.target == InputText ) {
         String old_text = component.getInputText();
         String text = InputText.getText();
         component.setInputText( text );
         changeAgent.firePropertyChange( "inputText", old_text, text );
      } else if ( event.id == Event.KEY_RELEASE && event.target == Width ) {
         int old_width, width;
         old_width = component.getWidth();
         try {
            width = Integer.parseInt( Width.getText() );
            try {
               component.setWidth( width );
               changeAgent.firePropertyChange( "width", new Integer( old_width ),
                                               new Integer( width ) );
            } catch( PropertyVetoException e ) {
               // do nothing... wait for acceptable data.
            }
         } catch( NumberFormatException e ) {
            // do nothing... wait for better data.
         }
      }
      return ( super.handleEvent( event ) );
   }

   public void addPropertyChangeListener( PropertyChangeListener l ) {
      changeAgent.addPropertyChangeListener( l );
   }

   public void removePropertyChangeListener(PropertyChangeListener l) {
      changeAgent.removePropertyChangeListener( l );
   }

   private TextReader component;
   private TextField InputText, Width;
   private PropertyChangeSupport changeAgent = new PropertyChangeSupport( this );
}
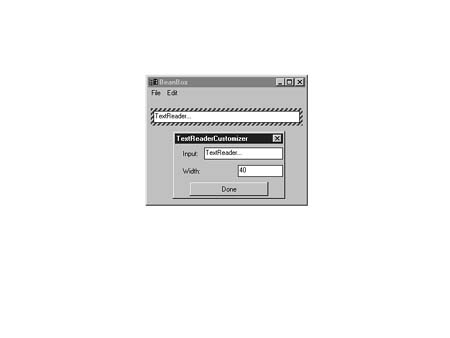
Listing 38.9 shows most of the code for the TextReaderCustomizer class.
Some of the AWT-specific code was removed for clarity. The full listing is available
on the CDROM. Stop for a minute and take a look at the handleEvent() method.
This is the method that's called by AWT when the user enters data. Notice how you
were forced to catch ProperyVetoExceptions for the setWidth() accessor?
You can also see how the PropertyChangeListener methods are used appropriately.
Figure 38.4 shows what the customizer looks like when called up from within Sun's
BeanBox.
FIG. 38.4
Sun's BeanBox showing the TextReader Bean and its customizer dialog.
Unfortunately, a GUI interface is not always available to a Bean. The most likely reason for this is that the Bean is being run in the background or on a server. Whatever the case, Beans that need to provide alternative or additional behavior in non-GUI environments can do so by using the java.beans.Beans class and the java.beans.Visibility interface.
The static methods isDesignTime() and isGuiAvailable() in the java.beans.Beans class can be used to check if the Bean is being used in an application builder and if a GUI environment is available. The method isDesignTime() returns true if the Bean is in an application builder and false if not. The method isGuiAvailable() returns true if a GUI environment is available to the Bean, and false if not.
Just because a GUI environment is available doesn't necessarily mean a container wants a Bean to use it. Similarly, a container may wish to know if a Bean isn't using the GUI environment, or even if it needs one. A Bean and its container can communicate these things by implementing the java.beans.Visibility interface. The vast majority of Beans have no need for this interface and it isn't necessary to implement it unless a Bean plans to use it. There are four methods in the interface:
public abstract boolean avoidingGui()
This method is called by a container to ask if a Bean is currently avoiding the GUI environment. A Bean should return true for this method if it is actively avoiding the GUI environment. Notice that this is not the same as indicating that it doesn't need the GUI environment. For example, a container might use this information to free up resources being used by the GUI environment if a call to this method returns true.
public abstract void dontUseGui()
This method is called by the container to tell the Bean that even though a GUI environment may be available, the Bean shouldn't use it. For example, a container using a Bean on a server would call this method to tell the Bean there's no point in using the GUI environment. If a Bean chooses to comply with this method (and it should) then the Bean should return true for subsequent calls to avoidingGui().
public abstract boolean needsGui()
This method is called by the container to ask if a Bean absolutely has to have a GUI environment. If a Bean can function in a non-GUI environment, it should return false. Note that it's safe to return true and then never use the GUI environment, but it's not safe to return false and use it anyway.
public abstract void okToUseGui()
This method is called by a container to tell a Bean that a GUI environment is available and it can use it. This method might also be called after dontUseGui() to indicate a previously unavailable GUI environment is available again. Note that a call to this method in no way implies that a Bean should use the GUI environment, for example, if it wasn't planning to.
Developing a JavaBean can be as simple or as involved as the programmer desires. The base functionality for a Bean consists of the accessor methods for the Bean's properties and the event-related methods for delivering and receiving events. Beyond that, the developer of a JavaBean can begin to take control of how the Bean is perceived in its environment by implementing some or all of the methods found in the java.beans.BeanInfo interface. For cus-tomization purposes, the developer can even provide a complete GUI interface for setting the properties of the Bean. The possibility for a truly reusable "write once, run everywhere" component that interoperates with other traditional components exists in the JavaBeans component model.