| Previous | Table of Contents | Next |
Physical Maps
Physical maps, of course, refer to the physical world—that is, how things really are. Because physical maps are incredibly more detailed than logical maps, you’ll want to chew them off in bite-sized chunks. Some sites can get away with just one physical map (usually fewer than 50 PCs in these cases). Most sites usually need a physical map for each floor of the building. This is usually a good breakdown for most sites, because it shows each and every wire running along with each and every PC, printer, switch, and hub, and this can get rather large. Accordingly, for simpler sites, it’s really terrific to be able to lay your hands on the architectural floor plan of your building and add the network wiring and wire closet layout to it. A more complex site might also need more complex documentation in the form of a physical segment map.
I refer to a network as a physical network or physical segment—a group of hubs that are connected without a router or switch (in other words, the “party line”). Any hubs that are connected via a switch or router are always considered separate physical segments. Large ones can need their own maps.
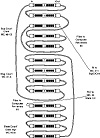
For example, Token-Ring (which I discuss in more detail in Hour 10, “Token-Ring Basics”) remains just “one network” even though it can have many hubs attached to it and can span several offices without using routers. Because the physical network is complex in this case, a separate physical segment map would be appropriate (see Figure 2.3). No matter what type of network you have, a physical documentation worksheet can act as a quick reference sheet for all data about that particular physical network (see Figure 2.4).

Figure 2.3 A sample Token-Ring physical map.

Figure 2.4 A physical documentation worksheet.
In general, you’ll want to get as detailed as you can. (I’ve never seen someone crying after a network outage because the maps were too detailed.)
Update your maps as they change. Make this part of your SOP (standard operating procedure) with your consultant, network provider, or PC guy—particularly if you add or change things on your own.
Date your maps! Because things do tend to change, you’ll end up with multiple maps of the same general area. If you have a date on each map, it’s easy to figure out which map is current.
Using color in your maps can be great, but you might find it harder to share your maps with associates and vendors who are trying to help you (color maps are hard to read via fax, for example). A better idea is to use different symbols for items that need to stand out.
Keep it simple! Other people are going to have to read your document, and you want them to actually understand it. Accordingly, try to stay with straight, clean lines and avoid flow chart spaghetti (crossed lines). If you have more detail than you can really fit into one page, add another page.
Software for mapping or flowcharting can help you a great deal, but don’t make the mistake of laying out your network map at the same time that you’re learning the new software package. Draw your network map out by hand if you’re unfamiliar with the software—this will make the layout go faster. Software is great, because minor changes are easy to update. However, complex software just isn’t necessary—any simple drawing program will do. In other words, you don’t need to make a career out of network mapping when you’ve got troubleshooting to do.
Device and Cable Labeling
A map does you no good, of course, if you can’t find a device that’s shown on the map. Don’t laugh—I’ve seen plenty of shops where nobody knows where the router is. How can you reboot the router if you don’t know which box the router is? A good troubleshooter will make it a point to label each device clearly and concisely before trouble strikes; a lack of labeling can really increase your downtime by a remarkable margin.
If you ever visit the U.S.S. North Carolina or a similar World War II battleship, you’ll marvel at all the hoses and pipes that are running throughout the ship—particularly in the machine rooms. Take a look at the meticulous way all these pipes are labeled; believe me, they didn’t do this for fun. They needed to know which pipe was air, steam, fresh water, brine, gas, or oil—a delay in a repair could literally sink the ship.
If you weren’t fortunate enough to have had the Navy meticulously label your network (and your installer hasn’t done it either), you’ll need to start today with “as you go” labeling. Each time you find out what a device is or where a cable is going, slap a label on it. Don’t assume that you’ll remember—you may have a great memory, but during a crisis, that memory may be on vacation. (Also, remember that you want to go on vacation yourself one day and let someone else troubleshoot all this stuff for you.)
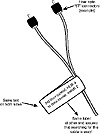
Go out and buy a label maker. They only cost about $50 and are really useful. They pump out quick, clear, and neat-looking labels. Also, you can print a label twice, cut once, and have a two-sided cable label, as shown in Figure 2.5.

Figure 2.5 Use a label maker to make two-sided cable labels.
You should test the labels you buy for adhesion. There’s nothing worse than making 250 labels, only to see them all flutter to the ground after a month. As with anything else in networking, a simple pilot test can save you a big headache later. Also, cable labels should be plastic rather than paper; otherwise, as cables get handled, the labels might rip.
Any cable label should be put a good distance from the end (anywhere from 12 to 18 inches, if you have the room). This way, you can read the label once there are 50 or so other cables plugged into the same switch or concentrator.
You really need to keep up with your labels when items change or are moved. Troubleshooting can take much, much longer if you think you know which cable is correct but find out later that it’s not.
Let’s say you have a router that connects your earthbound headquarters with your company’s moon base. If the router’s name is LOONIE, a good device label would be this:
LOONIE: Router for moon base, Lockheed Satellite transmitter
I’ve seen folks slap a label with an IP address on such a router; however, this is optional if you have good functional documentation that clearly states that LOONIE has two IP addresses (say, 167.195.160.1 on the earth side and 167.195.161.1 on the moon side). Still, as my grandmother would say, “It couldn’t hurt.”
| Previous | Table of Contents | Next |