

In Chapter 26, "Building an ActiveX Control," you learned how to build your own controls and include them in forms-based applications written in Visual Basic, Visual C++, and the VBA macro language. There's one other place those controls can go: on a Web page. But the ActiveX controls generated by older versions of Visual C++ were too big and slow to put on a Web page. This chapter shows how to get these controls onto your Web pages, and how to write faster, sleeker controls that will make your pages a pleasure to use.
It's a remarkably simple matter to put an ActiveX control onto a Web page that you know will be loaded by Microsoft Explorer 3.0. You use the <OBJECT> tag, a relatively new addition to HTML that describes a wide variety of, well, objects that you might want to insert into a Web page: a moving video clip, a sound, a Java applet, an ActiveX control, and many more kinds of information and ways of interacting with a user. Listing 28.1 shows the HTML source for a page that displays the dieroll control from Chapter 26.
Listing 28.1 fatdie.html-Using <OBJECT>
<HTML>

<HEAD>

<TITLE>A Web page with a rolling die</TITLE>

<BODY>

 <OBJECT

CLASSID="clsid:46646B43-EA16-11CF-870C-00201801DDD6"

CODEBASE="http://www.gregcons.com/test/dieroll.ocx"

ID=die1

WIDTH=200

HEIGHT=200

ALIGN=center

HSPACE=0

VSPACE=0

>

If you see this text, your browser does not support the OBJECT tag. </BR>

</OBJECT>


Here is some text after the die


</BODY>

</HTML>
The only ugly thing here is the CLSID, and the easiest way to get that, since you're a software developer, is to cut and paste it from dieroll.odl, the Object Description Library. Use FileView to open dieroll.odl quickly. Here's the section in dieroll.odl that includes the CLSID:
//  Class information for CDierollCtrl


[ uuid(46646B43-EA16-11CF-870C-00201801DDD6),

  helpstring("Dieroll Control"), control ]
This section is at the end of dieroll.odl-the earlier CLSIDs do not refer to the whole control, only to portions of it. Copy the uuid from inside the brackets into your HTML source.
| TIP |
Microsoft has a product called the Control Pad that gets CLSIDs from the Registry for you and makes life easier for Web page builders who are initimidated by instructions like "open the ODL file" or who don't have the ODL file, since it's not shipped with the control. Since you're building this control, and know how to open files in Developer Studio, this chapter will not describe the Control Pad tool. If you're curious, Microsoft's Control Pad Web page at http://www.microsoft.com/workshop/author/cpad/ has more details. |
The CODEBASE attribute of the <OBJECT> tag specifies where the OCX file is kept, so that if the user does not have a copy of the ActiveX control, one will be downloaded automatically. The use of the CLSID means that if this user has already installed this ActiveX control, there is no download time, the control is simply used right away.
| TIP |
If you don't have access to a Web server where you can put controls while you're developing them, use a file:// URL in the CODEBASE attribute that points to the location of the control on your hard drive. |
The remainder of the attributes of the <OBJECT> tag should be fairly intuitive if you've built a Web page before: ID is used by other tags on the page to refer to this control, WIDTH and HEIGHT specify the size, in pixels, that the control should appear, and HSPACE and VSPACE are horizontal and vertical blank space, in pixels, around the entire control.
Everything after the <OBJECT ...> tag and before the </OBJECT> tag is ignored by browsers that understand the <OBJECT> tag. (The <OBJECT...> tag is usually many lines long and contains all the information to describe the object.) Browsers that do not understand the <OBJECT> tag ignore the <OBJECT ...> tag and the </OBJECT> tag and display the HTML between them, in this case a line of text pointing out that this browser does not support the tag. This is part of the specification for a Web browser: it should ignore tags it doesn't understand.
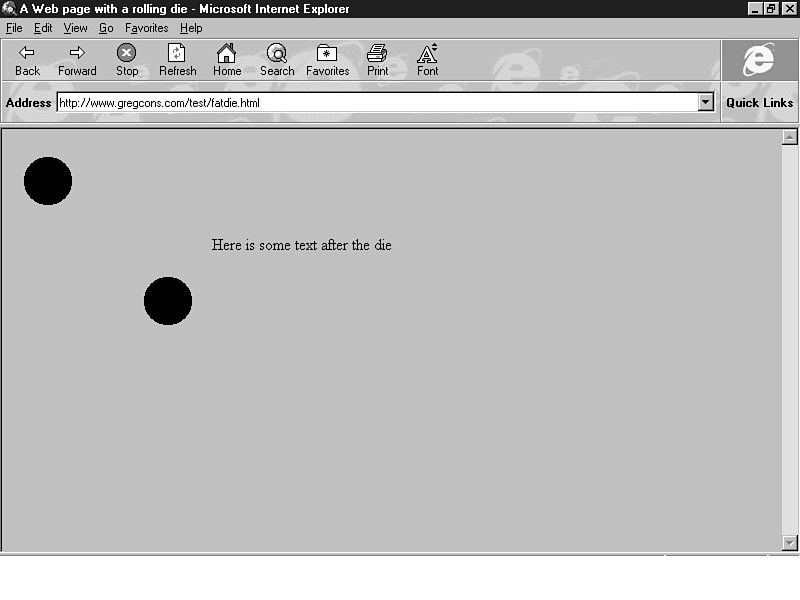
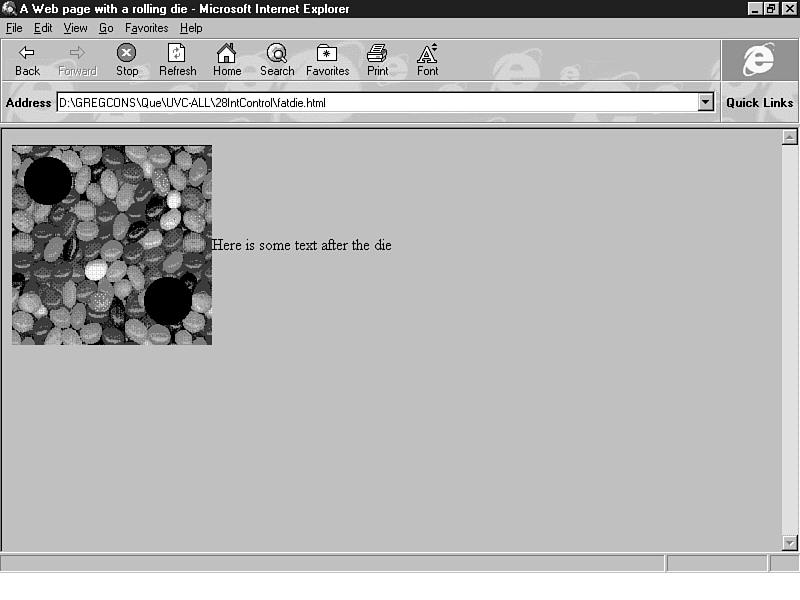
Figure 28.1 shows this page displayed in Microsoft Explorer 3.0. Clicking on the die rolls it, and everything works beautifully. Things certainly look simple and amazing. But two flaws appear immediately:
Figure 28.1 : Microsoft Internet Explorer can show ActiveX controls.
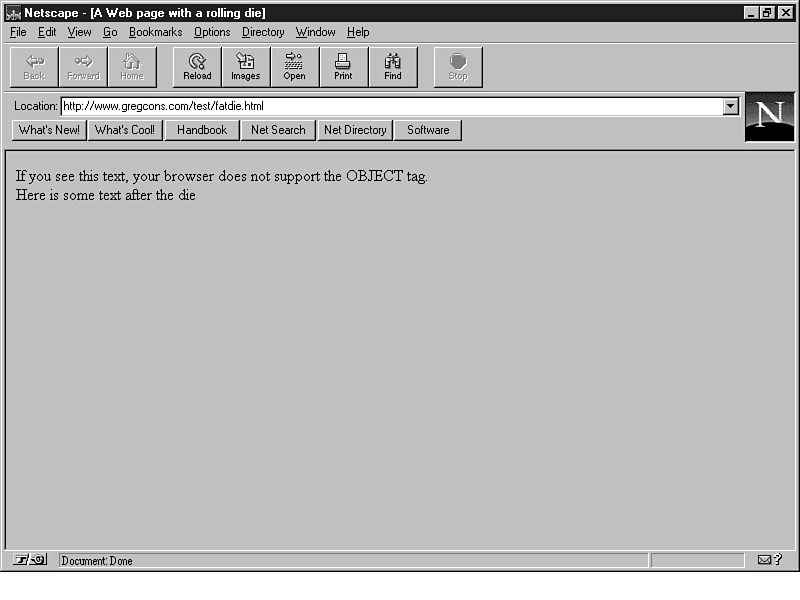
Figure 28.2 shows the same page displayed in Netscape Navigator 2.0. It doesn't support the <OBJECT> tag, so it doesn't show the die. And Netscape Navigator is used by over 80% of the people who browse the web! Does that mean it's not worth writing ActiveX controls for web pages? Not at all. As you'll see in the very next section, there's a way that Navigator users can use the same controls you make available to Explorer users.
Figure 28.2 : Netscape Navigator cannot show ActiveX controls.
The size issue is a bigger worry. The release version of the Dieroll control, as built for Chapter 26, is 26 KB. Many designers put a 50K limit per Web page for graphics and other material to be downloaded, and this simple control uses half that limit. A more powerful control would easily exceed it. The majority of this chapter deals with ways to reduce that size or otherwise minimize the download time for ActiveX controls, so that Web page designers will be able to tap their full power without worrying that users will label their pages as "slow," one of the worst knocks against any Web site.
There's a third flaw that you won't notice, since you have Visual C++ installed on your computer. The control requires the MFC DLL. The user must download it and install it before the controls can run. The mechanism that automatically downloads and installs controls does not automatically download and install this DLL. Microsoft doesn't mention this problem very often, and doesn't offer much advice about getting the MFC DLL to your user or getting it installed. (They do claim, rather optimistically, that the DLL, roughly 1 MB, should download in about 10 minutes.) This is essentially the same issue, though, as developing an application using the MFC DLLs dynamically rather than statically linking them into the application.
| NOTE |
It might occur to you to try linking the MFC library statically into your control. It seems easy enough to do: choose Build Settings, and on the General tab there is a drop down box inviting you to choose just that. If you do that and build, you'll get hundreds of linker errors: the COleControl and CPropPage functions are not in the DLL that is linked statically. (That's because Microsoft felt it would be foolish to link the MFC functions statically into a control.) Setting up another library to link in those functions is beyond the scope of this chapter, especially since all this work would lead to an enormous (over 1 MB) control that would take far too long to download the first time. |
NCompass Labs have produced a Netscape plug-in, called ControlActive, that allows you to embed an ActiveX control into a page that will be read with Netscape. As the control developer, you need to prepare an ODS (object data stream) file for your control to be used in this way. Full details are on the NCompass ControlActive page, http://www.ncompasslabs.com/documents/authoring.htm#_Toc353797310 and elsewhere on the NCompass site.
Once your ODS file is prepared, change your HTML to activate the plug-in. Netscape plug-ins are added to a Web page with the EMBED tag. Including this tag between <OBJECT ...> and </OBJECT>, as shown in Listing 28.2, means that browsers that don't know the <OBJECT> tag get another chance to show the control, this time with EMBED and the plug-in.
Listing 28.2 fatdie2.html-Using <OBJECT> and <EMBED>
<HTML>

<HEAD>

<TITLE>A Web page with a rolling die</TITLE>

</HEAD>

<BODY>

 <OBJECT

CLASSID="clsid:46646B43-EA16-11CF-870C-00201801DDD6"

CODEBASE="dieroll.ocx"

ID=die1

WIDTH=200

HEIGHT=200

ALIGN=center

HSPACE=0

VSPACE=0

>

<PARAM NAME="Image" VALUE="http://www.gregcons.com/test/beans.bmp">

If you see this text, your browser does not support the OBJECT tag -- the

EMBED tag is being used instead. </BR>

<!-- NCompass plugin for Netscape -->

     <EMBED

     SRC="dieroll.ODS"

     CODEBASE="dieroll.OCX"

     WIDTH=200

     HEIGHT=200

     PARAM_Image="http://www.gregcons.com/test/beans.bmp">

</OBJECT>


Here is some text after the die


</BODY>

</HTML>
You will probably want to include a link on your page to the NCompass page to help your readers get and learn about the plug-in.
Microsoft is committed to establishing ActiveX controls as a cross-platform, multi-browser solution that will, in the words of its slogan, "Activate the Internet." The ActiveX control specification is no longer a proprietary document, but has been released to a committee that will maintain the standard. So don't pay any attention to people who suggest you should only build these controls if your readers use Internet Explorer!
Java is an application development language as well as an applet development language, which means you can develop ActiveX controls in Java if you choose to, using a tool like Microsoft's Visual J++ integrated into Developer Studio. But when most people frame a showdown like "ActiveX versus Java" they mean ActiveX versus Java applets, little tightly contained applications that run on a Web page and cannot run stand-alone.
Many people are concerned about the security of running an application they did not code, when they do not know the person or organization supplying the application. The Java approach attempts to restrict the actions that applets can perform, so that even malicious applets cannot do any real damage. But regular announcements of flaws in the restriction approach are damaging the credibility of Java. Some influential netters have gone so far as to say that a Java applet can never be guaranteed to be safe.
The approach taken by Microsoft with ActiveX, which is extendable to Java and any other code that can run, is the trusted supplier approach. Code is digitally signed so that you are sure who provided it, and that it has not been changed since it was signed. This won't prevent bad things from happening if you run the code, but will guarantee that you know who to go to afterward for compensation for those bad things. This is just the same as buying shrink-wrapped software from the shelf in the computer store. For more details, look at http://www.microsoft.com/ie/most/howto/trusted.htm and follow some of the links from that page.
Probably the biggest difference between the ActiveX approach and the Java applet approach is downloading. Java code is downloaded every time you load the page that contains it. ActiveX code is downloaded once, unless you already have the control installed some other way (perhaps a CD was sent to you in a magazine, for example) and then never again. A copy is stored on the user's machine and entered into the Registry. The Java code that is downloaded is small, because most of the code that's involved is in the Java Virtual Machine installed on your computer, probably as part of your browser. The ActiveX code that's downloaded can be much larger, though the optimizations discussed later in this chapter can reduce the size significantly by relying on DLLs and other code already on the user's computer. If the user will come to this page once and never again, they may be annoyed to find ActiveX controls cluttering up their disk and Registry. On the other hand, if they come to the same page repeatedly, they will be pleased to find that there is no download time: the control simply activates and runs.
Microsoft did not develop OCX controls to be placed into Web pages, and changing their name to ActiveX controls didn't magically make them smaller, or faster to load. So the AppWizard that comes with Visual C++ has a number of options available to achieve those ends. This chapter will change these options in the dieroll control that was already created just to show how it's done. Since Dieroll is a fairly lean control already, and loads quickly, these simple changes don't make much difference. It's worth learning the techniques, though, for your own controls, which will surely be fatter than Dieroll.
The first few options to reduce your control have always been available, on Step 2 of the OLE Control Wizard:
If you are developing your control entirely for the Web, many of these settings don't matter any more. Whether your control has an About box or not, users won't be able to bring it up when they are viewing the control in a Web page, for example.
The activates when visible option is very important. Activating a control takes a lot of overhead, and should be postponed as long as possible. To unselect this option in the existing Dieroll code, open the Dieroll project in Developer Studio, and open DierollCtl.cpp with FileView. Look for a block of code like the one in Listing 28.3.
Listing 28.3 Excerpt from DierollCtl.cpp-Setting Activates when Visible
/////////////////////////////////////////////////////////////////////////////

// Control type information


static const DWORD BASED_CODE _dwDierollOleMisc =

    OLEMISC_ACTIVATEWHENVISIBLE |

    OLEMISC_SETCLIENTSITEFIRST |

    OLEMISC_INSIDEOUT |

    OLEMISC_CANTLINKINSIDE |

    OLEMISC_RECOMPOSEONRESIZE;


IMPLEMENT_OLECTLTYPE(CDierollCtrl, IDS_DIEROLL, _dwDierollOleMisc)
Delete the OLEMISC_ACTIVATEWHENVISIBLE line. Build a release version of the application. Though the size of the Dieroll OCX file is unchanged, Web pages with this control should load more quickly, since the window is not created until the user first clicks the die. If you reload the Web page with the die in it, you'll see the first value immediately, even though the control is inactive. The window is created to catch mouse clicks, not to display the die roll.
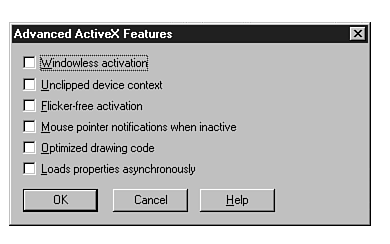
There are more optimizations available: Figure 28.3 shows the list of advanced options for OLE Control Wizard, reached by clicking the Advanced button on Step 2. Each of these options can be chosen when you first build the application, through Control Wizard. They can also be changed in an existing application, saving you the trouble of redoing AppWizard and adding your own functionality again. The options are:
Windowless activation is going to be very popular. If you want a transparent control or one that is not a rectangle, you must use windowless activation. But because it reduces code size and speeds execution, every control should consider using this option. Modern containers will provide the functionality for the control: in older containers the control will create the window anyway, denying you the savings but ensuring the control still works.
To implement this in Dieroll, override CDierollCtrl::GetControlFlags()like this:
DWORD CDierollCtrl::GetControlFlags()

{

    return COleControl::GetControlFlags()| windowlessActivate;

}
Add the function quickly by right-clicking on CDierollCtrl in Class View and choosing Add Function. If you do this to Dieroll, build it, and reload the Web page that uses it, you will notice no apparent effect, because Dieroll is such a lean control. You will at least notice that it still functions perfectly, and doesn't mind not having a window.
The next two options, unclipped device context and flicker-free activation are not available to windowless controls. In a control with a window, choosing unclipped device context means that you are completely sure that you never draw outside the client rectangle of the control. Skipping the checks that make sure you don't makes your controls run faster, though it could mean trouble if you have an error in your draw code. If you were to do this in Dieroll, the override of GetControlFlags()would look like this:
DWORD CDierollCtrl::GetControlFlags()

{

    return COleControl::GetControlFlags()& ~clipPaintDC;

}
Don't try to combine this with windowless activation: it doesn't do anything.
Flicker-free activation is useful for controls which draw their inactive and active views identically. (Think back to Chapter 24, "Building an ActiveX Server Application," in which the server object was drawn in dimmed colors when the objects were inactive.) If there is no need to redraw, because the drawing code is the same, you can select this option and skip the second draw. Your users won't see an annoying flicker as the control activates, and activation will be a tiny bit quicker. If you were to do this in Dieroll, the GetControlFlags()override would be:
DWORD CDierollCtrl::GetControlFlags()

{

    return COleControl::GetControlFlags()| noFlickerActivate;

}
Like unclipped device context, don't try to combine this with windowless activation: it doesn't do anything.
Mouse pointer notifications, when inactive, enable more controls to turn off the activate when visible option. If the only reason to be active is to have a window to process mouse interactions, this option will divert those interactions to the container through an IPointerInactive interface. To enable this option in an application that is already built, you override GetControlFlags()again:
 DWORD CDierollCtrl::GetControlFlags()

{

    return COleControl::GetControlFlags()| pointerInactive;

}
Now your code will receive WM_SETCURSOR and WM_MOUSEMOVE messages through message map entries, even though you have no window. The container, whose window your control is using, will send these messages to you through the IPointerInactive interface.
The other circumstance under which you might want to process window messages while still inactive, and so without a window, is if the user drags something over your control and drops it. The control needs to activate at that moment, so that it has a window to be a drop target. You can arrange that with an override to GetActivationPolicy():
DWORD CDierollCtrl::GetActivationPolicy()

{

    return POINTERINACTIVE_ACTIVATEONDRAG;

}
Don't bother doing this if your control isn't a drop target, of course.
The problem with relying on the container to pass on your messages through the IPointerInactive interface is that the container may have no idea such an interface exists, and have no plans to pass your messages on with it. If you think your control might end up in such a container, then don't remove the OLEMISC_ACTIVATEWHENVISIBLE flag from the block of code like the one in Listing 28.4
Listing 28.4 Excerpt from DierollCtl.cpp-Fine-tuning Activates when Visible
/////////////////////////////////////////////////////////////////////////////

// Control type information


static const DWORD BASED_CODE _dwDierollOleMisc =

    OLEMISC_ACTIVATEWHENVISIBLE |

    OLEMISC_SETCLIENTSITEFIRST |

    OLEMISC_INSIDEOUT |

    OLEMISC_CANTLINKINSIDE |

    OLEMISC_RECOMPOSEONRESIZE;


IMPLEMENT_OLECTLTYPE(CDierollCtrl, IDS_DIEROLL, _dwDierollOleMisc)
Instead, OR in another flag, OLEMISC_IGNOREACTIVATEWHENVISIBLE. This oddly named flag is meaningful to containers that understand IPointerInactive, and means, in effect "I take it back, don't activate when visible after all." Containers that don't understand IPointerInactive don't understand this flag either, and your control will activate when visible, and thus be around to catch mouse messages in these containers.
Optimized drawing code is only useful to controls that will be sharing the container with a number of other drawing controls. As you may recall from Chapter 11, "Drawing on the Screen," the typical pattern for drawing a view of any kind is to set the brush, pen, or other GDI object to a new value, saving the old, then use the GDI object, then restore it to the saved value. If there are a number of controls doing this in turn, all those restore steps could be skipped in favor of one restore at the end of all the drawing. The container saves all the GDI object values before instructing the controls to redraw, and restores them all afterwards.
If you would like your control to take advantage of this, there are two changes to be made. First, if a pen or other GDI object is to remain connected between draw calls, it must not go out of scope. That means any local pens, brushes, and fonts should be converted to member variables so that they stay in scope between function calls. Second, the code to restore the old objects should be surrounded by an if statement that calls COleControl::IsOptimizedDraw()to see if the restoration is necessary. A typical draw routine would set up the colors, then proceed like this:
...

if(!m_pen.m_hObject)

{

    m_pen.CreatePen(PS_SOLID, 0, forecolor);

}

if(!m_pen.m_hObject)

{

    m_brush.CreateSolidBrush(backcolor);

}


CPen* savepen = pdc->SelectObject(&m_pen);

CBrush* savebrush = pdc->SelectObject(&m_brush);


...

// use device context

...

if(!IsOptimizedDraw())

{

    pdc->SelectObject(savepen);

    pdc->SelectObject(savebrush);

}

...
The device context has the addresses of the member variables, so when it lets go of them at the direction of the container, their m_hObject member becomes NULL. As long as it is not NULL there is no need to reset the device context, and if this container supports optimized drawing code there is no need to restore it either.
If you select this optimized drawing code option with AppWizard, the if statement with the call to IsOptimizedDraw() is added to your draw code, with some comments to remind you what to do.
The last of the optimization options, loads properties asynchronously, is covered in the next section.
Asynchronous refers to spreading out activities over time, and not insisting that one activity be complete before another can begin. In the context of the Web, it's worth harking back to the features that made Netscape Navigator better than Mosaic, way back when it was first released. The number one benefit cited by people who were on the Web then was that the Netscape browser, unlike Mosaic, could display text while pictures were still loading. This is classic asynchronous behavior. You don't have to wait until the huge image files have transferred to see what the words on the page are and whether the images are worth waiting for.
Faster Internet connections and more compact image formats have lessened some of the concerns about waiting for images. Still, being asynchronous is a good thing. For one thing, waiting for video clips, sound clips, and executable code has made many Web users long for the good old days when they only had to wait 30 seconds for pages to find all their images.
The die that comes up in your Web page is the default die appearance. There's no way for the user to access the properties of the control. The Web page developer can, using the <PARAM> tag inside the <OBJECT> tag. (Browsers that ignore OBJECT also ignore PARAM.) Here's the HTML to include a die with a number rather than dots:
<HTML>

<HEAD>

<TITLE>A Web page with a rolling numbered die</TITLE>

<BODY>

 <OBJECT

CLASSID="clsid:46646B43-EA16-11CF-870C-00201801DDD6"

CODEBASE="http://www.gregcons.com/test/dieroll.ocx"

ID=die2

WIDTH=200

HEIGHT=200

ALIGN=center

HSPACE=0

VSPACE=0

>

<PARAM NAME="Dots" value="0">

If you see this text, your browser does not support the OBJECT tag. </BR>

</OBJECT>


Here is some text after the die


</BODY>

</HTML>
The <PARAM> tag has two attributes: NAME provides a name that matches the external OLE name (Dots in this case) and value provides the value (0, or FALSE, in this case.) The die displays with a number.
In order to demonstrate the value of asynchronous properties, Dieroll needs to have some big properties. So, since this is a demonstration application, the next step is to add a big property. A natural choice is to give the user more control over the appearance of the die. The user (which means the Web page designer if the control is being used in a Web page) can specify an image file and use that as the background for the die. Before you see how to make that happen, imagine what the Web page reader will have to wait for when loading a page that uses Dieroll:
When Dieroll gains another property, an image file that might be quite large, there will be another delay while the image file is retrieved from wherever it is kept. If nothing happens in the meantime, the Web page reader will eventually tire of staring at an empty square and go away to another page. Using asynchronous properties means that the control can draw itself roughly and start to be useful, even while the large image file is still being downloaded. For Dieroll, drawing the dots on a plain background using GetBackColor()will do until the image file is ready.
A BLOB is a Binary Large OBject. It's a generic name for things like the image file we are about to add to the Dieroll control. The way a control talks to a BLOB is through a moniker. That's not new, it's just that monikers have always been hidden away inside OLE. If you already understood them, you will have a great deal more to learn about them, because things are changing with the introduction of asynchronous monikers. If you've never heard of them before, no problem. Eventually there will be all sorts of asynchronous monikers, but at the moment only URL monikers have been implemented. These are a way for OLE to connect BLOB properties to URLs. If you're prepared to trust OLE to do this for you, you can achieve some amazing things. The remainder of this subsection explains how to work with URL monikers to load BLOB properties asynchronously.
Remember, the idea here is that the control will start drawing itself even before it has all of its properties. Your OnDraw() code will be structured like this:
// prepare to draw

if(AllPropertiesAreLoaded)

{

    // draw using the BLOB

}

else

{

    // draw without the BLOB

}

//cleanup after drawing
There are two problems to solve here. First, what will be the test to see if all the properties are loaded? And second, how can you arrange to have OnDraw called again when the properties are ready, if it's already been called, and has already drawn the control the "BLOBless" way?
The first problem has been solved by adding two new functions to COleControl. GetReadyState() returns one of these values:
The function InternalSetReadyState()sets the ready state to one of these values.
The second problem, getting a second call to OnDraw() after the control has already been drawn without the BLOB, has been solved by a new class called CDataPathProperty, and its derived class CCachedDataPathProperty. These classes have a member function called OnDataAvailable() which catches the Windows message generated when the property has been retrieved from the remote site. The OnDataAvailable() function invalidates the control, forcing a redraw.
Make a copy of the Dieroll folder you created in Chapter 26, "Building an ActiveX Control," (or the Chapter 26 code from the CD) and change it to windowless activation as described earlier in this chapter. Now you're ready to begin. There is a lot to be done to implement asynchronous properties, but each step is quite straightforward.
| Caution |
Shortly after Visual C++ 4.2 was released, Microsoft prepared a patch called the 4.2a patch, available from http://www.microsoft.com. This patch updates some of the Internet-related code to reflect versions of Internet Explorer and the ActiveX SDK released after Visual C++ 4.2. What that means to you is this: if you have not installed the patch this control will not work for you. Get the patch and install it. |
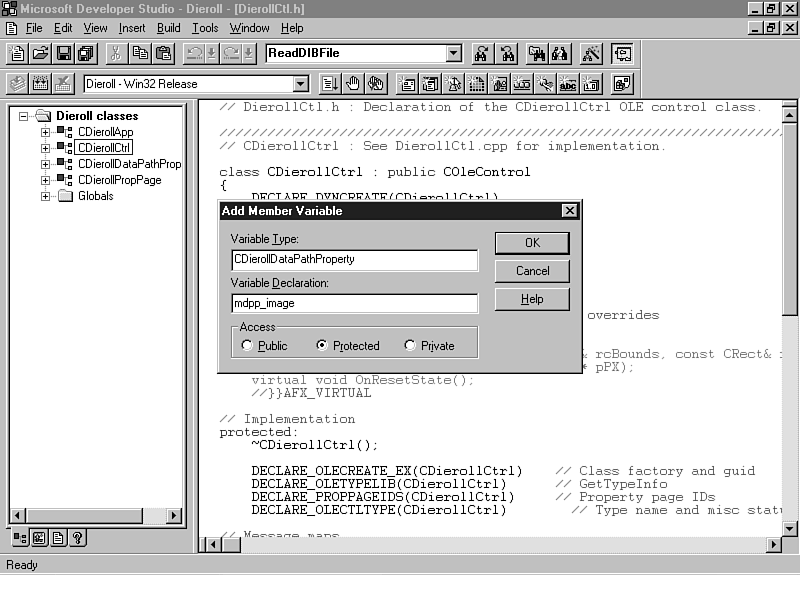
Add the CDierollDataPathProperty Class Open ClassWizard, click the OLE Automation tab, and click the Add Class button. From the drop-down menu that appears under the button, choose New. This brings up the Create New Class dialog. Name the class CDierollDataPathProperty. Click the drop down box for Base class and choose CCachedDataPathProperty. Do not add this class to the Component Gallery. The dialog should resemble Figure 28.4.
Figure 28.4 : Create a new class to handle asynchronous properties.
The reason that the new class should inherit from CCachedDataProperty is that it will load the property information into a file, and that is an easier way to handle the bitmap. If the control has a property that was downloaded because it changed often (for example, current weather) then CDataPathProperty would be a better choice.
Add the Image Property to CDierollCtrl With the new CDierollDataPathProperty class added to the Dieroll control, add the property to the original CDierollCtrl class that you copied. In ClassWizard, on the OLE Automation tab, make sure that CDierollCtrl is selected in the right most drop-down box. Click Add Property, and fill out the dialog as shown in Figure 28.5. The external name you choose is the one that will appear in the HTML: Image is simple and doesn't require a lot of typing. The type should be OLE_DATAPATH-that choice won't be in the drop-down box for type until you change the Implementation to Get/Set method.
Figure 28.5 : The image file is added as an OLE_DATAPATH.
ClassWizard adds the Get and Set functions to your control class, but the TODO comments (see Listing 28.5) are a little longer than usual.
Listing 28.5 DierollCtl.cpp-Get and Set Functions
OLE_DATAPATH CDierollCtrl::GetImage()

{

    CString strResult;

    // TODO: Replace "VAR" with the name of a member variable

    //       whose type is derived from CDataPathProperty.


    // strResult = VAR.GetPath();


    return strResult.AllocSysString();

}


void CDierollCtrl::SetImage(LPCTSTR lpszNewValue)

{

    // TODO: Replace "VAR" with the name of a member variable

    //       whose type is derived from CDataPathProperty.


    // Load(lpszNewValue, VAR);


    SetModifiedFlag();

}
As with other Get and Set properties, you will have to add the member variable. It is an instance of the new CDierollDataPathProperty class. Right-click on CDierollCtrl in Class View and choose Add Variable. Figure 28.6 shows how to fill in the dialog to declare the member variable mdpp_image. (The dpp in the name is to remind you that this is a data path property.)
Figure 28.6 : The image file member variable is an instance of the new class.
Now you can finish the Get and Set functions, as shown in Listing 28.6.
Listing 28.6 DierollCtl.cpp-Completed Get and Set Functions
OLE_DATAPATH CDierollCtrl::GetImage()

{

    CString strResult;

    strResult = mdpp_image.GetPath();

    return strResult.AllocSysString();

}


void CDierollCtrl::SetImage(LPCTSTR lpszNewValue)

{

    Load(lpszNewValue, mdpp_image);

    SetModifiedFlag();

}
At the top of the header file for CDierollCtrl, add this include statement:
#include "DierollDataPathProperty.h"
Now there are some bits and pieces to deal with because you are changing an existing control rather than turning on asynchronous properties when you first built Dieroll. First, in CDierollCtrl::DoPropExchange(), arrange persistence and initialization for mdpp_image by adding this line:
PX_DataPath( pPX, _T("Image"), mdpp_image);
Second, add a line to the stub of CDierollCtrl::OnResetState() that ClassWizard provided, to reset the data path property when the control is reset. The function is shown in Listing 28.7.
Listing 28.7 DierollCtl.cpp-CDierollCtrl::OnResetState()
/////////////////////////////////////////////////////////////////////////////

// CDierollCtrl::OnResetState - Reset control to default state


void CDierollCtrl::OnResetState()

{

    COleControl::OnResetState();  // Resets defaults found in DoPropExchange


    mdpp_image.ResetData();

}
Add the ReadyStateChange Event and the ReadyState Property Use ClassWizard to add the stock event ReadyStateChange. In ClassWizard, click the OLE events tab, then the Add Event button. Choose ReadyStateChange from the drop down box and click OK. Figure 28.7 shows the Add Event dialog for this event. Events, as discussed in Chapter 26, notify the container of the control that something has happened within the control. In this case, what has happened is that the rest of the control's data has arrived and the control's state of readiness has changed.
Figure 28.7 : Add a stock event to notify the container of a change in the readiness of the control.
Use ClassWizard to add a property to CDierollCtrl for the ready state. In ClassWizard, click the OLE Automation tab, then the Add Property button. Choose ReadyState from the drop down box, and since this is a stock property, the rest of the dialog is filled in for you, as shown in Figure 28.8. ClassWizard doesn't add a stub function for GetReadyState() because CDierollCtrl will inherit this from COleControl.
Figure 28.8 : Add a stock property to track the readiness of the control.
Add a line to the constructor to initialize the member variable in COleControl that is used in COleControl::GetReadyState() and set by COleControl::InternalSetReadyState(). Since the control can be used right away, the readiness state should start at READYSTATE_INTERACTIVE. Listing 28.8 shows the new constructor:
Listing 28.8 DierollCtl.cpp-CDierollCtrl::GetImage()
CDierollCtrl::CDierollCtrl()

{

    InitializeIIDs(&IID_DDieroll, &IID_DDierollEvents);


    m_lReadyState = READYSTATE_INTERACTIVE;

}
Implement CDierollDataPathProperty There is some work to do in CDierollDataPathProperty before changing CDierollCtrl::OnDraw(). This class loads a bitmap, and this chapter is not going to explain most of what's involved in reading a .BMP file into a CBitmap object. The most important function is OnDataAvailable(), which is in Listing 28.9.
Listing 28.9 DierollDataPathProperty.cpp-OnDataAvailable()
void CDierollDataPathProperty::OnDataAvailable(DWORD dwSize, DWORD grfBSCF)

{

    CCachedDataPathProperty::OnDataAvailable(dwSize, grfBSCF);


    if(grfBSCF & BSCF_LASTDATANOTIFICATION)

    {

        m_Cache.SeekToBegin();

        if (ReadBitmap(m_Cache))

        {

            BitmapDataLoaded = TRUE;

            // safe because this control has only one property:

            GetControl()->InternalSetReadyState(READYSTATE_COMPLETE);

            GetControl()->Invalidate();

        }

    }

}
Every time a block of data is received from the remote site, this function is called. The first line of code uses the base class version of the function to deal with that block and set the flag called grfBSCF. If, after dealing with the latest block, the download is complete, the ReadBitmap() function is called to read the cached data into a bitmap object that can be displayed as the control background. The code for ReadBitmap() will not be presented or discussed here, though it is on the CD for those who would like to read it.
Once the bitmap has been read, the control's ready state is complete and the call to Invalidate() arranges for a redraw.
Revise CDierollCtrl::OnDraw() The structure of CDierollCtrl::OnDraw() was laid out long ago. The background is filled in before the code that checks whether to draw dots or a number, in this block of code:
COLORREF back = TranslateColor(GetBackColor());

CBrush backbrush;

backbrush.CreateSolidBrush(back);

pdc->FillRect(rcBounds, &backbrush);
Replace that block with the one in Listing 28.10.
Listing 28.10 DierollDataPathProperty.cpp-New Code for OnDraw()
CBrush backbrush;

BOOL drawn = FALSE;

if(GetReadyState()== READYSTATE_COMPLETE)

{

    CBitmap* image = mdpp_image.GetBitmap(*pdc);

    if(image)

    {

        CDC memdc;

        memdc.CreateCompatibleDC(pdc);

        memdc.SelectObject(image);

        BITMAP bmp;                //just for height and width

        image->GetBitmap(&bmp);

        pdc->StretchBlt(0,            //upper left

                        0,            //upper right

                        rcBounds.Width(), // target width

                        rcBounds.Height(), // target height

                        &memdc,        // the image

                        0,            //offset into image -x

                        0,            //offset into image -y

                        bmp.bmWidth, // width

                        bmp.bmHeight, // height

                        SRCCOPY);    //copy it over


        drawn = TRUE;

    }

}

if(!drawn)

{

    COLORREF back = TranslateColor(GetBackColor());

    backbrush.CreateSolidBrush(back);

    pdc->FillRect(rcBounds, &backbrush);

}
The BOOL variable drawn ensures that if the control is complete, but something goes wrong with the attempt to use the bitmap, the control will be drawn the old way. If the control is complete, the image is loaded into a CBitmap*, and then drawn into the device context. Bitmaps can only be selected into a memory device context, and then copied over to an ordinary device context. Using StretchBlt()will stretch the bitmap during the copy, though a sensible web page designer will have specified a bitmap that matches the HEIGHT and WIDTH attributes of the OBJECT tag. The old drawing code is still here, used if drawn remains FALSE.
Having made all those changes, build the control, which will register it. One way to test it would be to bring up that HTML page in Explorer again, but you may prefer to debug the control. It is possible to debug a control even though you cannot run it stand alone. Normally, a developer would arrange to debug the control in the Test Container, but you can use any application that can contain the control.
In Developer Studio, choose Build Settings. Click on the Debug tab, and make sure that all the lines in the left most list box are selected. Select General in the top drop-down box, and in the edit box labeled Executable for debug session, enter the full path to Microsoft Internet Explorer on your computer. (Figure 28.9 shows an example.) Now when you choose Build Debug Go, or click the Go toolbar button, Explorer will launch. Open a page of HTML that loads the control, and the control will run in the debugger. You can set breakpoints, step through code, and examine variables just as with any other application.
Figure 28.9 : Arrange to run Explorer when you debug the control.
Here's the syntax for an OBJECT tag that sets the Image property:
<OBJECT

CLASSID="clsid:46646B43-EA16-11CF-870C-00201801DDD6"

CODEBASE="http://www.gregcons.com/test/dieroll.ocx"

ID=die1

WIDTH=200

HEIGHT=200

ALIGN=center

HSPACE=0

VSPACE=0

>

<PARAM NAME="Dots" VALUE="1">

<PARAM NAME="Image" VALUE="http://www.gregcons.com/test/beans.bmp">

If you see this text, your browser does not support the OBJECT tag. </BR>

</OBJECT>
| TIP |
Remember, don't just copy these HTML samples to your own machine if you are building Dieroll yourself. You need to use your own CLSID, and a URL to the location of your copy of the OCX, and the image file you are using. |
Figure 28.10 shows the control with a background image of jelly beans. It takes thirty seconds to a minute to load this 40K image through the Web, and while it is loading, the control is perfectly usable as a plain die with no background image. That's the whole point of asynchronous properties, and that's what all the effort of the previous sections achieves.
Figure 28.10 : Now the die displays on a field of jelly beans, or any other image you choose.
There is a way to build an ActiveX control that does not need the MFC DLLs. Microsoft has provided a framework and some samples, collectively called the Base Control Framework, that you can build on to produce a control. Typically the OCX files produced are larger than those produced by the OLE Control Wizard, but far smaller than the MFC DLL. The work involved is considerable, though. Microsoft recommends that you choose this route only if you understand the fundamentals of OLE Automation and dual interfaces, are willing to edit .ODL files, and understand and are willing to work with OLE persistence interfaces. In addition, most of the instructions provided with the framework assume you are comfortable running a make tool from an MS-DOS prompt.
For those who are even braver, the ActiveX Template Library can also be used to build controls, though it would be a very dificult job to implement a significant user interface on such a control. The controls produced are certainly very small, but the work involved is not.
To learn more about BaseCtl and ATL, and to read Microsoft's disclaimers about "not for the faint-of-heart" and "not for the timid," point your Web browser at http://www.microsoft.com/intdev/controls/controls.htm and scroll to the bottom of the page.
ActiveX controls are changing fast. Watch for more announcements from Microsoft of development kits and other add-ons to make building Internet-ready controls faster and easier. Look also for upgrades to the not-quite-complete material that shipped with Visual C++ 4.2. If you'd like to learn more about programming for the Internet, try one of these chapters: