


Users tell programs to do things by choosing menu items or by clicking buttons on dialogs. They give the application details about their request by typing in edit boxes, choosing from list boxes, selecting radio buttons, checking or unchecking radio buttons, and more. This chapter builds a simple application that has menu items and dialogs, to illustrate the coding issues involved.
In this chapter, you will see how to develop an application very much like the traditional "Hello, world!" of C programming. The application simply displays a text string in the main window. The document (what you save in a file) contains the string and a few settings. There is a new menu item to bring up a dialog box to change the string and the settings, which control the appearance of the string. This is a deliberately simple application so that the concepts of adding menu items and adding dialogs are not obscured by trying to understand the actual brains of the application. So bring up Developer Studio and follow along.
First, use AppWizard to create the starter application. Choose File, New and then Project Workspace. Name the project ShowString so that your class names will match those shown here. Click Create.
It doesn't matter much whether you choose SDI or MDI, but MDI will allow you to see for yourself how little effort is required to have multiple documents open at once, so choose MDI. Choose US English and then click Next.
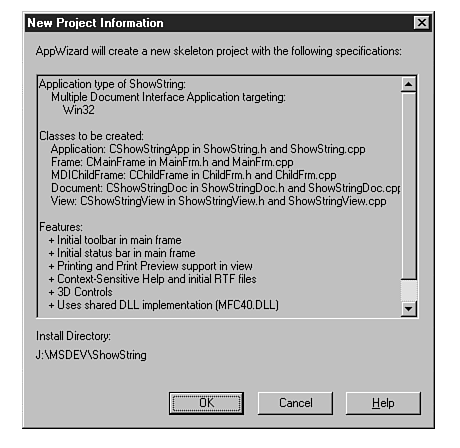
The ShowString application needs no database support and no OLE support, so click Next on each of these steps. In AppWizard's Step 4 dialog box, set to work selecting a docking toolbar, status bar, printing and print preview, context-sensitive help, and 3-D controls, and then click Next. Choose source-file comments and shared DLL and then click Next. The class names and file names are all fine, so click Finish. Figure 17.1 shows the final confirmation dialog.
Figure 17.1 : AppWizard summarizes the design choices for ShowString.
The ShowString application displays a string that will be kept in the document. You need to add a member variable to the document class, CShowStringDoc, and add loading and saving code to the Serialize() function. You can initialize the string by adding code to OnNewDocument() for the document and, in order to actually display it, override OnDraw() for the view.
Member Variable and Serialization Add a private variable to the document and a public function to get the value, by adding these lines to ShowStringDoc.h:
private:
CString string;
public:
CString GetString() {return string;}
The inline function will give other parts of your application a copy of the string to use whenever necessary but make it impossible for other parts to change the string.
Next, change the skeleton CShowStringDoc::Serialize() function provided by AppWizard to look like Listing 17.1. Since you used the MFC CString class, the archive has operators << and >> already defined, so this is a simple function to write. It fills the archive from the string when you are saving the document and fills the string from the archive when you are loading the document from a file.
Listing 17.1 ShowStringDoc.cpp-CShowStringDoc::Serialize()
void CShowStringDoc::Serialize(CArchive& ar)

{

    if (ar.IsStoring())

    {

        ar << string;

    }

    else

    {

        ar >> string;

    }

}
Initializing the String Whenever a new document is created, you want your application to initialize string to "Hello, world". A new document is created when the user chooses File, New. This message is caught by CShowStringApp (the message map is shown in Listing 17.2) and handled by CWinApp::OnFileNew(). Starter applications generated by AppWizard call OnFileNew() to create a blank document when they run. OnFileNew() calls the document's OnNewDocument() which actually initializes the member variables of the document.
Listing 17.2 ShowString.cpp-Message Map
BEGIN_MESSAGE_MAP(CShowStringApp, CWinApp)

	//{{AFX_MSG_MAP(CShowStringApp)

	ON_COMMAND(ID_APP_ABOUT, OnAppAbout)

		// NOTE - the ClassWizard will add and remove mapping macros here.

		//    DO NOT EDIT what you see in these blocks of generated code!

	//}}AFX_MSG_MAP

	// Standard file based document commands

	ON_COMMAND(ID_FILE_NEW, CWinApp::OnFileNew)

	ON_COMMAND(ID_FILE_OPEN, CWinApp::OnFileOpen)

	// Standard print setup command

	ON_COMMAND(ID_FILE_PRINT_SETUP, CWinApp::OnFilePrintSetup)

END_MESSAGE_MAP()
AppWizard gives you the simple OnNewDocument()shown in Listing 17.3.
Listing 17.3 ShowStringDoc.cpp-CShowStringDoc::OnNewDocument()
BOOL CShowStringDoc::OnNewDocument()

{

    if (!CDocument::OnNewDocument())

        return FALSE;


    // TODO: add reinitialization code here

    // (SDI documents will reuse this document)


    return TRUE;

}
Take away the comments and add this line in their place:
string = "Hello, world!";
(What else could it say, after all?) Leave the call to CDocument::OnNewDocument() because that will handle all the other work involved in making a new document.
Getting the String onto the Screen Whenever your view needs to be drawn, such as when your application is first started, resized, restored, or when a window that had been covering it is taken away, the view's OnDraw() function is called to draw it. AppWizard has provided a skeleton, shown in Listing 17.4.
Listing 17.4 ShowStringView.cpp-CShowStringView::OnDraw()
void CShowStringView::OnDraw(CDC* pDC)

{

    CShowStringDoc* pDoc = GetDocument();

    ASSERT_VALID(pDoc);


    // TODO: add draw code for native data here

}
OnDraw() takes a pointer to a device context, discussed in the "Understanding Device Contexts" section of Chapter 11, "Drawing on the Screen." The device context class, CDC, has a member function called DrawText() that draws text on the screen. It is declared like this:
int DrawText( const CString& str, LPRECT lpRect, UINT nFormat )
The CString to be passed to this function is going to be the string from the document class, which can be accessed as pDoc->GetString(). The lpRect is the client rectangle of the view, returned by GetClientRect(). Finally, nFormat is the way the string should be displayed; for example, DT_CENTER means that the text should be centered from left to right within the view. DT_VCENTER means that the text should be centered up and down, but this works only for single lines of text that are identified with DT_SINGLELINE. Multiple format flags can be combined with |, so DT_CENTER|DT_VCENTER|DT_SINGLELINE is the nFormat that you want. The drawing code to be added to CShowStringView::OnDraw() looks like this:
CRect rect;

GetClientRect(&rect);

pDC->DrawText(pDoc->GetString(), &rect, DT_CENTER|DT_VCENTER|DT_SINGLELINE);
This sets up a CRect and passes its address to GetClientRect(), which sets the CRect to the client area of the view. DrawText() draws the document's string in the rectangle, centered vertically and horizontally.
At this point, the application should display the string properly. Build it, execute it, and you should see something like Figure 17.2. You have quite a lot of functionality: menus, toolbars, status bar, and so on, but nothing real, yet. Starting with the next section, that will change.
Figure 17.2 : ShowString starts simply, with the usual greeting.
AppWizard creates two menus for you, shown in the ResourceView window in Figure 17.3. IDR_MAINFRAME is the menu shown when no file is open; IDR_SHOWSTTYPE is the menu shown when a ShowString document is open. Notice that IDR_MAINFRAME has no View or Window menus and that the File menu is much shorter than the one on the IDR_SHOWSTTYPE menu, with only New, Open, Print Setup, recent files, and Exit items.
Figure 17.3 : AppWizard creates two menus for ShowString.
You are going to add a menu item to ShowString, so the first decision is where to add it. The user will be able to edit the string that is displayed and to set the format of the string. You could add a Value item to the Edit menu that brings up a small dialog for only the string and then create a Format menu with one item, Appearance, that brings up the dialog to set the appearance. But the choice you are going to see here is to combine everything into one dialog and then put it on a new Tools menu, under the Options item. You may have noticed already that more and more Windows applications are standardizing on Tools, Options as the place for miscellaneous settings.
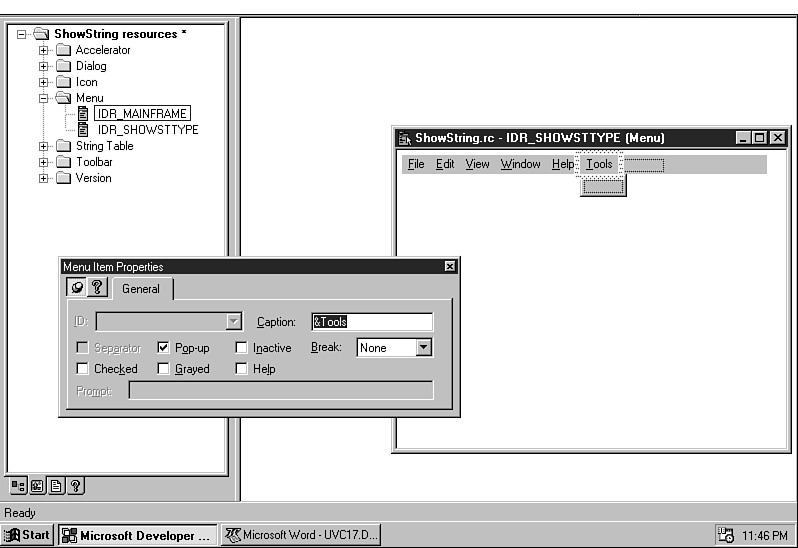
Do you need to add the item to both menus? No. When there is no document open, there is nowhere to save the changes made with this dialog. So only IDR_SHOWSTTYPE needs to have a menu added. Bring up the menu by double-clicking on it in the ResourceView window. At the far right of the menu, after Help, is an empty menu. Click on it and type &Tools. The Properties window will appear; pin it to the background by clicking the pushpin. The Caption box will contain &Tools. The menu at the end becomes the Tools menu, with an empty item underneath it; another empty menu then appears to the right of the Tools menu, as shown in Figure 17.4.
Figure 17.4 : Adding the Tools menu is easy in the ResourceView window.
| TIP |
The & in the Caption edit box indicates which letter should act as the key to select the menu item when it is displayed. This letter will be underlined in the menu. There is no further work required on your part. |
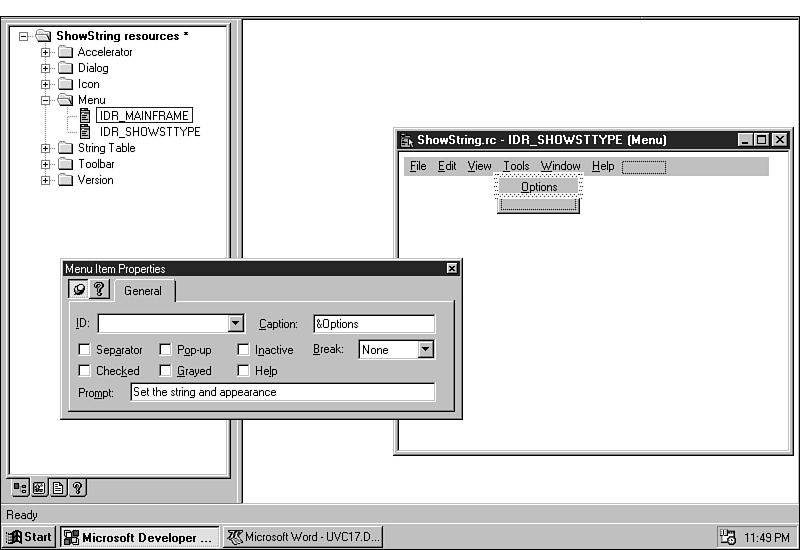
Click the new Tools menu and drag it between the View and Window menus, corresponding to the position of Tools in products like Developer Studio and Microsoft Word. Next, click the empty subitem. The Properties box changes to show the blank properties of this item; change the caption to &Options and enter a sensible prompt, as shown in Figure 17.5.
Figure 17.5 : The menu item Tools, Options will control everything that ShowString does.
All menu items have a resource ID, and this resource ID is the way the menu items are connected to your code. Developer Studio will choose a good one for you, but it doesn't appear in the Properties box right away. Click on some other menu item and then click on Options again, and you'll see that the resource ID is ID_TOOLS_OPTIONS. Alternatively, press Enter when you are finished and the highlight will move down to the empty menu item below Options. Press the UpArrow cursor key to return the highlight to the Options item.
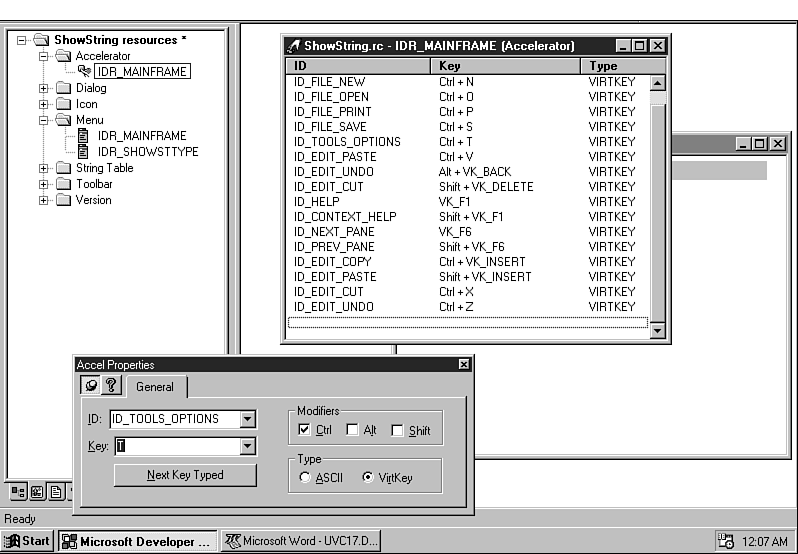
If you'd like to provide an accelerator, such as Ctrl+C for Edit, Copy, this is a good time to do it. Click Accelerator in the ResourceView window and then double-click IDR_MAINFRAME, the only Accelerator table in this application. At a glance, you can see what key combinations are already in use. Ctrl+O and Ctrl+P are already taken, but Ctrl+T is available. To connect Ctrl+T to Tools, Options, follow these steps:
Figure 17.6 shows the properties box for this accelerator after clicking on the newly entered line again.
Figure 17.6 : Keyboard accelerators are connected to resource IDs.
What happens when the user chooses this new menu item, Tools, Options? A dialog is displayed. So, tempting as it may be to start connecting this menu to code, it makes more sense to build the dialog first.
As discussed in Chapter 7 "Dialog and Controls," a dialog box is a special kind of window. The controls on it are also windows. Because they are contained within the dialog box, they are child windows, and the dialog box is their parent window. There are two types of dialog boxes:
The examples of modal and modeless dialog boxes are both common dialog boxes available to any Windows application. But of course many applications need dialogs that have not been conveniently provided by Microsoft, and ShowString is no exception. ShowString is actually going to have two custom dialogs: one brought up by Tools, Options, and an About box. An About box has been provided by AppWizard but needs to be changed a little, and the Options box will be built from scratch.
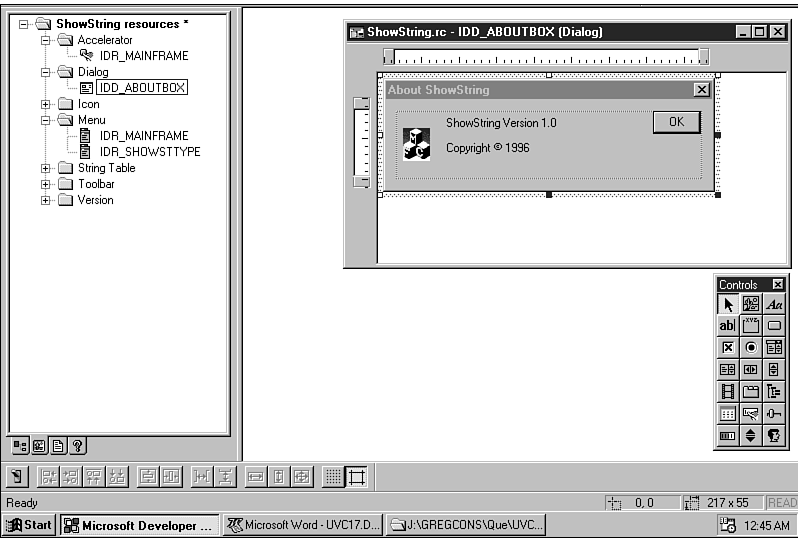
Figure 17.7 shows the About box that AppWizard makes for you; it will do as an About box. It contains the name of the application and the current year. To view the About box for ShowString, click on the ResourceView tab in the project workspace window. Expand the Dialogs list by clicking the + icon next to the word Dialogs, and then double click on IDD_ABOUTBOX to bring up the About dialog box resource.
Figure 17.7 : AppWizard makes an About box for you.
You might want to add a company name to your About box. Here's how to add "Que Books," as an example. Click the line of text that reads Copyright 1996, and it will be surrounded by a selection box. Bring up the properties box, if it is not up. Edit the caption to add Que Books at the end; the changes are reflected immediately in the dialog.
| TIP |
If the rulers you see in Figure 17.7 don't appear when you open IDD_ABOUTBOX in Developer Studio, you can turn them on by choosing Layout, Guide Settings and selecting the Rulers and Guides radio button in the top half of the Guide Settings dialog box. |
I decided to add a text string reminding users what book this application is from. Here's how to do that:
The About box should look like Figure 17.8.
Figure 17.8 : In a matter of minutes, your About box can be customized.
| TIP |
All the Layout menu items are on the Dialog toolbar. |
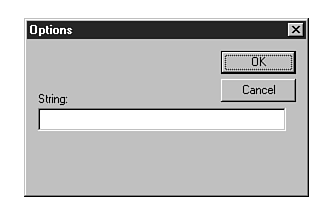
The Options dialog is pretty simple to build. First, make a new dialog by choosing Insert, Resource and then double-clicking Dialog. An empty dialog called Dialog1 appears, with an OK and a Cancel button, as shown in Figure 17.9.
Figure 17.9 : A new dialog always has OK and Cancel buttons.
Next, follow these steps to convert the empty dialog into the Options dialog:
You will revisit this dialog later, when adding the appearance abilities, but for now it's ready to be connected. It should look like Figure 17.10.
Figure 17.10 : The Options dialog is the place to change the string.
When the user chooses Tools, Options, the Options dialog should be displayed. You use ClassWizard to arrange for one of your functions to be called when the item is chosen, and then you write the function, which will create an object of your dialog class and then display it.
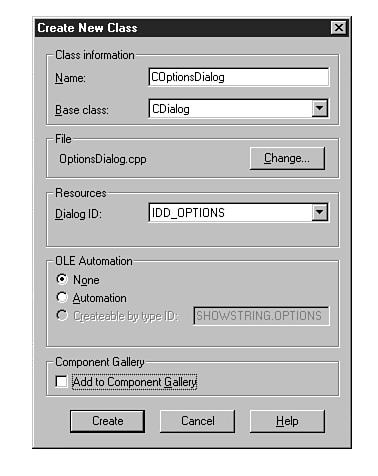
ClassWizard will make the dialog class for you. While the window displaying the IDD_OPTIONS dialog has focus, choose View, ClassWizard. ClassWizard realizes there is not yet a class that corresponds to this dialog and offers to create one, as shown in Figure 17.11. Leave Create a new class selected and then click OK.
Figure 17.11 : Create a C++ class to go with the new dialog.
The Create New Class dialog, shown in Figure 17.12, appears. Fill it in as follows:
Perhaps you're curious about what code was created for you when ClassWizard made the class. The header file is shown in Listing 17.5.
Listing 17.5 OptionsDialog.h-Header File for COptionsDialog
// OptionsDialog.h : header file

//


/////////////////////////////////////////////////////////////////////////////

// COptionsDialog dialog


class COptionsDialog : public CDialog

{

// Construction

public:

    COptionsDialog(CWnd* pParent = NULL);   // standard constructor


// Dialog Data

    //{{AFX_DATA(COptionsDialog)

    enum { IDD = IDD_OPTIONS };

    CString     m_string;

    //}}AFX_DATA

// Overrides

    // ClassWizard generated virtual function overrides

    //{{AFX_VIRTUAL(COptionsDialog)

    protected:

    virtual void DoDataExchange(CDataExchange* pDX);    // DDX/DDV support

    //}}AFX_VIRTUAL

// Implementation

protected:

    // Generated message map functions

    //{{AFX_MSG(COptionsDialog)

        // NOTE: the ClassWizard will add member functions here

    //}}AFX_MSG

    DECLARE_MESSAGE_MAP()

};
There are an awful lot of comments here to help ClassWizard find its way around in the file when the time comes to add more functionality, but there is only one member variable, m_string; one constructor; and one member function, DoDataExchange(), which gets the control value into the member variable, or vice versa. The source file is not much longer; it's shown in Listing 17.6.
Listing 17.6 OptionsDialog.cpp-Implementation File for COptionsDialog
// OptionsDialog.cpp : implementation file

//


#include "stdafx.h"

#include "ShowString.h"

#include "OptionsDialog.h"


#ifdef _DEBUG

#define new DEBUG_NEW

#undef THIS_FILE

static char THIS_FILE[] = __FILE__;

#endif

/////////////////////////////////////////////////////////////////////////////

// COptionsDialog dialog

COptionsDialog::COptionsDialog(CWnd* pParent /*=NULL*/)

    : CDialog(COptionsDialog::IDD, pParent)

{

    //{{AFX_DATA_INIT(COptionsDialog)

    m_string = _T(__);

    //}}AFX_DATA_INIT

}

void COptionsDialog::DoDataExchange(CDataExchange* pDX)

{

    CDialog::DoDataExchange(pDX);

    //{{AFX_DATA_MAP(COptionsDialog)

    DDX_Text(pDX, IDC_OPTIONS_STRING, m_string);

    //}}AFX_DATA_MAP

}

BEGIN_MESSAGE_MAP(COptionsDialog, CDialog)

    //{{AFX_MSG_MAP(COptionsDialog)

        // NOTE: the ClassWizard will add message map macros here

    //}}AFX_MSG_MAP

END_MESSAGE_MAP()
The constructor sets the string to an empty string; this code is surrounded by special ClassWizard comments that will enable it to add other variables later. The DoDataExchange() function calls DDX_Text() to transfer data from the control with the resource ID IDC_OPTIONS_STRING to the member variable m_string, or vice versa. This code, too, is surrounded by ClassWizard comments. Finally, there is an empty message map, because COptionsDialog doesn't catch any messages.
There are seven classes in ShowString: CAboutDlg, CChildFrame, CMainFrame, COptionsDialog, CShowStringApp, CShowStringDoc, and CShowStringView. Which one should catch the command that is sent when the user chooses the menu item Tools, Options? The string and the options will be saved in the document and displayed in the view, so one of those two classes should handle the changing of the string. The document owns the private variable and will not let the view change the string unless you implement a public function to set the string. So it makes the most sense to have the document catch the message.
To catch the message, follow these steps:
Figure 17.13 : ClassWizard suggests a good name for the message-catching function.
| TIP |
You should almost never change the names that ClassWizard suggests for message catchers. If you find that you have to, be sure to choose a name that starts with On. |
What happened to CShowStringDoc when you arranged for the ID_TOOLS_OPTIONS message to be caught? The new message map in the header file is shown in Listing 17.7.
Listing 17.7 ShowStringDoc.h-Message Map for CShowStringDoc
// Generated message map functions

protected:

    //{{AFX_MSG(CShowStringDoc)

    afx_msg void OnToolsOptions();

    //}}AFX_MSG

    DECLARE_MESSAGE_MAP()
This is just declaring the function. In the source file, ClassWizard changed the message map as shown in Listing 17.8.
Listing 17.8 ShowStringDoc.cpp-Message Map for CShowStringDoc
BEGIN_MESSAGE_MAP(CShowStringDoc, CDocument)

    //{{AFX_MSG_MAP(CShowStringDoc)

    ON_COMMAND(ID_TOOLS_OPTIONS, OnToolsOptions)

    //}}AFX_MSG_MAP

END_MESSAGE_MAP()
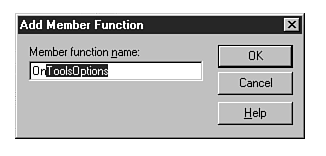
This arranges for OnToolsOptions() to be called when the command ID_TOOLS_OPTIONS is sent. ClassWizard also added a skeleton for OnToolsOptions():
void CShowStringDoc:: OnToolsOptions()

{

    // TODO: Add your command handler code here


}
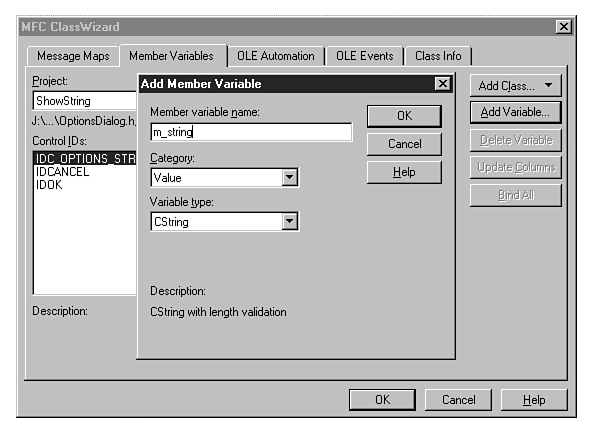
OnToolsOptions() should initialize and display the dialog and then do something with the value that the user provided. In order to initialize the edit control on the dialog, and to use the value that the user entered, the edit box control needs to be connected to a member variable of COptionsDialog. ClassWizard handles this very nicely. Here's what to do:
You're ready to write OnToolsOptions(), shown in Listing 17.9.
Listing 17.9 ShowStringDoc.cpp-OnToolsOptions()
]void CShowStringDoc::OnToolsOptions()

{

    COptionsDialog dlg;

    dlg.m_string = string;

    if (dlg.DoModal() == IDOK)

    {

        string = dlg.m_string;

        SetModifiedFlag();

        UpdateAllViews(NULL);

    }


}
This code fills the member variable of the dialog with the member variable of the document (ClassWizard added m_string as a public member variable of COptionsDialog, so the document can change it) and then puts up the dialog by calling DoModal(). If the user clicks OK, the member variable of the document is changed, the modified flag is set (so that the user will be prompted to save the document on exit), and the view is asked to redraw itself with a call to UpdateAllViews(). In order for this to compile, of course, the compiler must know what a COptionsDialog is, so add this line at the beginning of ShowStringDoc.cpp:
#include "OptionsDialog.h"
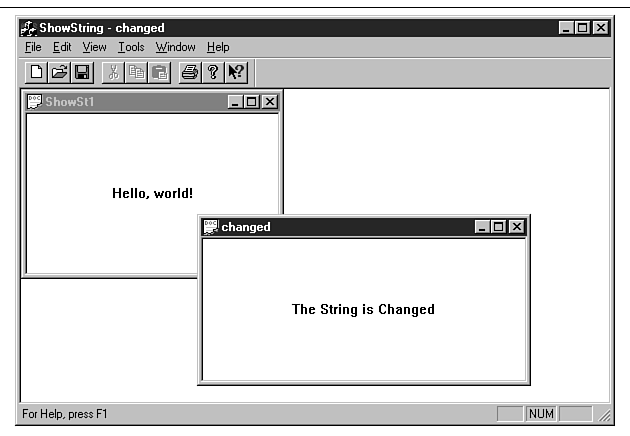
At this point, you can build the application and run it. Choose Tools, Options and change the string. Click OK and you'll see the new string in the view. Exit the application, and you'll be asked whether to save the file. Save it, restart the application, and open the file again. The default "Hello world" document remains open, and the changed document is open with a different string. The application works, as you can see in Figure 17.15 (the windows are resized to let them both fit in the figure.)
Figure 17.15 : ShowString can change the string, save it to a file, and reload it.
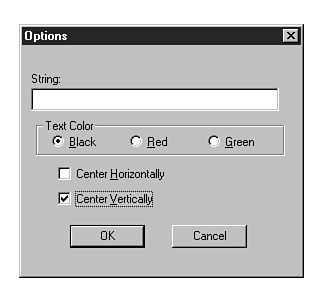
ShowString doesn't have much to do, just demonstrate menus and dialogs. But the only dialog control that ShowString uses is an edit box. In this section, you add a set of radio buttons and check boxes to change the way the string is drawn in the view.
It is quite simple to incorporate a full-fledged Font dialog into an application, but the example in this section is going to do something much simpler. A group of radio buttons will let the user choose among several colors. One check box will allow the user to specify that the text should be centered horizontally, and another will allow that the text be centered vertically. Because these are check boxes, the text can be either, neither, or both.
Open the IDD_OPTIONS dialog by double-clicking on it in the ResourceView window and then add the radio buttons by following these steps:
Next, add the check boxes by follwing these steps:
Figure 17.16 : The options dialog for ShowString has been expanded.
| TIP |
If you don't recognize the icons on the Controls toolbar, use the tooltips. If you hold the cursor over any of the toolbar buttons, a tip will pop up after a few seconds, telling you what control the button represents. |
Finally, set the tab order by choosing Layout, Tab Order and clicking on the controls, in this order:
Then click away from the dialog to leave the two static text controls as positions 9 and 10.
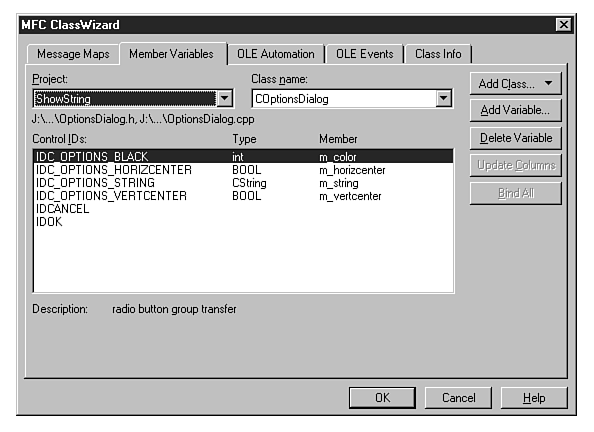
Having added controls to the dialog, you need to add corresponding member variables to the class, COptionsDialog. Bring up ClassWizard and add member variables for each control. Figure 17.17 shows the summary of the member variables created. The check boxes are connected to BOOL variables; these member variables will be TRUE if the box is checked and FALSE if it is not. The radio buttons are handled differently. Only the first-the one with the Group box checked in its properties box-is connected to a member variable. That integer is a zero-based index that indicates which button is selected. In other words, when the Black button is selected, m_color will be 0; when Red is selected, m color will be 1; and when Green is selected, m_color will be 2.
The variables to be added to the document are the same ones that were added to the dialog. They need to be added to the CShowStringDoc class definition in the header file, to OnNewDocument(), and to Serialize(). The top few lines of the class definition should now look like Listing 17.10.
Listing 17.10 ShowStringDoc.h-CShowStringDoc Member Variables
private:

    CString string;

    int    color;

    BOOL horizcenter;

    BOOL vertcenter;

public:

    CString GetString() {return string;}

    int    GetColor() {return color;}

    BOOL GetHorizcenter() {return horizcenter;}

    BOOL GetVertcenter() {return vertcenter;}
As with string, these are private variables with public get functions but no set functions. All these options should be serialized; the new Serialize() is shown in Listing 17.11.
Listing 17.11 ShowStringDoc.cpp-Serialize()
void CShowStringDoc::Serialize(CArchive& ar)

{

    if (ar.IsStoring())

    {

        ar << string;

        ar << color;

        ar << horizcenter;

        ar << vertcenter;

    }

    else

    {

        ar >> string;

        ar >> color;

        ar >> horizcenter;

        ar >> vertcenter;

    }

}
What are good defaults for these new member variables? Black text, centered in both directions, was the old behavior, and it makes sense to use it as the default. The new OnNewDocument() is shown in Listing 17.12.
Listing 17.12 ShowStringDoc.cpp-OnNewDocument()
BOOL CShowStringDoc::OnNewDocument()

{

    if (!CDocument::OnNewDocument())

        return FALSE;


    string = "Hello, world!";

    color = 0;     //black

    horizcenter = TRUE;

    vertcenter = TRUE;


    return TRUE;

}
Of course, at the moment, these member variables are never changed from these defaults. To allow the user to change the variables, you will have to change the function that handles the dialog box.
The OnToolsOptions() function sets the values of the dialog member variables from the document member variables and then displays the dialog. If the user clicked OK, the document member variables are set from the dialog member variables and the view is redrawn. Having just added three member variables to the dialog and the document, you have three lines to add before the dialog is displayed and then three more to add in the block that's called after OK is clicked. The new OnToolsOptions() is shown in Listing 17.13.
Listing 17.13 ShowStringDoc.cpp-OnToolsOptions()
void CShowStringDoc::OnToolsOptions()

{

    COptionsDialog dlg;

    dlg.m_string = string;

    dlg.m_color = color;

    dlg.m_horizcenter = horizcenter;

    dlg.m_vertcenter = vertcenter;


    if (dlg.DoModal() == IDOK)

    {

        string = dlg.m_string;

        color = dlg.m_color;

        horizcenter = dlg.m_horizcenter;

        vertcenter = dlg.m_vertcenter;

        SetModifiedFlag();

        UpdateAllViews(NULL);

    }


}
So what happens when the user brings up the dialog box and changes the value of a control, say, by unselecting Center Horizontally? The framework-through Dialog Data Exchange (DDX), as set up by ClassWizard-changes the value of COptionsDialog::m_horizcenter to FALSE. This code in OnToolsOptions() changes the value of CShowStringDoc::horizcenter to FALSE. When the user saves the document, Serialize() will save horizcenter. This is all good, but none of this code actually changes the way the view is drawn. That involves OnDraw().
The single call to DrawText() in OnDraw() gets a little more complex now. The document member variables are used to set the appearance of the view.
The color is set with CDC::SetTextColor() before the call to DrawText(). It's a good idea to save the old text color and restore it when you are finished. The parameter to SetTextColor() is a COLORREF, and you can directly specify combinations of red, green, and blue as hex numbers in the form 0x00bbggrr, so that, for example, 0x000000FF is bright red. Most people prefer to use the RGB macro, which takes hex numbers from 0x0 to 0xFF, specifying the amount of each color; bright red is RGB(FF,0,0). Add the lines shown in Listing 17.14 lines before the call to DrawText() to set up everything.
Listing 17.14 ShowStringDoc.cpp-OnDraw () Additions Before DrawText() Call
COLORREF oldcolor;

switch (pDoc->GetColor())

{

case 0:

    oldcolor = pDC->SetTextColor(RGB(0,0,0)); //black

    break;

case 1:

    oldcolor = pDC->SetTextColor(RGB(0xFF,0,0)); //red

    break;

case 2:

    oldcolor = pDC->SetTextColor(RGB(0,0xFF,0)); //green

    break;

}
Add this line after the call to DrawText():
pDC->SetTextColor(oldcolor);
There are two approaches to setting the centering flags. The brute-force way is to list the four possibilities (neither, horizontal, vertical, and both) and have a different DrawText() statement for each. If you were to add other settings, this would quickly become unworkable. It's better to set up an integer to hold the DrawText() flags and "or in" each flag, if appropriate. Add the lines shown in Listing 17.15 before the call to DrawText().
Listing 17.15 ShowStringDoc.cpp-OnDraw () Additions After DrawText() Call
    int DTflags = 0;

    if (pDoc->GetHorizcenter())

    {

        DTflags |= DT_CENTER;

    }

    if (pDoc->GetVertcenter())

    {

        DTflags |= (DT_VCENTER|DT_SINGLELINE);

    }
The call to DrawText() now uses the DTflags variable:
pDC->DrawText(pDoc->GetString(), &rect, DTflags);
Now the settings from the dialog box have made their way to the dialog class, to the document, and finally to the view, to actually affect the appearance of the text string. Build and execute ShowString and then try it out. Any surprises?
This is not the last you will see of ShowString; it will reappear in Chapter 21, "Help," and throughout Part IV, "ActiveX Applications and ActiveX Controls." But there's a lot of other material to cover between here and there. The rest of this part of the book presents sample applications and how-to instructions for everyday tasks all developers face: