![]()
![]()
![]()
In the last two days you learned about JavaScript and VBScript. You might be wondering what all this stuff has to do with Visual J++ and Java applets. Today you will answer this question by building a document that contains an applet, an ActiveX
control, an HTML form, and a script. The ability to combine all of these elements through scripting can be very powerful indeed.
You will begin by building a simple Java applet and inserting it into an HTML file. You will then briefly review how to pass parameters to the applet from within the HTML file.
The example will then be expanded to show how to use JavaScript and VBScript to access the applet's methods and variables. Finally, ActiveX controls will be introduced to the example and you will glue everything together with JavaScript and VBScript.
This final example will demonstrate using scripts to communicate between both an HTML form and an ActiveX control to an applet.
The applet that you will use throughout today's lesson simply draws a circle of the color that is specified. The applet will have three parameters that are used to control the color of the circle. These parameters are r, g, and b. They are used to
indicate the red, blue, and green components for the color of the circle. The valid range of values of each of the color components is 0 to 255.
You will first build the applet using Visual J++. The applet will then be integrated into HTML and the color of the circle will be set by passing parameters. The second half of the day will be spent exploring different ways to control the applet (set
the color) using scripts, forms, and ActiveX controls.
The first step is run Applet Wizard to create a new applet. If you are unfamiliar with Applet Wizard, you might wish to review Day 9.
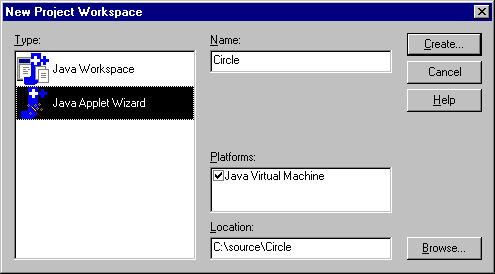
Perform the following steps to create a new project. Refer to Figure 21.1 as you perform the following steps:
Figure 21.1. Creating the Circle Project.
The applet should be named Circle. Refer to Figure 21.2 as you perform the following steps:
Figure 21.2. Step 1 of Applet Wizard.
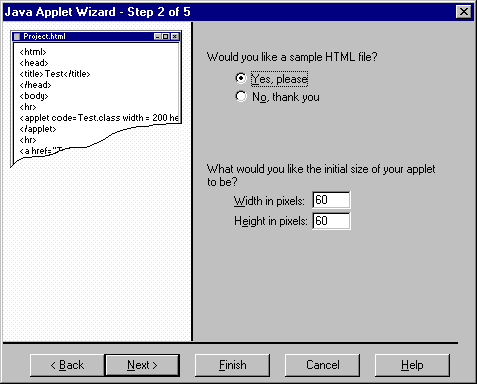
The width and height of the applet should be set to 60. Refer to Figure 21.3 as you perform the following steps:
Figure 21.3. Step 2 of Applet Wizard.
The Circle applet will not need support for animation or multi-threading. To keep things simple, these two options should be disabled. Refer to Figure 21.4 as you perform the following steps:
Figure 21.4. Step 3 of the Applet Wizard.
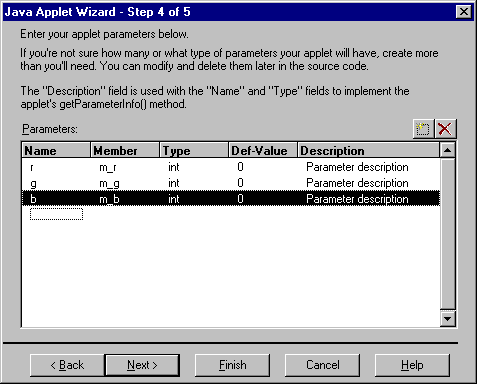
The Circle applet will need three parameters for passing red, green, and blue color values. Refer to Figure 21.5 as you perform the following steps:
Figure 21.5. Step 4 of Applet Wizard.
All that is left is to enter the author information and let Applet Wizard generate the code. Refer to Figure 21.6 as you perform the following steps:
Figure 21.6. Step 5 of Applet Wizard.
The generated code is shown in Listing 21.1. A few of the comments have been removed to simplify the listing.
Listing 21.1. The basic Circle applet
//****************************************************************************


// Circle.java:    Applet


//


//****************************************************************************


import java.applet.*;


import java.awt.*;


//============================================================================


// Main Class for applet Circle


//


//============================================================================


public class Circle extends Applet


{


    //------------------------------------------------------------------------


    // Members for applet parameters


    // <type>       <MemberVar>    = <Default Value>


    //------------------------------------------------------------------------


    private int m_r = 0;


    private int m_g = 0;


    private int m_b = 0;


    // Parameter names.  To change a name of a parameter, you need only make


    // a single change.  Simply modify the value of the parameter string below.


    //------------------------------------------------------------------------


    private final String PARAM_r = "r";


    private final String PARAM_g = "g";


    private final String PARAM_b = "b";


    // Circle Class Constructor


    //------------------------------------------------------------------------


    public Circle()


    {


        // TODO: Add constructor code here


    }


    // APPLET INFO SUPPORT:


    //   The getAppletInfo() method returns a string describing the applet's


    // author, copyright date, or miscellaneous information.


       //------------------------------------------------------------------------


    public String getAppletInfo()


    {


        return "Name: Circle\r\n" +


               "Author: David Blankenbeckler\r\n" +


               "Created with Microsoft Visual J++ Version 1.0";


    }


    // PARAMETER SUPPORT


    //   The getParameterInfo() method returns an array of strings describing


    // the parameters understood by this applet.


    //


       // Circle Parameter Information:


       //  { "Name", "Type", "Description" },


       //------------------------------------------------------------------------


    public String[][] getParameterInfo()


    {


        String[][] info =


        {


            { PARAM_r, "int", "Parameter description" },


            { PARAM_g, "int", "Parameter description" },


            { PARAM_b, "int", "Parameter description" },


        };


        return info;


    }


    // The init() method is called by the AWT when an applet is first loaded or


    // reloaded.  Override this method to perform whatever initialization your


    // applet needs, such as initializing data structures, loading images or


    // fonts, creating frame windows, setting the layout manager, or adding UI


    // components.


       //------------------------------------------------------------------------


    public void init()


    {


        // PARAMETER SUPPORT


        //   The following code retrieves the value of each parameter


        // specified with the <PARAM> tag and stores it in a member


        // variable.


        //--------------------------------------------------------------------


        String param;


        // r: Parameter description


        //--------------------------------------------------------------------


        param = getParameter(PARAM_r);


        if (param != null)


            m_r = Integer.parseInt(param);


        // g: Parameter description


        //--------------------------------------------------------------------


        param = getParameter(PARAM_g);


        if (param != null)


            m_g = Integer.parseInt(param);


        // b: Parameter description


        //--------------------------------------------------------------------


        param = getParameter(PARAM_b);


        if (param != null)


            m_b = Integer.parseInt(param);


//----------------------------------------------------------------------


        resize(60, 60);


        // TODO: Place additional initialization code here


    }


    // Place additional applet clean up code here.  destroy() is called when


    // when you applet is terminating and being unloaded.


    //------------------------------------------------------------------------


    public void destroy()


    {


        // TODO: Place applet cleanup code here


    }


    // Circle Paint Handler


    //------------------------------------------------------------------------


    public void paint(Graphics g)


    {


        g.drawString("Created with Microsoft Visual J++ Version 1.0", 10, 20);


    }


    //   The start() method is called when the page containing the applet


    // first appears on the screen. The AppletWizard's initial implementation


    // of this method starts execution of the applet's thread.


    //------------------------------------------------------------------------


    public void start()


    {


        // TODO: Place additional applet start code here


    }


    //   The stop() method is called when the page containing the applet is


    // no longer on the screen. The AppletWizard's initial implementation of


    // this method stops execution of the applet's thread.


    //------------------------------------------------------------------------


    public void stop()


    {


    }


    // TODO: Place additional applet code here


}
The Java applet is almost complete! All you have to do now is add a few lines of code to draw a circle. Java has a function in the java.awt.Graphics class that can be used to draw the circle. To use this class you must first import it into your source.
Visual J++ has already done this with the following line at the beginning of the source:
import java.awt.*;
All that remains is to add the code to set the color and draw the circle. For more information about the java.awt.Graphics class, see to Day 10.
Before drawing the circle, you need to set the color. This can be accomplished with the setColor() method. After setting the color you can draw the circle using the fillOval() method.
Replace the default line that the Applet Wizard placed in Circle's paint method (g.drawString(Created with. . .) with the following lines:
public void paint(Graphics g)


{


   g.setColor(new Color(m_R, m_G, m_B));


   g.fillOval(10, 10, 40, 40);


}
As you can see, the setColor() function will use the parameters that you passed for red, green, and blue to set the color. These are the parameters that were defined in Figure 21.5.
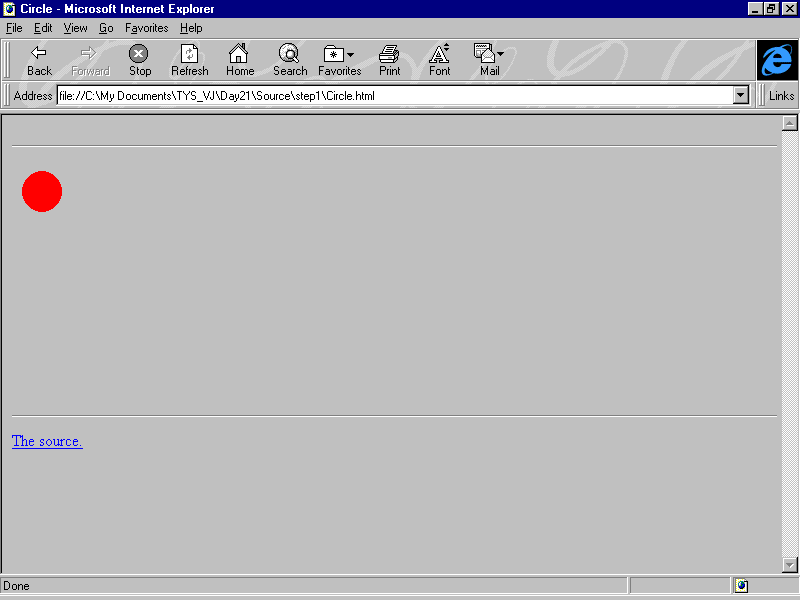
You can now build the Java applet and view it in your Java-enabled Web browser. You can use the Circle.html file that was created automatically by the Applet Wizard to view the applet. The output should appear similar to Figure 21.7.
Figure 21.7. The Circle applet.
Figure 21.8. The Applet Wizard-generated Circle.html.
Your applet, Circle, is included in the document by the <APPLET> tag. The code= attribute is used to specify the Circle class. In addition, you can see the initial height and width of the applet is set to 60.
The ID attribute that was automatically inserted by Applet Wizard is not a standard attribute for the <APPLET> tag. Instead, the NAME attribute should be used. The ID or NAME attribute is used when referencing the applet elsewhere in the HTML
file, such as in a script. Although the ID attribute will work properly for Internet Explorer 3.0, it will not work correctly with Netscape Navigator 3.0. For this reason, the ID attribute should be changed to NAME. The NAME attribute will work properly
for both browsers. Change the ID attribute to NAME as follows:
<applet


    code=Circle.class


    name=Circle


    width=60


    height=60 >


    <param name=r value=0>


    <param name=g value=0>


    <param name=b value=0>


</applet>
The three parameters that you created, r, g, and b, were also automatically created in the HTML file by Applet Wizard. As you can see, all three of these were set to 0, which represents the color black.
In order to change the initial color of the circle, you need to set the parameters to different values. For example, the following HTML code will create a green circle because parameter g is set to 255 and the other two are set to 0.
<html>


<head>


<title>Circle</title>


</head>


<body>


<hr>


<applet


    code=Circle.class


    name=Circle


    width=60


    height=60 >


    <param name=r value=0>


    <param name=g value=255>


    <param name=b value=0>


</applet>


<hr>


<a href="Circle.java">The source.</a>


</body>


</html>
Although this is useful for specifying the default color, it does not give you dynamic control over the color of the circle. In order to change the color of the circle dynamically, you need to use a scripting language such as VBScript or JavaScript (or
build that functionality into the Java applet itself). You will now explore the use of VBScript and JavaScript in controlling a Java applet.
You will now add buttons to the form so that the user can change the color of the circle. But first, you need to add a function to your applet to provide you access to the variables m_r, m_g, and m_b. These three variables are private variables that
the applet sets to the values of the passed parameters, r, g, and b.
You could simply make the m_r, m_g, and m_b variables public. However, as you learned earlier this week, this is not good object-oriented programming practice. Instead, an accessor method should be used to change the values of these variables. Instead
of creating three different accessor methods (one for each r, g, and b), you can simply create a single method called setCircleColor.
public void setCircleColor(int red, int green, int blue)


{


   m_r = red;


   m_g = green;


   m_b = blue;


}
You also need to create a means to make the applet repaint. Simply changing the member variables for the colors will not cause the circle to be repainted. This is easily accomplished, however, by adding a call to the repaint() method in your
setCircleColor method, such as the following example:
public void setCircleColor(int red, int green, int blue)


{


m_r = red;


m_g = green;


m_b = blue;


repaint();


}
Because you have declared the setCircleColor method as public, you can access it from a script in an HTML document. The new version of your Circle applet can now be rebuilt.
After rebuilding your applet you will most likely need to restart the Web browser because the old version will still be in the cache.
With these changes you can now access the private member variables, m_r, m_g, and m_b, from your script using the accessor method that you created called setCircleColor. You will first add three buttons to change the color to either red, green, or
blue. These buttons can be added by placing the following form definition after the applet definition in Circle.html:
<FORM>


<INPUT TYPE="BUTTON" NAME="cmdRED" VALUE="RED"><P>


<INPUT TYPE="BUTTON" NAME="cmdGREEN" VALUE="GREEN"><P>


<INPUT TYPE="BUTTON" NAME="cmdBLUE" VALUE="BLUE"><P>


</FORM>
The preceding form definition will create three buttons named cmdRED, cmdGREEN, and cmdBLUE. You now need an event handler script for the On_Click event for each button. Each of the On_Click event handlers will set the color variables to the
appropriate values using the setCircleColor method that you created. For example, to handle the clicking of the red button you would use the following:
Sub cmdRED_OnClick


   call document.Circle.setCircleColor(255, 0, 0)


End Sub
As you can see, accessing the private variables of an applet through a public accessor method is fairly easy. Although it is similarly easy to access the variables directly by defining them as public, this is generally not good programming practice.
However, if it is desired, it is simply a matter of defining the variable with the public modifier. The variable can then be defined just like the method, such as the following example:
' DO NOT ADD THIS TO THE SCRIPT WE ARE BUILDING


' THIS IS JUST AN EXAMPLE OF ACCESSING PUBLIC VARIABLES OF AN APPLET


Sub directVariableAccess


   document.Circle.m_r = 255


   document.Circle.m_g = 0


   document.Circle.m_b = 0


End Sub
Adding the event handlers for the green and blue buttons is accomplished in a similar manner: by calling the setCircleColor method with the appropriate parameters. Listing 21.2 shows the modified HTML file after the addition of the buttons and their
associated event handlers.
Listing 21.2. Controlling the Circle Applet with VBScript.
<html>


<head>


<title>Circle</title>


</head>


<body>


<hr>


<applet


    code="Circle.class"


    name=Circle


    width=60


    height=60 >


    <param name=R value=0>


    <param name=G value=0>


    <param name=B value=0>


</applet>


<SCRIPT LANGUAGE="VBScript">


Sub cmdRED_OnClick


   call document.Circle.setCircleColor(255, 0, 0)


End Sub


Sub cmdGREEN_OnClick


   call document.Circle.setCircleColor(0, 255, 0)


End Sub


Sub cmdBLUE_OnClick


   call document.Circle.setCircleColor(0, 0, 255)


End Sub


</SCRIPT>


<FORM>


<INPUT TYPE="BUTTON" NAME="cmdRED" VALUE="RED"><P>


<INPUT TYPE="BUTTON" NAME="cmdGREEN" VALUE="GREEN"><P>


<INPUT TYPE="BUTTON" NAME="cmdBLUE" VALUE="BLUE"><P>


</FORM>


<hr>


<a href="Circle.java">The source.</a>


</body>


</html>
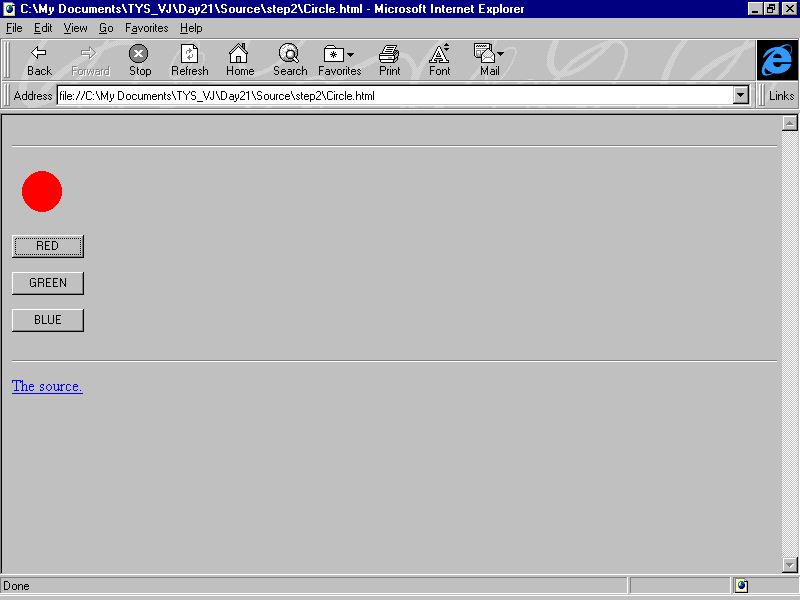
You can now view the changes to Circle.html in your Web browser. Clicking one of the three buttons changes the color of the circle. The output should now appear similar to Figure 21.9.
Figure 21.9. The Circle applet with VBScript.
Controlling an applet with JavaScript is very similar to using VBScript, the difference being entirely related to the syntax of the language. The form definition for JavaScript is slightly different because you specify the event handler code in the
form control tag. For example, the form definition would be as follows:
<FORM>


<INPUT TYPE="BUTTON" NAME="cmdRED" VALUE="RED" onClick="setRED()"><P>


<INPUT TYPE="BUTTON" NAME="cmdGREEN" VALUE="GREEN" onClick="setGREEN()"><P>


<INPUT TYPE="BUTTON" NAME="cmdBLUE" VALUE="BLUE" onClick="setBLUE()"><P>


</FORM>
As you can see, the first button, named cmdRED has an onClick event handler called setRED(). Similarly, there is an onClick event handler for the green and blue buttons. The event handlers would then be added as follows:
function setRED() {


   document.Circle.setCircleColor(255,0,0);


}
The setGREEN and setBLUE event handlers should be added in a similar fashion, changing the calling parameters appropriately. The complete HTML listing should now look as shown in Listing 21.3.
Listing 21.3. Controlling the Circle Applet with JavaScript.
<html>


<head>


<title>Circle</title>


</head>


<body>


<hr>


<applet


    code="Circle.class"


    name=Circle


    width=60


    height=60 >


    <param name=R value=0>


    <param name=G value=0>


    <param name=B value=0>


</applet>


<SCRIPT LANGUAGE="JavaScript">


function setRED() {


   document.Circle.setCircleColor(255,0,0);


}


function setGREEN() {


   document.Circle.setCircleColor(0,255,0);


}


function setBLUE() {


   document.Circle.setCircleColor(0,0,255);


}


</SCRIPT>


<FORM>


<INPUT TYPE="BUTTON" NAME="cmdRED" VALUE="RED" onClick="setRED()"><P>


<INPUT TYPE="BUTTON" NAME="cmdGREEN" VALUE="GREEN" onClick="setGREEN()"><P>


<INPUT TYPE="BUTTON" NAME="cmdBLUE" VALUE="BLUE" onClick="setBLUE()"><P>


</FORM>


<hr>


<a href="Circle.java">The source.</a>


</body>


</html>
This HTML document should now appear and work just like the VBScript file in Figure 21.9.
The <OBJECT> tag is used to insert objects into an HTML document. An object can be a Java applet, an ActiveX control, an AVI file, and so on. Because the <APPLET> tag was introduced before the <OBJECT> tag, it is still generally used
for adding applets. However, the <OBJECT> tag could also be used and actually has greater functionality.
The object definition begins with <OBJECT> and ends with </OBJECT>. The following attributes are available:
Like the applet, an object can have parameters passed to it. This is done using the same method as the applet, through the <PARAM> tag. The <PARAM> tag is used as follows:
<PARAM NAME=paramName VALUE=paramValue>
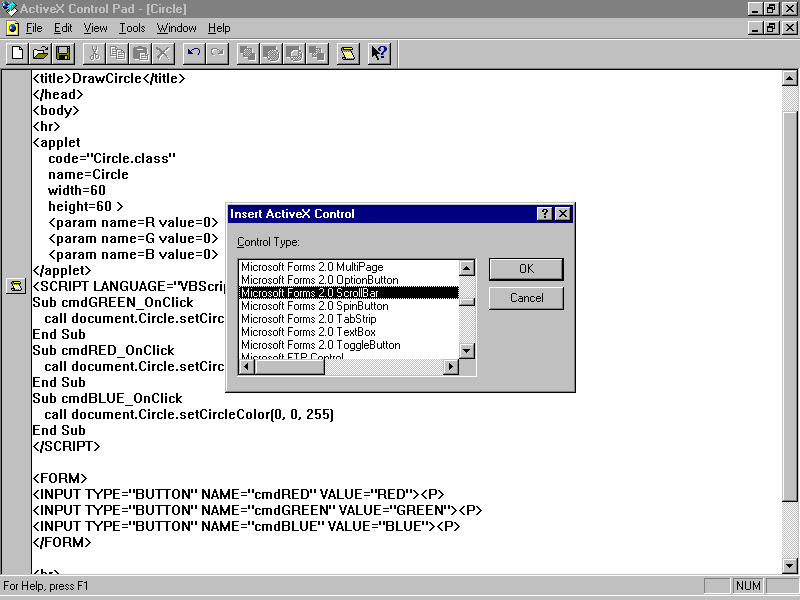
Now that you have learned about the structure and parameters of the <OBJECT> tag, put it to use in your Circle document to add scrollbar controls for changing the three colors. Microsoft provides ActiveX controls that you can use for the
scrollbars. Microsoft also provides a very useful tool to assist with inserting ActiveX controls into HTML documents called the ActiveX Control Pad. The ActiveX Control Pad is included with Microsoft Internet Explorer 3.0.
In order for the ActiveX examples to work in Internet Explorer you must have enabled the appropriate features for active content. These can be changed by selecting Options from the View menu. The Security tab contains the options for Active Content.
The following four options should be enabled:
Allow downloading of active content
Enable ActiveX controls and plug-ins
Run ActiveX scripts
Enable Java programs
The ActiveX Control Pad provides a nice user interface for inserting ActiveX controls and other objects into your HTML file. You will step through the process of inserting a scrollbar control to show how useful this powerful tool can be. Refer to
Figure 21.10 for the first four steps.
Figure 21.10. Inserting an ActiveX control with the ActiveX Control Pad.
The Properties dialog box and another box showing the size and orientation of the control will now appear. The screen should appear similar to Figure 21.11. You will now modify a few of the properties using the dialog box and then change the
orientation of the scrollbar in the other box.
First, change the ID attribute to a more meaningful name, sbRED. You will then change the upper and lower limits of the scrollbar to the upper and lower limits for the red setting, 0 and 255.
ID = sbRED


Min = 0


Max = 255
The scrollbar defaults to a vertical position. This can easily be changed by using the mouse to adjust the orientation and size of the control in the other dialog box.
That is all it takes to add an ActiveX scrollbar control to your HTML file! All that is left is to add the event handler code to respond to the scrollbar events.
Repeat the preceding instructions to insert two more scrollbars for control of green and blue. These will have the ID sbGREEN and sbBLUE.
To clean things up a bit and provide captions for the scrollbars, add the following HTML code after each </OBJECT> tag:
   Red<P>
This will add two non-breaking spaces and a color identifier followed by a paragraph break. Replace Red with Green and Blue respectively for the other two scrollbar captions.
The resulting HTML file should now appear as in Listing 21.4.
Listing 21.4. ActiveX objects inserted into HTML
<html>
<head>
<title>Circle</title>
</head>
<body>
<hr>
<applet
code="Circle.class"
name=Circle
width=60
height=60 >
<param name=R value=0>
<param name=G value=0>
<param name=B value=0>
</applet>
<SCRIPT LANGUAGE="VBScript">
Sub cmdRED_OnClick
call Document.Circle.setCircleColor(255,0,0)
End Sub
Sub cmdGREEN_OnClick
call Document.Circle.setCircleColor(0,255,0)
End Sub
Sub cmdBLUE_OnClick
call Document.Circle.setCircleColor(0,0,255)
End Sub
</SCRIPT>
<P>
<OBJECT ID="sbRED" WIDTH=104 HEIGHT=20
CLASSID="CLSID:DFD181E0-5E2F-11CE-A449-00AA004A803D">
<PARAM NAME="Size" VALUE="2752;529">
<PARAM NAME="Max" VALUE="255">
</OBJECT>   Red<P>
<OBJECT ID="sbGREEN" WIDTH=104 HEIGHT=20
CLASSID="CLSID:DFD181E0-5E2F-11CE-A449-00AA004A803D">
<PARAM NAME="Size" VALUE="2752;529">
<PARAM NAME="Max" VALUE="255">
</OBJECT>   Green<P>
<OBJECT ID="sbBLUE" WIDTH=104 HEIGHT=20
CLASSID="CLSID:DFD181E0-5E2F-11CE-A449-00AA004A803D">
<PARAM NAME="Size" VALUE="2752;529">
<PARAM NAME="Max" VALUE="255">
</OBJECT>   Blue <P>
<FORM>
<INPUT TYPE="BUTTON" NAME="cmdRED" VALUE="RED"><P>
<INPUT TYPE="BUTTON" NAME="cmdGREEN" VALUE="GREEN"><P>
<INPUT TYPE="BUTTON" NAME="cmdBLUE" VALUE="BLUE"><P>
</FORM>
<hr>
<a href="Circle.java">The source.</a>
</body>
</html>
Your final task is to provide scripting to support the ActiveX controls that you added. There are essentially two things that need to be added for each control:
First you will add the three event handlers to change the color of the circle when the scrollbar is changed. These event handlers are very similar to the ones that you created for the buttons. The difference is that you reference the color values to
the values of the three scrollbars. For example, the event handler for the Red scrollbar would look like the following:
Sub sbRED_Change


  call Document.Circle.setCircleColor(sbRED.Value, sbGREEN.Value, sbBLUE.Value)


End Sub
This event handler will respond to changes to sbRED, which is the red scrollbar. When a change occurs the setCircleColor method is called with the current values of the red, green, and blue scrollbars. This will cause the m_r, m_g, m_b variables in the
Circle Java applet to be updated and the repaint() method called. The color of the circle will then change to reflect the new amount of each color specified by the scrollbars.
Add two similar functions to support the change events of the other two scrollbars: sbGREEN and sbBLUE.
Now you need to modify the event handlers for the button's OnClick events. Three statements need to be added to each handler to update the current value of each of the scrollbars. For example, the cmdRED_OnClick event handler should have the following
three lines added to it:
sbRED.Value = 255


sbGREEN.Value = 0


sbBLUE.Value = 0
When the red button is clicked, the scrollbars will be updated to reflect the correct color of the circle. Similar statements should be added to the cmdGREEN_OnClick and cmdBLUE_OnClick handlers. The final code listing is shown in Listing 21.5. The
final screen output is shown in Figure 21.12.
Listing 21.5. Controlling ActiveX with VBScript.
<html>
<head>
<title>Circle</title>
</head>
<body>
<hr>
<applet
code="Circle.class"
name=Circle
width=60
height=60 >
<param name=R value=0>
<param name=G value=0>
<param name=B value=0>
</applet>
<SCRIPT LANGUAGE="VBScript">
Sub cmdRED_OnClick
call Document.Circle.setCircleColor(255,0,0)
sbRED.Value = 255
sbGREEN.Value = 0
sbBLUE.Value = 0
End Sub
Sub sbRED_Change
call Document.Circle.setCircleColor(sbRED.Value, sbGREEN.Value, sbBLUE.Value)
End Sub
Sub cmdGREEN_OnClick
call Document.Circle.setCircleColor(0,255,0)
sbRED.Value = 0
sbGREEN.Value = 255
sbBLUE.Value = 0
End Sub
Sub sbGREEN_Change
call Document.Circle.setCircleColor(sbRED.Value, sbGREEN.Value, sbBLUE.Value)
End Sub
Sub cmdBLUE_OnClick
call Document.Circle.setCircleColor(0,0,255)
sbRED.Value = 0
sbGREEN.Value = 0
sbBLUE.Value = 255
End Sub
Sub sbBLUE_Change
call Document.Circle.setCircleColor(sbRED.Value, sbGREEN.Value, sbBLUE.Value)
End Sub
</SCRIPT>
<P>
<OBJECT ID="sbRED" WIDTH=104 HEIGHT=20
CLASSID="CLSID:DFD181E0-5E2F-11CE-A449-00AA004A803D">
<PARAM NAME="Size" VALUE="2752;529">
<PARAM NAME="Max" VALUE="255">
</OBJECT>   Red<P>
<OBJECT ID="sbGREEN" WIDTH=104 HEIGHT=20
CLASSID="CLSID:DFD181E0-5E2F-11CE-A449-00AA004A803D">
<PARAM NAME="Size" VALUE="2752;529">
<PARAM NAME="Max" VALUE="255">
</OBJECT>   Green<P>
<OBJECT ID="sbBLUE" WIDTH=104 HEIGHT=20
CLASSID="CLSID:DFD181E0-5E2F-11CE-A449-00AA004A803D">
<PARAM NAME="Size" VALUE="2752;529">
<PARAM NAME="Max" VALUE="255">
</OBJECT>   Blue <P>
<FORM>
<INPUT TYPE="BUTTON" NAME="cmdRED" VALUE="RED"><P>
<INPUT TYPE="BUTTON" NAME="cmdGREEN" VALUE="GREEN"><P>
<INPUT TYPE="BUTTON" NAME="cmdBLUE" VALUE="BLUE"><P>
</FORM>
<hr>
<a href="Circle.java">The source.</a>
</body>
</html>
Figure 21.12. The final Circle applet with the ActiveX controls.
You should now be able to change the color of the circle by either pressing one of the three color buttons or changing one of the three color scrollbars. In addition, pressing the buttons should cause the scrollbars to be updated to reflect the current
color of the circle.
This example could also be created using JavaScript instead of VBScript. Listing 21.6 shows this same example created with JavaScript.
Listing 21.6. Controlling ActiveX with JavaScript.
<html>
<head>
<title>Circle</title>
</head>
<body>
<hr>
<applet
code="Circle.class"
name=Circle
width=60
height=60 >
<param name=R value=0>
<param name=G value=0>
<param name=B value=0>
</applet>
<SCRIPT LANGUAGE="JavaScript">
function setRED(){
Document.Circle.setCircleColor(255,0,0);
sbRED.Value = 255;
sbGREEN.Value = 0;
sbBLUE.Value = 0;
}
function sbRED_Change(){
Document.Circle.setCircleColor(sbRED.Value, sbGREEN.Value, sbBLUE.Value)
}
function setGREEN(){
Document.Circle.setCircleColor(0,255,0);
sbRED.Value = 0;
sbGREEN.Value = 255;
sbBLUE.Value = 0;
}
function sbGREEN_Change(){
Document.Circle.setCircleColor(sbRED.Value, sbGREEN.Value, sbBLUE.Value)
}
function setBLUE(){
Document.Circle.setCircleColor(0,0,255);
sbRED.Value = 0;
sbGREEN.Value = 0;
sbBLUE.Value = 255;
}
function sbBLUE_Change(){
Document.Circle.setCircleColor(sbRED.Value, sbGREEN.Value, sbBLUE.Value)
}
</SCRIPT>
<P>
<OBJECT ID="sbRED" WIDTH=104 HEIGHT=20
CLASSID="CLSID:DFD181E0-5E2F-11CE-A449-00AA004A803D">
<PARAM NAME="Size" VALUE="2752;529">
<PARAM NAME="Max" VALUE="255">
</OBJECT>   Red<P>
<OBJECT ID="sbGREEN" WIDTH=104 HEIGHT=20
CLASSID="CLSID:DFD181E0-5E2F-11CE-A449-00AA004A803D">
<PARAM NAME="Size" VALUE="2752;529">
<PARAM NAME="Max" VALUE="255">
</OBJECT>   Green<P>
<OBJECT ID="sbBLUE" WIDTH=104 HEIGHT=20
CLASSID="CLSID:DFD181E0-5E2F-11CE-A449-00AA004A803D">
<PARAM NAME="Size" VALUE="2752;529">
<PARAM NAME="Max" VALUE="255">
</OBJECT>   Blue <P>
<FORM>
<INPUT TYPE="BUTTON" NAME="cmdRED" VALUE="RED" onClick="setRED()"><P>
<INPUT TYPE="BUTTON" NAME="cmdGREEN" VALUE="GREEN" onClick="setGREEN()"><P>
<INPUT TYPE="BUTTON" NAME="cmdBLUE" VALUE="BLUE" onClick="setBLUE()"><P>
</FORM>
<hr>
<a href="Circle.java">The source.</a>
</body>
</html>
This concludes your final week of Teach Yourself Visual J++ in 21 Days! Today you learned how to use both JavaScript and VBScript to control both applets and ActiveX objects. You should now have a good understanding of all the glue that bonds
your Visual J++ creations together into its final form, an HTML document. Although it is true that Visual J++ can be used to create standalone Java applications, it will most likely be used for the creation of Java applets, at least in the near future.
Through the use of HTML and the two scripting languages, applets can be generalized and modularized. This is a powerful concept because it creates the opportunity for reusable modules.
As an example, consider designing a Web document that requires graphing and database capabilities. You could approach this task in two ways. First you could design everything into a Java applet. This would definitely work, but it doesn't create nice,
clean generic modules that can be used again in future projects. A second approach would be to create generic modules and glue them together using scripts. The graphing capability could be provided by a generic graphing ActiveX control. The database might
be a custom applet that you design. These two components can then communicate with each other through a scripting language such as VBScript or JavaScript. When used in this way, scripting is a powerful tool that you can use in your Visual J++ projects.
Q: It seems like it would have been easier to just declare the m_r, m_g, and m_b variables as public. Couldn't I have then just set those variables to the correct values in my scripts?
A: There are two things that should be considered before taking this approach. The first is that it is generally not good object-oriented programming practice to declare member variables as public. The other consideration is that even if you did
simply define the variables as public and set them in your script, you would still have to create a public function to cause the repaint. The best solution in this case was to create one function that set all three colors and did the repaint.
Q: I noticed that you used the call statement when calling the applet's setCircleColor method when using VBScript. Is the call statement necessary?
A: Use of the call statement is optional and a matter of preference. If you use the call statement, the argument list must be surrounded by parentheses. If you do not use the call statement, the argument list should not be enclosed in
parentheses.
Q: I tried the ActiveX Scrollbar example with Netscape Navigator 3.0, and it did not work. Why not?
A: Netscape Navigator 3.0 does not directly support ActiveX controls. In order to use ActiveX with Navigator, you must install an ActiveX plug-in. One such plug-in, ControlActive, is available from NCompass Labs at the following address:
Although this will allow you to use ActiveX controls, the plug-in does not support scripting of ActiveX controls. In order to Script ActiveX controls with Netscape Navigator, additional support is necessary. One such solution is ScriptActive, also from
NCompass Labs. There are different ScriptActive offerings available to support either VBScript or JavaScript.
![]()
![]()
![]()
![]()