![]()
![]()
![]()
Object-oriented programming (OOP) is one of the biggest programming ideas of recent years, and you might worry that you must spend years learning all about object-oriented programming methodologies and how they can make your life easier than the old
way of programming. It all comes down to organizing your programs in ways that echo how things are put together in the real world.
Today, you'll get an overview of object-oriented programming concepts in Java and how they relate to how you structure your own programs:
If you're already familiar with object-oriented programming, much of today's lesson will be familiar to you. You might want to kick back and skim it, but you might find some tidbits of new information here. Tomorrow, you'll get into more specific
details.
Consider, if you will, Legos. Legos, for those of you who don't spend much time with children, are small plastic building blocks in various colors and sizes. Each Lego has small round nibs (bumps) on one side that fit into the small round holes on the
other side of another Lego. By the successive joining of the nibs to the holes, so that they fit together snugly, you create larger shapes. With different Lego bits (Lego wheels, Lego engines, Lego hinges, Lego pulleys), you can put together castles,
automobiles, giant robots that swallow cities, or just about anything else you can imagine. Each Lego bit is a small object (ah, that word object) that fits together with other small objects in predefined ways to create other larger objects.
Here's another example. You can walk into a computer store, and with a little background information, assemble an entire PC computer system from various components: a motherboard, a CPU chip, a video card, a hard disk, a keyboard, and so on. Ideally,
when you finish assembling all the various self-contained units, you have a system in which all the units work together to create a larger system with which you can solve the problems you bought the computer for in the first place.
Internally, each of those components might be vastly complicated and engineered by different companies with different methods of design. But you don't need to know how each component works, what every chip on the board does, or how, when you press the
A key, an A gets sent to your screen. As the assembler of the overall system, each component you use is a self-contained unit, and all you're interested in is how each component interacts with one another. Will this video card fit into the slots on the
motherboard and will this monitor work with this video card? Will each particular component speak the right commands to the other components it interacts with so that each part of the computer is understood by every other part? Once you know what the
interactions are between the components and can match the interactions, putting together the overall system is easy.
What does this have to do with VJ++ programming? Everything. Object-oriented programming works in exactly this same way. When you use object-oriented programming, your overall program is made up of lots of different self-contained components (objects),
each of which has a specific role in the program and all of which can communicate to one another in predefined ways.
Object-oriented programming is modeled on how, in the real world, large objects are often made up of many kinds of smaller objects. This capability of combining objects, however, is only one very general aspect of object-oriented programming.
Object-oriented programming provides many other concepts and features to make creating and using objects easier and more flexible, and the most important of these features is that of classes.
 A class is a template for multiple objects with similar features.
When you write a program in an object-oriented language, you don't define actual objects. You define classes of objects.
For example, you might have a Tree class that describes the features of all trees (has leaves and roots, grows, creates chlorophyll). The Tree class serves as an abstract model for the concept of a tree. In order to reach out and grab—or interact
with or cut down a tree—you have to have a concrete instance of that tree. Of course, once you have a tree class, you can create lots of different instances of that tree, and each different tree instance can have different features (short, tall,
bushy, drops leaves in Autumn), while still behaving like and being immediately recognizable as a tree. (See Figure 3.1.)
Figure 3.1. The tree class and tree instances.
An instance of a class is another word for an actual object. If class is the general (generic) representation of an object, an instance is its concrete representation.
So what, precisely, is the difference between an instance and an object? Nothing, really. Object is the more general term, but both instances and objects are the concrete representation of a class. In fact, the terms instance and object are often used
interchangeably in OOP language. An instance of a tree and a tree object are both the same thing.
In an example closer to the sort of things you might want to do in Java programming, you might create a class for the user interface element called a button. The Button class defines the properties of a button (its label, its size, its appearance) and
how it behaves. (Does it need a single click or a double click to activate it, does it change color when it's clicked, what does it do when it's activated?) Once you define the Button class, you can easily create instances of that button—that is,
button objects—that all take on the basic features of the button as defined by the class, but might have different appearances and behavior based on what you want a particular button to do. By creating a Button class, you don't have to keep rewriting
the code for each individual button you want to use in your program, and you can reuse the Button class to create different kinds of buttons as you need them in this program and in other programs.
If you're used to programming in C, you can think of a class as sort of creating a new composite data type by using struct and typedef. Classes, however, can provide much more than just a collection of data, as you'll discover in the rest of today's lesson.
When you write a Java program, you design and construct one or more classes that your program will use. Then, when your program runs, instances of those classes are created and discarded as needed. Your task, as a Java programmer, is to create the
right set of classes to accomplish what your program needs to accomplish.
Fortunately, you don't have to start from the very beginning: the Java environment comes with a library of classes that implement a lot of the basic behavior you need, not only for basic programming tasks (classes to provide basic math functions,
arrays, strings, and so on), but also for graphics and networking behavior. In most cases, the Java class libraries are enough so that all you have to do in your Java program is create a single class that uses the standard class libraries. For complicated
Java programs, however, you might have to create a whole set of classes with defined interactions between them.
A class library is a set of classes.
Every class you write in Java is generally made up of two components: properties and methods. In this section, you'll learn about each one as it applies to a theoretical class called Motorcycle. To finish this section, you'll create the Java code to
implement a representation of a motorcycle.
Properties are the individual things that differentiate one object from another and determine the appearance, state, or other qualities of that object. You'll now create a theoretical class called Motorcycle. The properties of a motorcycle might
include the following:
Properties of an object can also include information about its state; for example, you could have properties for engine condition (off or on) or current gear selected.
Properties are defined by variables; in fact, you can consider them analogous to global variables for the entire object. Because each instance of a class can have different values for its variables, each variable is called a data member.
Data Members define the properties of an object. The class defines the type of the property, and each instance stores its own value for that property. (You will learn more about data members tomorrow.)
Each property, as the term is used here, has a single corresponding data member; changing the value of a variable changes the attribute of that object. Data members might be set when an object is created and stay constant throughout the life of the
object, or they might be able to change at will as the program runs.
In addition to data members, there are also class variables, which apply to the class itself and to all its instances. Unlike data members, whose values are stored in the instance, a class variables' values are stored in the class itself. You'll learn
about class variables later on this week; you'll learn more specifics about data members tomorrow.
A class' methods (behavior) determine how the instances of the class change their internal state or react when the instance is asked to do something by another class or object. Methods are the only way objects can do anything to themselves or have
anything done to them. For example, to go back to the theoretical Motorcycle class, here are some methods that the Motorcycle class might have:
To define an object's behavior, you create methods, which look and behave just like functions in other languages but are defined inside a class. Java does not have functions defined outside classes (as C++ does).
Methods are functions defined inside classes that operate on instances of those classes.
Methods don't always affect only a single object; objects communicate with each other using methods as well. A class or object can call methods in another class or object to communicate changes in the environment or to ask that object to change its
state.
Just as there are instance and class variables, there are also instance and class methods. Instance methods (which are so common they're usually just called methods) apply and operate on an instance of a class; class methods apply and operate on the
class itself. You'll learn more about class methods later on this week.
At this point, you might be wondering "Why do I care about objects, classes, properties, methods, instances, and so on?". To that end, lets put some of the concepts that you have learned together. The easiest way to do this is to use some
real-world examples.
Liz is an object of class type Person. She is a woman (property) and she talks (method). Liz's truck is an object of class Vehicle. It is blue (property) and its engine starts and stops (method).
Patrick's PC is an object of class Computer. It is an SMP-P90 (property) and it plays a music CD (method).
Dave's PC is also an object of class Computer. It is a P5-66 (property), it plays a music CD (method), and it can print a document (method).
Think of a few other real-world objects (not related to programming or computers) and see if you can describe them as in the preceding examples.
Here's one to get you started. A tabby cat chases mice. Pick out the class, property, and method.
Up to this point, today's lesson has been pretty theoretical. In this section, you'll create a working example of the Motorcycle class so that you can see how data members and methods are defined in a class. You'll also create a Java application that
creates a new instance of the Motorcycle class and shows its data members.
We're not going to go into a lot of detail about the actual syntax of this example here. Don't worry too much about it if you're not really sure what's going on; it will become clear to you later on this week. All you really need to worry about in this example is understanding the basic parts of this class definition.
Before you begin, open a New Project Workspace in Microsoft Developer Studio and open a new source window. Type the following:
class Motorcycle


{


}
Congratulations! You've now created a class. Of course, it doesn't do very much at the moment, but that's a Java class at its very simplest.
First, create some data members for this class—three of them, to be specific. Just below the second line, after the {, add the following three lines:
String m_Make;


String m_Color;


boolean m_EngineState;
Here, you've created three data members: two, m_Make and m_Color, can contain String objects. (String is part of that standard class library mentioned earlier.) The third, m_EngineState, is a Boolean that refers to whether the engine is off or on.
Now add some methods (behavior) to the class. There are all kinds of things a motorcycle can do, but to keep things short, add just one method—a method that starts the engine. Add the following lines below the data members in your class
definition:
void startEngine()


  {


    if (m_EngineState == true)


        System.out.println("The engine is already on.");


    else


    {


        m_EngineState = true;


        System.out.println("The engine is now on.");


    }


  }
The startEngine method tests to see whether the engine is already running (in the line m_EngineState == true) and, if it is, merely prints a message to that effect. If the engine isn't already running, it changes the state of the engine to true and
then prints a message.
With your methods and properties in place, save the program to a file called Motorcycle.java. (Remember, we recommend that you name your Java files the same name as the class they define.) Here's what your program should look like so far:
class Motorcycle


{


String m_Make;


String m_Color;


boolean m_EngineState;


void startEngine()


  {


    if (m_EngineState == true)


        System.out.println("The engine is already on.");


    else


    {


        m_EngineState = true;


        System.out.println("The engine is now on.");


    }


  }


}
Before you compile this class, add one more method. The showAtts method prints the current values of the data members in an instance of your Motorcycle class. Here's what the function looks like:
void showAtts()


{


    System.out.println("This motorcycle is a "


        + color + " " + make);


    if (m_EngineState == true)


        System.out.println("The engine is on.");


    else System.out.println("The engine is off.");


}
The showAtts method prints two lines to the screen: the m_Make and m_Color of the motorcycle object, and whether or not the engine is on or off.
Save the file, insert it into your Project (select Insert | Files into Project from the menu) and compile the project (Build | Compile from the menu).
What happens if you now use the JVIEW interpreter to run this compiled class? Try it. VJ++ assumes that this class is an application and looks for a main method. This is just a class, however, so it doesn't have a main method. The JVIEW interpreter
(JVIEW) gives you an error like this one:
In class Motorcycle: void main(String argv[]) is not defined
To do something with the Motorcycle class—for example, to create instances of that class and play with them—you're going to need to create a VJ++ application that uses this class or add a main method to this one. For simplicity's sake, do the
latter. Listing 3.1 shows the main() method you'll add to the Motorcycle class.
Listing 3.1. The main() method for Motorcycle.java.
 1: public static void main (String args[])


2:{


 3:    Motorcycle mMyCycle = new Motorcycle();


 4:    mMyCycle.m_Make = "Harley Davidson Sportster";


 5:    mMyCycle.m_Color = "yellow";


 6:    System.out.println("Calling showAtts...");


 7:    mMyCycle.showAtts();


 8:    System.out.println("————");


 9:    System.out.println("Starting engine...");


 10:    mMyCycle.startEngine();


11:    System.out.println("————");


12:    System.out.println("Calling showAtts...");


13:    mMyCycle.showAtts();


14:    System.out.println("————");


15:    System.out.println("Starting engine...");


16:    mMyCycle.startEngine();


17:}
With the main() method, the Motorcycle class is now an application, and you can compile it again and this time it'll run. Here's how the output should look:
Calling showAtts...


This motorcycle is a yellow Harley Davidson Sportster


The engine is off.


————


Starting engine...


The engine is now on.


————


Calling showAtts...


This motorcycle is a yellow Harley Davidson Sportster


The engine is on.


————


Starting engine...


The engine is already on.
The contents of the main() method are going to look very new to you, so go through it line by line so that you at least have a basic idea of what it does. (You'll get details about the specifics of all of this tomorrow and the day after.)
 The first line declares the main() method. The main() method always looks like this; you'll learn the specifics of each part later this week.
Line 2, Motorcycle mMyCycle = new Motorcycle(), creates a new instance of the Motorcycle class and stores a reference to it in the variable mMyCycle. Remember, you don't actually operate on classes in your Java programs; rather, you create an instance
(objects) from those classes and then call the methods and the properties in those objects.
Lines 3 and 4 set the data members for this motorcycle object: The make is now a Harley Davidson Sportster (one of the greats), and the color is yellow.
Lines 5 and 6 call the showAtts() method, defined in your motorcycle object. (Actually, only 6 does; 5 just prints a message that you're about to call this method.) The new motorcycle object then prints out the values of its data members—the
m_Make and m_Color as you set in the previous lines—and shows that the engine is off.
Line 7 prints a divider line to the screen; this is just for nicer looking output.
Line 9 calls the startEngine() method in the motorcycle object to start the engine. The engine should now be on.
Line 12 prints the values of the data members again. This time, the report should say the engine is now on.
Line 15 tries to start the engine again, just for fun. Because the engine is already on, this should print the error message.
Now that you have a basic grasp of classes, objects, methods, variables, and how to put it all together in a Java program, it's time to add some more object terms to your knowledge-base. Inheritance, interfaces, and packages are all mechanisms for
organizing classes and class behaviors. The Java class libraries use all these concepts, and the best class libraries you write for your own programs will also use these concepts.
Inheritance is one of the most powerful concepts in object-oriented programming, and it has a direct effect on how you design and write your Java classes. Inheritance is a very powerful mechanism. The concept of inheritance is that—when you write
a class, you only have to specify how that class is different from some other class; inheritance will give you automatic access to the information contained in the original class.
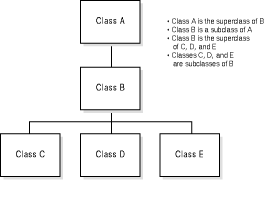
When using inheritance, all classes—those you write, those from other class libraries that you use, and those from the standard utility classes as well—are arranged in a strict hierarchy. (See Figure 3.2.)
Figure 3.2. A class hierarchy.
Each class has a superclass (the class above it in the hierarchy), and each class can have one or more subclasses. (Classes below that class in the hierarchy.) Classes further down in the hierarchy are said to inherit from classes further up in the
hierarchy.
Subclasses inherit all the methods and variables from their superclasses—that is, in any particular class, if the superclass defines behavior that your class needs, you don't have to redefine it or copy that code from some other class. Your class
automatically gets that behavior from its superclass, that superclass gets behavior from its superclass, and so on all the way up the hierarchy. Your class becomes a combination of all the methods and properties of the classes above it in the hierarchy.
At the top of the Java class hierarchy is the class Object; all classes inherit from this one superclass. Object is the most general class in the hierarchy; it defines behavior inherited by all the classes in the Java class hierarchy. Each class
farther down in the hierarchy adds more information and becomes more tailored to a specific purpose. In this way, you can think of a class hierarchy as defining a very abstract concept at the top of the hierarchy and than having those ideas become more
concrete the farther down the chain of superclasses the concept goes.
Most of the time when you write new Java classes, you'll want to create a class that has all the information some other class has, plus some extra information. For example, you might want a version of a Button with its own built-in label. To get all
the Button information, all you have to do is define your class to inherit from Button. Your class will automatically get all the behavior defined in Button (which means the behavior specifically defined in Button, in Button's superclass, and so forth all
the way up to Object), so all you have to worry about are the things that make your class different from Button itself. This mechanism for defining new classes as the differences between the new class and its superclasses is called subclassing.
Subclassing involves creating a new class that inherits from some other class in the class hierarchy. Using subclassing, you only need to define the differences between your class and its parent; the core behavior (of the
parent/superclass) is available to your class through inheritance.
What if your class defines entirely new behavior, and isn't really a subclass of another class? Your class can also inherit directly from Object, which still allows it to fit neatly into the Java class hierarchy. In fact, if you create a class
definition that doesn't indicate its superclass in the first line, Java automatically assumes you're inheriting from Object. The Motorcycle class you created in the previous section automatically inherited from Object.
If you're creating a larger set of classes, it makes sense for your classes not only to inherit from the existing class hierarchy, but also to make up a hierarchy themselves. This might take some planning beforehand when you're trying to figure out how
to organize your Java code, but the advantages are significant once it's done:
For example, go back to that Motorcycle class and pretend you created a Java program to implement all the features of a motorcycle. It's done, it works, and everything is fine. Now, your next task is to create a Java class called Car.
Car and Motorcycle have many similar features; both are vehicles driven by engines. Both have transmissions and headlamps and speedometers. So, your first impulse might be to open up your Motorcycle class file and copy over a lot of the information you
already defined into the new class Car.
A far better plan is to factor out the common information for Car and Motorcycle into a more general class hierarchy. This might seem like a lot of additional effort for just the classes Motorcycle and Car, but once you add Bicycle, Scooter, Truck, and
so on, having common behavior in a reuseable superclass significantly reduces the amount of work you have to do overall.
Now design a class hierarchy that might serve this purpose. Starting at the top is the class Object, which is the root of all Java classes. The most general class that motorcycle and car both belong might be called Vehicle. A vehicle, generally, is
defined as a thing that propels someone or something from one place to another. In the Vehicle class, you define only the behavior that enables propulsion from point a to point b, and nothing more.
Below Vehicle? How about two classes: PersonPoweredVehicle and EnginePoweredVehicle? EnginePoweredVehicle is different from Vehicle because it has an engine, and the methods might include stopping and starting the engine, having certain amounts of
gasoline and oil, and perhaps the speed or gear in which the engine is running. Person-powered vehicles have some kind of mechanism for translating people motion into vehicle motion—pedals, for example. Figure 3.3 shows what you have so far.
Figure 3.3. The basic vehicle hierarchy.
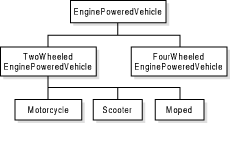
Now, we'll get even more specific. With EnginePoweredVehicle, you might have several classes: Motorcycle, Car, Truck, and so on. Or you can factor out still more behavior and have intermediate classes for TwoWheeled and FourWheeled vehicles, with
different behaviors for each. (See Figure 3.4.)
Figure 3.4. Two-wheeled and four-wheeled vehicles.
Finally, with a subclass for the two-wheeled engine-powered vehicles you can have a class for motorcycles. Alternatively, you could define scooters and mopeds, both of which are two-wheeled, engine-powered vehicles but have different qualities from
motorcycles.
Where do properties such as make or color come in? Wherever you want them to go—or, more usually, where they fit most naturally in the class hierarchy. You can define the make and color on Vehicle, and all the subclasses will have those variables
as well. The point to remember is that you have to define a feature or a behavior only once in the hierarchy then it's automatically reused by each subclass.
How does inheritance work? How is it that instances of one class can automatically get variables and methods from the classes further up in the hierarchy?
For data members, when you create a new instance of a class, you get a "slot" for each variable defined in the current class and for each variable defined in all its superclasses. In this way, all the classes combine to form a template for
the current object and then each object fills in the information appropriate to its situation.
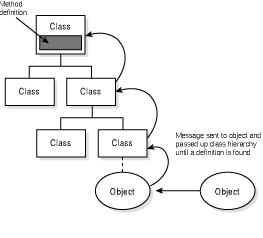
Methods operate similarly: New objects have access to all the method names of its class and its superclasses, but method definitions are chosen dynamically when a method is called. That is, if you call a method on a particular object, Java first checks
the object's class for the definition of that method. If it's not defined in the object's class, it looks in that class's superclass, and so on up the chain until the method definition is found. (See Figure 3.5.)
Figure 3.5. How methods are located.
Things get complicated when a subclass defines a method that has the same signature (name and number and type of arguments) as a method defined in a superclass. In this case, the method definition that is found first (starting at the bottom and working
upward toward the top of the hierarchy) is the one that is actually executed. Because of this, you can purposefully define a method in a subclass that has the same signature as a method in a superclass, which then "hides" the superclass' method.
This is called overloading a method. You'll learn more about methods on Day 7.
Overloading a method is creating a method in a subclass that has the same signature (name, number, and type of arguments) as a method in a superclass. That new method then hides the superclass' method. (See Figure 3.6.)
Figure 3.6. Overriding methods.
Java's form of inheritance, as you learned in the previous sections, is called single inheritance. Single inheritance means that each Java class can have only one superclass (parent class). Remember, though that any given superclass can have multiple
subclasses.
In other object-oriented programming languages, such as C++, classes can have more than one superclass, and they inherit combined variables and methods from all those classes. This is called multiple inheritance. Multiple inheritance can provide
enormous power in terms of being able to create classes that factor in just about any imaginable behavior, but it can also significantly complicate class definitions and the code to produce them. Java makes inheritance simpler by only allowing single
inheritance.
Java has two remaining concepts to discuss here: packages and interfaces. Both are advanced topics for implementing and designing groups of classes and class behavior. You'll learn about both interfaces and packages on Day 18, but they are worth at
least introducing here.
Recall that Java classes have only a single superclass, and they inherit variables and methods from that superclass and all its superclasses. Although single inheritance makes the relationship between classes and the functionality those classes
implement easy to understand and to design, it can also be somewhat restricting—in particular, when you have similar behavior that needs to be duplicated across different "branches" of the class hierarchy. Java solves this problem of shared
behavior by using the concept of interfaces.
An interface is a collection of method names, without actual definitions, that indicate that a class has a set of behaviors in addition to the behaviors the class gets from its superclasses.
Although a single Java class can have only one superclass (due to single inheritance), that class can also implement any number of interfaces. By implementing an interface, a class provides method implementations (definitions) for the method names
defined by the interface. If two very disparate classes implement the same interface, they can both respond to the same method calls (as defined by that interface), although what each class actually does in response to those method calls might be very
different.
You don't need to know very much about interfaces right now. You'll learn more as the book progresses, so if all this is very confusing, don't panic!
The final new Java concept for today is that of packages.
Packages in Java are a way of grouping together related classes and interfaces. Packages enable modular groups of classes to be available only if they are needed and eliminate potential conflicts between class names in
different groups of classes.
You'll learn all about packages, including how to create and use them, in Week 3. For now, there are only a few things you need to know:
To finish up today, create a class that is a subclass of another class and override some methods. You'll also get a basic feel for how packages work in this example.
Probably the most typical instance of creating a subclass, at least when you first start programming in Java, is in creating an applet. All applets are subclasses of the class Applet (which is part of the java.applet package). By creating a subclass of
Applet, you automatically get all the behavior from the window toolkit and the layout classes that enables your applet to be drawn in the right place on the Web page and to interact with system operations, such as keypresses and mouse clicks.
In this example, you'll create an applet similar to the HelloWorld applet from yesterday, but one that draws the Hello string in a larger font and a different color. To start this example, first construct the class definition itself. Remember the HTML
and classes directories you created yesterday? Return to those and go back to Microsoft Developer Studio. Create a new Project Workspace and open a new source window. Enter the following class definition:
public class HelloAgainApplet extends java.applet.Applet


{


}
Here, you're creating a class called HelloAgainApplet. Note the part that says extends java.applet.Applet—that's the part that says your applet class is a subclass of the Applet class. Note also that because the Applet class is contained in the
java.applet package (and not java.lang), you don't have automatic access to that class. So, you have to refer to it explicitly by package and class name.
The other part of this class definition is the public keyword. Public means that your class is available to the Java system at large once it is loaded. Most of the time you need to make a class public only if you want it to be visible to all the other
classes in your Java program; but applets, in particular, must be declared to be public. (You'll learn more about public classes in Week 3.)
A class definition with nothing in it doesn't really have much of a point; without adding or overriding any of its superclasses' variables or methods, there's little point to creating a subclass at all. Add some information to this class to make it
different from its superclass.
First, add a data member to contain a Font object (remember, the Font object will be an instance of class Font:
Font m_f = new Font("TimesRoman", Font.BOLD, 36);
The m_f data member now contains a new instance of the class Font, part of the java.awt package. This particular font object is a Times Roman font, boldface, 36 points high. In the previous Hello World applet, the font used for the text was the default
font: 12 point Times Roman. Using a font object, you can change the font of the text you draw in your applet.
By creating a data member to hold this font object, you make it available to all the methods in your class. Now create a method that uses it.
When you write applets, there are several standard methods defined in the applet superclasses that you will commonly override in your applet class. These include methods to initialize the applet, to start it running, to handle operations such as mouse
movements or mouse clicks, or to clean up when the applet stops running. One of those standard methods is the paint() method, which actually displays your applet on screen. The default definition of paint() doesn't do anything—it's an empty method. By
overriding paint(), you tell the applet just what to draw on the screen. Here's a definition of paint():
public void paint(Graphics g)


{


    g.setFont(m_f);


    g.setColor(Color.red);


    g.drawString("Hello again!", 5, 25);


}
There are two things to know about the paint() method. First, note that this method is declared public, just as the applet itself was. The paint() method is actually public for a different reason—because the method it's overriding is also public.
If a superclass' method is defined as public, your override method also has to be public or you'll get an error when you compile the class.
Secondly, note that the paint() method takes a single argument: an instance of the Graphics class. The Graphics class provides platform-independent behavior for rendering fonts, colors, and basic drawing operations. You'll learn a lot more about the
Graphics class in Week 2, when you create more extensive applets.
Inside your paint() method, you've done three things:
For an applet this simple, this is all you need to do. Here's what the applet looks like so far:
public class HelloAgainApplet extends java.applet.Applet


{


  Font f = new Font("TimesRoman",Font.BOLD,36);


  public void paint(Graphics g)


  {


    g.setFont(m_f);


    g.setColor(Color.red);


    g.drawString("Hello again!", 5, 50);


  }


}
If you've been paying attention, you'll notice something is wrong with this example up to this point. If you don't know what it is, try saving this file (remember, save it to the same name as the class: HelloAgainApplet.java) and compiling it using the
VJ++ compiler. You should get a bunch of errors similar to this one:
HelloAgainApplet.java:7: Class Graphics not found in type declaration.
Why are you getting these errors? Because the classes you're referring to are part of a package. Remember that the only package you have access to automatically is java.lang. You referred to the Applet class in the first line of the class definition by
referring to its full package name (java.applet.Applet). Further on in the program, however, you referred to all kinds of other classes as if they were already available.
There are two ways to solve this problem: refer to all external classes by full package name or import the appropriate class or package at the beginning of your class file. Which one you choose to do is mostly a matter of choice, although if you find
yourself referring to a class in another package quite often, you might want to import it to cut down on the amount of typing.
In this example, you'll import the classes you need. There are three of them: Graphics, Font, and Color. All three are part of the java.awt package. Here are the lines to import these classes. These lines go at the top of your program, before the
actual class definition:
import java.awt.Graphics;


import java.awt.Font;


import java.awt.Color;
import java.awt.*;
Now, with the proper classes imported into your program, HelloAgainApplet should compile cleanly to a class file. To test it, use Microsoft Developer Studio (Build | Execute) to create a default HTML for you or type in the example below.
Here's an HTML file to use:
<HTML>


<HEAD>


<TITLE>Another Applet</TITLE>


</HEAD>


<BODY>


<P>My second Java applet says:


<APPLET CODE="HelloAgainApplet.class" WIDTH=200 HEIGHT=75>


</APPLET>


</BODY>


</HTML>
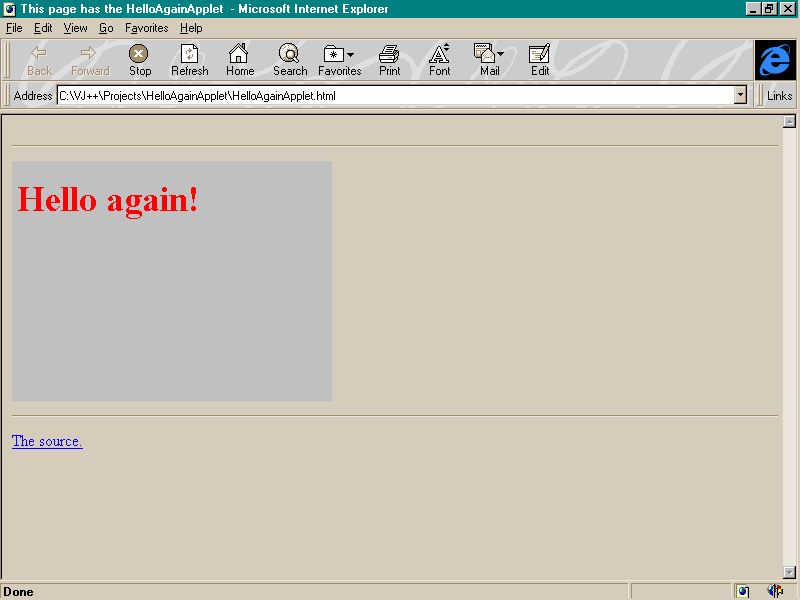
For this HTML example, your Java class file is in the same directory as this HTML file. Save the file as HelloAgainApplet.html and fire up your Java-capable browser. Figure 3.7 shows the result you should be getting. (The words Hello Again should
display in red.)
Figure 3.7. The HelloAgainApplet.
If this is your first encounter with object-oriented programming, a lot of the information in this chapter is going to seem really theoretical and overwhelming. Fear not; the further along in this book you get, and the more Java applications you
create, the easier it is to understand. You might even want to read the beginning sections of this chapter again, now that you have some hands-on experience with objects.
One of the biggest hurdles of object-oriented programming is not necessarily the concepts, it's their names. OOP has lots of jargon surrounding it. To summarize today's material, here's a glossary of terms and concepts you learned today:
Class: A template for an object that contains properties and methods representing attributes and behavior. Via inheritance, classes can inherit properties and methods from other classes.
Object: A concrete instance of some class.
Instance: The same thing as an object; each object is an instance of some class.
Superclass: A class further up in the inheritance hierarchy than its child, the subclass.
Subclass: A class lower in the inheritance hierarchy than its parent, the superclass. When you create a new class based on some parent class, that is often called subclassing.
Instance method: A method defined in a class, which operates on an instance of that class. Instance methods are usually just called methods.
Class method: A method defined in a class, which operates on the class itself, and can be called via the class or any of its instances. (More on this tomorrow.)
Data member: A variable that is owned by an individual instance and whose value is stored in the instance. (More on this tomorrow.)
Class variable: A variable that is owned by the class and all its instances as a whole, and is stored in the class. (More on this tomorrow.)
Interface: A collection of abstract behavior specifications that individual classes can then implement.
Package: A collection of classes and interfaces. Classes from packages other than java.lang must be explicitly imported or referred to by full package name.
Q: Methods are effectively functions that are defined inside classes. If they look like functions and act like functions, why aren't they called functions?
A: Some object-oriented programming languages do call them functions (C++ calls them member functions). Other object-oriented languages differentiate between functions inside and outside a body of a class or object, where having separate terms
is important to understanding how each works. Because the difference is relevant in other languages, and because the term method is now in such common use in object-oriented technology, Java uses the word as well.
Q: I understand data members and methods, but not class variables and class methods.
A: Most everything you do in a Java program will be with objects. Some behaviors and attributes, however, make more sense if they are stored in the class itself rather than in the object. For example, to create a new instance of a class, you
need a method that is defined for the class itself, not for an object. (Otherwise, how can you create an instance of a class? You need an object to call the new method in, but you don't have an object yet.) Class variables, on the other hand, are often
used when you have an attribute whose value you want to share with all the instances of a class.
Most of the time, you'll use data members and methods. You'll learn more about class variables and class methods later this week.
![]()
![]()
![]()
![]()