![]()
![]()
![]()
Some Visual C++ database applications might call for a one-time-only installation by you, the developer. If that's the case, you can copy the applications' .EXE, .HLP, and .VBX files, together with any database and ancillary files that might be required, onto a set of disks that you will copy to the appropriate directories of the client's computer. If your Visual C++ database front end will be used by a large number of people, or if you want to impress your clients with a sophisticated setup application similar to those used to install mainstream Windows applications, you need to create "official" distribution disks.
This chapter is intended primarily for developers who are creating applications that will be used with Windows 95 and later versions of Windows. The techniques shown here are very useful for versions of Windows earlier than Windows 95; however, it's unlikely that readers of this book will be creating many applications for earlier versions of Windows. In the future, expect Windows NT to offer facilities that are comparable to those offered by Windows 95.
Most of the setup tools are part of the WIN32SDK. The AutoPlay facility is entirely part of Windows, and the developer's portion of AutoPlay consists of a five-page Word for Windows document. The InstallSHIELD Professional toolkit expands on the InstallSHIELD SDK product included with Visual C++ 4 and that is part of the WIN32SDK. It's available from InstallShield Corporation. (InstallShield Corporation used to be called Stirling Technologies, Inc. They changed their name to reflect their most successful product.)
The WIN32SDK, which is part of the MSDN Level II product, includes Microsoft Setup, the "standard" setup program that has been used extensively by Microsoft and other application vendors. One problem with Microsoft Setup is that it requires the setup program to be created as an application (you edit C source code and then build your own SETUP.EXE program). With InstallSHIELD SDK, you need to modify only a single script file—a much simpler process.
The Sax Setup Wizard product from Sax Software is entirely Windows-based. It uses no scripting at all, because all user input is accomplished through wizard dialog boxes.
All three installation generator programs described in this chapter create professional installations that will help assure the user that your product is professional and of high quality—an important factor in today's competitive software market.
The Microsoft Setup program (which is also referred to as MS Setup or MSSETUP) is based on the design of the wizards included with Access 1.0, which predated the release of Visual C++. The Microsoft Setup program resembles the SetupWizard of the Access 1.1 Distribution Kit (ADK), but the C version uses a different approach to create the distribution files and execute the setup application. The primary differences between the methods used by Visual C++ and the ADK wizards to create the distribution disks are explained in the following sections.
NOTE
Microsoft no longer supports the Microsoft Setup program. It's still included with Visual C++, but it hasn't changed for some time, and Microsoft won't update it in the future. Unless you're already using Microsoft Setup, you shouldn't consider it for new projects.
When you use Microsoft Setup, you don't get the same effects as with the other, newer setup programs such as Sax Setup Wizard and InstallSHIELD. For example, the Microsoft Setup program doesn't support the uninstall process automatically. If you use Microsoft Setup, you must write your uninstall code completely on your own, something that both InstallSHIELD and Sax Setup Wizard do for you.
Using Microsoft Setup is a multistep process. Follow these steps to create your own setup application:
Listing 24.1. A sample SETUP.INF file.
[Source Media Descriptions]

    "1", "Disk 1", "", ""

[Minimum Files]

      1, setupapi.c,,,COPY,1992-01-30,,,,,,,,,,52174,,999,,,

[Extra Files]

      1, sample.inf,,,!COPY,1992-01-30,,,,,,,,,,10,,999,,,

[Default File Settings]

"STF_BACKUP"     = ""

"STF_COPY"       = "YES"

"STF_DECOMPRESS" = "YES"

"STF_OVERWRITE"  = "ALWAYS"

"STF_READONLY"   = "YES"

"STF_ROOT"       = ""

"STF_SETTIME"    = "YES"

"STF_TIME"       = "1"

"STF_VITAL"      = "YES"
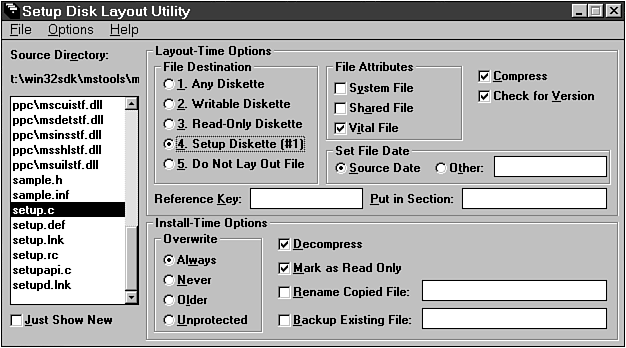
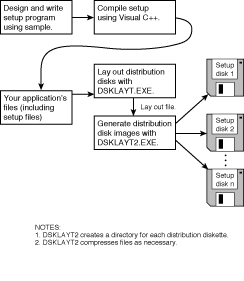
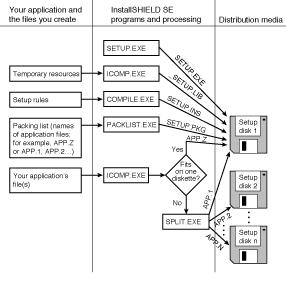
Figure 24.2 shows the process of developing your application's distribution disks. Note that the DSKLAYT2.EXE program is a DOS-based application that runs in a DOS window under Windows 95 and Windows NT. This application won't run under Windows 3.x or native-mode DOS because it's an NT console mode application.
Figure 24.2. The Microsoft Setup process.
Sax Software markets an application installation system called the Sax Setup Wizard. This product was initially developed for Windows 3.x; it now fully supports Windows 95. The Sax Setup Wizard is a powerful yet easy-to-use setup generator, excellent for many types of projects.
Using Sax Setup Wizard is much simpler than using the Microsoft Setup program. Sax Setup Wizard is a totally Windows-based installation program that offers extensive user feedback to assist in creating installation disks. Sax Setup Wizard can create not only disk-based installations but also installations for CD-ROM-based products. This is very helpful, because the AutoRun facility (described later) can call the Sax Setup Wizard-created setup program if needed.
Sax Setup Wizard is a single program that requires no additional scripts or other manual input from the user. This differs from Microsoft Setup and InstallSHIELD, both of which are multistep processes that require some form of script from the user.
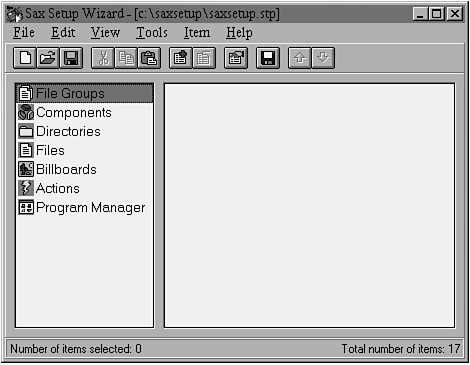
Figure 24.3 shows Sax Setup Wizard's main window before a project has been opened.
Figure 24.3. Sax Setup Wizard's main window.
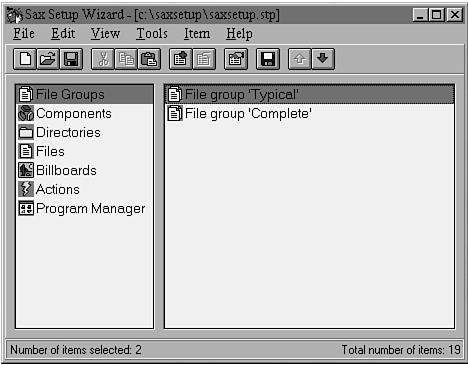
After a project has been opened, the values defined by the programmer are displayed in Sax Setup Wizard's main window, as shown in Figure 24.4.
Figure 24.4. Sax Setup Wizard's main window with a project opened.
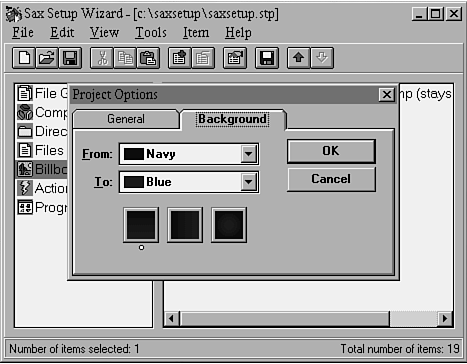
The main thing the user sees when installing applications is the installation program's background. All installation programs let you set the background when the setup program is being developed, and Sax Setup Wizard is no different. With Sax Setup Wizard, you can configure the shading (the trend for a gradient color in installation programs has almost become the standard). Also, your application's title can be text. You specify this in the General tab of the Project Options dialog box, shown in Figure 24.5.
Figure 24.5. Sax Setup Wizard's Project Options dialog with the Background tab open.
Building a distribution disk set is a simple process with Sax Setup Wizard. You can specify the destination (most of the time you will build to a directory on a hard disk) and the disk size (you can choose from all of the common sizes, including CD-ROM distribution media, which offers a virtually unlimited size), or e-mail distribution.
After you have configured the distribution of your application and generated the disk images, you can copy these images to disks and distribute your application. If I were writing a review, I'd certainly rate the Sax Setup Wizard as the easiest setup generator currently on the market.
The documentation from InstallShield Corporation refers to the InstallSHIELD SDK version as InstallSHIELD SE. This chapter uses the same designation. InstallSHIELD SE is a basic application installation system that is very compatible with Windows 95. Applications that are installed using InstallSHIELD SE can be easily removed later using the Add/Remove Programs option under the Windows 95 Control Panel applet.
The InstallSHIELD SE program works like this:
Figure 24.6 shows the process of creating a distribution disk set for a Windows 95 application.
Figure 24.6. The InstallSHIELD SE process.
Take a look at each of the files you must create in order to use InstallSHIELD SE. This example uses the files from InstallShield Corporation's sample program because they represent an excellent starting point and can be easily modified to work with different applications.
The first file you need is the rules file. This file, which is a standard text file created using any editor you want (such as Notepad), is shown in Listing 24.2. The rules file is processed using the InstallSHIELD SE Compile program. The Compile program converts the rules file into an .INS file, which must be named SETUP.INS and be placed on the first disk of your product's distribution disk set, where the InstallShield SE program will look for it.
NOTE
The files shown in the listings for InstallSHIELD SE are all found in the InstallSHIELD SE directory of the WIN32SDK. They are not found on this book's CD-ROM.
Listing 24.2. SETUP.RUL: The rules file.
/*----------------------------------------------------------------------------\

    IIIIIIII SSSSSSSS

       II    SS                     InstallSHIELD SDK Edition (R)

       II    SSSSSSSS            1995, Stirling Technologies, Inc.

       II          SS                   All Rights Reserved.

    IIIIIIII SSSSSSSS

    This source code is intended as a supplement to Stirling Technologies,

    Inc., product documentation.  Refer to your Stirling Technologies, Inc.,

    product documentation for more detailed information.

\-----------------------------------------------------------------------------/

/*----------------------------------------------------------------------------\

        Filename:  SETUP.RUL

     Description:  InstallSHIELD SDK Edition Template One template script.

          Author:  Stirling Technologies, Inc.   Date: 2-4-95

        External

           Files:

        Comments:  This template script performs a basic installation to a

                   Windows 95 or Windows NT platform.  The installation

                   includes components: Application Program Files, Sample and

                   Template Files, Online Help Files, and Multimedia Tutorial

                   Files.  With minor modifications, this template can be

                   adapted to create new, customized installations.

   Modifications:  (Precede each entry with "+" sign. Include name and date.)

                   +                             Date:

\----------------------------------------------------------------------------*/

        // Size of components

#define SIZE_REQ_SAMPLES        1400000

#define SIZE_REQ_TEMPLATES        10000

#define SIZE_REQ_PROGRAM         200000

#define APP_NAME                "Sample App"

#define PROGRAM_GROUP_NAME      "Sample App Group"

#define APPBASE_PATH            "Company\\SampleApp\\"

#define COMPANY_NAME            "SampleCompany"

#define PRODUCT_NAME            "SampleApp"

#define PRODUCT_VERSION         "3.0"

#define PRODUCT_KEY             "designer.exe"

#define UNINSTALL_KEY           "SampleAppV3"

#define APPBASE_DIR95           "Program Files"

#define BASE_REGISTRYNT \

    "Software\\Microsoft\\Windows NT\\CurrentVersion\\App Paths\\"

#define BASE_REGISTRY95 \

    "Software\\Microsoft\\Windows\\CurrentVersion\\App Paths\\"

#define SYS_BOOTMACHINE         3

#define STR_COMPLETE95 \

    "by selecting the program icon in the Programs menu.\n\n"

#define STR_COMPLETENT \

    "by selecting the program icon in the program group.\n\n"

declare

        // --- Global variable definition ---

        STRING  svGrp, szMsg, szFileSet, szTitle, szAppPath, szAppSharedDir;

        STRING  szProgram, szTemp, svUninstLogFile, szRegKey;

        STRING  svMainDirectory[ _MAX_STRING ];

        BOOL    bSpaceOk, bReshowSetupType;

        NUMBER  nResult, nStatusId, nType;

        BOOL    bIncludeProgram, bIncludeSamples, bIncludeHelp, bIncludeTut;

        BOOL    bWinNT;

        // --- Function definition ---

        prototype SetupScreen();

        prototype CheckRequirements();

        prototype CheckSpaceRequirements( number, number, number, string );

        prototype CreateRegDBEntries();

program

StartHere:

        Disable( BACKGROUND );

        // Setup installation screen

        SetupScreen();

        // Set installation info that is required for other functions.

  InstallationInfo( COMPANY_NAME, PRODUCT_NAME, PRODUCT_VERSION, PRODUCT_KEY );

        // Create a Welcome dialog.

WelcomeDlg:

        Disable( BACKBUTTON );

        Welcome( "Welcome", 0 );

        Enable( BACKBUTTON );

        // --- System test for proper configuration ---

        CheckRequirements();

        // --- Ask user for the path to place installed application ---

GetTargetDirectory:

        svMainDirectory = TARGETDISK ^ APPBASE_DIR95 ^ APPBASE_PATH;

        if ( AskDestPath( "Choose Destination Location", szMsg,

                          svMainDirectory, 0 ) = BACK ) then

           goto WelcomeDlg;

        endif;

        szAppSharedDir = svMainDirectory ^ "System";

DetermineUserSelection:

        nType = SetupType( "Setup Type", "", svMainDirectory, TYPICAL, 0 );

        if ( nType = BACK ) then goto GetTargetDirectory; endif;

        bReshowSetupType = FALSE;

        switch (nType)

        case TYPICAL:

             bIncludeSamples  = TRUE;

             bIncludeProgram  = TRUE;

             bIncludeHelp = TRUE;

        case COMPACT:

             bIncludeProgram  = TRUE;

        case CUSTOM:

             SetDialogTitle( DLG_ASK_OPTIONS, "Select Components" );

             bIncludeSamples  = TRUE;

             bIncludeProgram  = TRUE;

             bIncludeHelp = TRUE;

             szMsg = "Select the components that you wish to install.\n"+

                 "If the check box is unchecked, that component will not be "+

                 "installed. Click Next to continue with the installation.";

             nResult = AskOptions( NONEXCLUSIVE, szMsg,

                               "Application Program Files", bIncludeProgram,

                               "Sample and Template Files", bIncludeSamples,

                                   "On-Line Help Files", bIncludeHelp,

                                   "Multimedia Tutorial", bIncludeTut );

             if ( nResult = BACK ) then goto DetermineUserSelection; endif;

             // Handle exiting of setup

             if (nResult = CANCEL) then

                if (AskYesNo( "Are you sure you would like to exit setup?", NO)

                   = YES) then

                   abort;

                else

                   bReshowSetupType = TRUE;

                endif;

             endif;

        endswitch;

        if (bReshowSetupType = TRUE) goto DetermineUserSelection;

        // Check space requirements

        bSpaceOk = CheckSpaceRequirements( bIncludeSamples,

                                           bIncludeProgram,

                                           bIncludeHelp,

                                           svMainDirectory );

        if (bSpaceOk = FALSE) goto DetermineUserSelection;

                                     // Ask user to try again

FolderSelection:

        if ( bWinNT ) then

           svGrp = PROGRAM_GROUP_NAME;

           // Allow user to modify folder name

           if ( SelectFolder( "Folder Selection", svGrp, svGrp ) = BACK ) then

              goto DetermineUserSelection;

           endif;

        endif;

FileTransferSetup:

        // Set the deinstallation information

        DeinstallStart( svMainDirectory, svUninstLogFile, UNINSTALL_KEY, 0 );

        RegDBSetItem( REGDB_UNINSTALL_NAME, APP_NAME );

        // Set APPPATH for the main application

        szAppPath = svMainDirectory ^ "PROGRAM" + ";" + szAppSharedDir;

        RegDBSetItem( REGDB_APPPATH, szAppPath );

        szProgram = svMainDirectory ^ "PROGRAM\\designer.exe";

        RegDBSetItem( REGDB_APPPATH_DEFAULT, szProgram );

        // Set APPINFO for auxiliary application

        if (bWinNT) then

           szRegKey = BASE_REGISTRYNT ^ "demo.exe";

        else

           szRegKey = BASE_REGISTRY95 ^ "demo.exe";

        endif;

        RegDBSetDefaultRoot( REGKEY_LOCAL_MACHINE );

        RegDBSetKeyValueEx( szRegKey, "Path", REGDB_STRING,  szAppPath, -1 );

        szProgram = svMainDirectory ^ "PROGRAM\\demo.exe";

        RegDBSetKeyValueEx( szRegKey, "", REGDB_STRING,  szProgram, -1 );

        // --- Define the file to be copied to the user's machine ---

        szFileSet = "General";

        TARGETDIR = svMainDirectory;

        FileSetBeginDefine( szFileSet );

          SetStatusWindow( -1, "Copying program files..." );

          // Always copy readme and related

          CompressGet( "data.z", "*.*", COMP_NORMAL );

          if (bIncludeProgram) then

             TARGETDIR = svMainDirectory ^ "PROGRAM";

             CompressGet( "data.z", "program\\*.*", INCLUDE_SUBDIR );

             CompressGet( "data.z", "shared\\*.*", COMP_NORMAL );

             TARGETDIR = szAppSharedDir;

             CompressGet( "data.z", "shared\\*.*", SHAREDFILE | COMP_NORMAL );

          endif;

          if (bIncludeSamples) then

             TARGETDIR = svMainDirectory ^ "SAMPLES";

             CompressGet( "data.z", "samples\\*.*", INCLUDE_SUBDIR );

          endif;

          if (bIncludeHelp) then

             TARGETDIR = svMainDirectory ^ "TEMPLATE";

             CompressGet( "data.z", "template\\*.*", INCLUDE_SUBDIR );

          endif;

        FileSetEndDefine( szFileSet );

DoFileTransfer:

        // --- Set up status bar/file info and perform file transfer ---

        Enable( EXIT );

        Enable( STATUS );

        Enable( FEEDBACK_FULL );

        StatusUpdate( ON, 90 );

        // --- Copy all files on all disks ---

        nResult = FileSetPerformEz( szFileSet, 0 );

        switch (nResult)

        case FS_DONE: // --- Successful completion ---

        case FS_CREATEDIR: // --- Create Directory Error ---

           MessageBox( "Unable to create a directory under " + TARGETDIR + "."+

              "Please check write access to this directory.", SEVERE );

             abort;

        default: // --- Group all other errors under default label ---

             NumToStr( szTemp, nResult );

             MessageBox( "General file transfer error."+

                          "Please check your target location and try again."+

                          "\n\n Error Number:"+szTemp, SEVERE );

             abort;

        endswitch;

SetRegistryEntries:

//        RegDBSetAppInfo( "Template", REGDB_STRING, "good.tpl", -1 );

//        RegDBSetAppInfo( "TemplatePath", REGDB_STRING,

//            svMainDirectory ^ "TEMPLATE", -1 );

        Disable( FEEDBACK_FULL );

        CreateRegDBEntries( );

        // --- Create program groups and icons ---

CreateFolderIcons:

        SetStatusWindow( 95, "Creating Folder and Icons...." );

        if ( bWinNT ) then

           CreateProgramFolder( svGrp );

           ShowProgramFolder( svGrp, 0 );

           LongPathToShortPath( svMainDirectory );

           Delay(1);

        endif;

        TARGETDIR = svMainDirectory;

        if (bIncludeProgram) then

           szProgram = TARGETDIR ^ "PROGRAM\\DESIGNER.EXE";

           if ( bWinNT ) then

              AddFolderIcon( svGrp, APP_NAME, szProgram,

                             TARGETDIR ^ "PROGRAM",

                             "", 0, "", REPLACE );

           else

              LongPathToQuote( szProgram, TRUE );

              AddFolderIcon( "", APP_NAME, szProgram,

                             TARGETDIR ^ "PROGRAM",

                             "", 0, "", REPLACE );

           endif;

           Delay( 1 );

        endif;

        if ( bWinNT ) then

           if (bIncludeSamples) then

              szProgram = TARGETDIR ^ "PROGRAM\\DEMO.EXE ";

              AddFolderIcon( svGrp, "Example1",

                             szProgram + TARGETDIR ^ "PROGRAM\\MULTI.DBD",

                             TARGETDIR ^ "PROGRAM",

                             "", 0, "", REPLACE );

              Delay( 1 );

           endif;

           if (bIncludeSamples) then

              AddFolderIcon( svGrp, "Example2",

                             szProgram + TARGETDIR ^ "SAMPLES\\LAUNCHER.DBD",

                             TARGETDIR ^ "SAMPLES",

                             "", 0, "", REPLACE );

              Delay( 1 );

           endif;

           AddFolderIcon( svGrp, "ReadmeFile",

                          "NOTEPAD.EXE " + TARGETDIR ^ "README.TXT",

                          TARGETDIR,

                          "", 0, "", REPLACE );

           Delay( 1 );

           szProgram = WINDIR ^ "UNINST.EXE";

           LongPathToShortPath( szProgram );

           LongPathToShortPath( svUninstLogFile );

           AddFolderIcon( svGrp, "Uninstaller",

                          szProgram + " -f" + svUninstLogFile,

                          WINDIR,

                          "", 0, "", REPLACE );

           Delay( 1 );

        endif;

        // Setup complete and readme file

        SetStatusWindow( 100, "Installation complete." );

    // If shared files could not be installed, users must restart system

        if (BATCH_INSTALL = TRUE) then

           szMsg = "Some files could not be installed because they are "+

         "currently in use by other programs in the system.  "+

         "To allow for proper operation of the new program you should restart"+

         "your system at this time.";

      if (RebootDialog( "Restart Windows", szMsg, SYS_BOOTMACHINE ) = 0) then

          // Still must ensure proper installation

          CommitSharedFiles(0);

      endif;

    else

           szMsg = "Setup is complete.  You may run the installed program ";

           if ( bWinNT ) then

              szMsg = szMsg + STR_COMPLETENT;

           else

              szMsg = szMsg + STR_COMPLETE95;

           endif;

           MessageBeep( 0 );

           MessageBox( szMsg, INFORMATION );

        endif;

        exit;

/*-------------------------------------------------------------------------

     Name    : SetupScreen

     Purpose : This function will set up the screen look.  This includes

               colors, fonts, text to be displayed, etc.

-------------------------------------------------------------------------*/

function SetupScreen()

        begin

          Enable( DEFWINDOWMODE );

          Enable( INDVFILESTATUS );

          SetTitle( APP_NAME + " Setup", 36, WHITE );

          SetTitle( "Setup", 0, BACKGROUNDCAPTION );  // Caption bar text

          Enable( BACKGROUND );

        end;

//-------------------------------------------------------------------------

//

//   Name    : CheckRequirements

//

//   Purpose : This function will check all minimum requirements for the

//             application being installed.  If any fail, the user

//             is informed and the installation is terminated.

//

//-------------------------------------------------------------------------

function CheckRequirements()

          number  nvDx, nvDy;

          number nvResult;

          STRING szResult;

        begin

          // --- Determine if NT or Windows 95 not --

          GetSystemInfo( WINMAJOR, nvResult, szResult );

          bWinNT = TRUE;

          if (nvResult = 4) then

             bWinNT = FALSE;  // Running Windows 95

          endif;

          // --- Check screen resolution ---

          GetExtents( nvDx, nvDy );

          if (nvDy < 480) then

      MessageBox( "This program requires VGA or better resolution.", WARNING );

             exit;

          endif;

        end;

//-------------------------------------------------------------------------

//

//   Name    : CheckSpaceRequirements

//

//   Purpose : This function will check space requirements based on the

//             elements being installed.

//

//-------------------------------------------------------------------------

function CheckSpaceRequirements( bIncludeSamples,

                                 bIncludeProgram,

                                 bIncludeHelp,

                                 szDir )

          number  nSizeRequired;

        begin

          nSizeRequired = 0;

          // Determine total size

          if (bIncludeSamples) then

            nSizeRequired = nSizeRequired + SIZE_REQ_SAMPLES;

          endif;

          if (bIncludeHelp) then

            nSizeRequired = nSizeRequired + SIZE_REQ_TEMPLATES;

          endif;

          if (bIncludeProgram) then

            nSizeRequired = nSizeRequired + SIZE_REQ_PROGRAM;

          endif;

          // Space check of target drive

          bSpaceOk = TRUE;

          if (GetDiskSpace( szDir ) < nSizeRequired) then

          szMsg = "There is not enough space available on the disk\n" +

                 "'" + svMainDirectory + "' \n" +

                 "Please free up some space or change the target location\n" +

                 "to a different disk";

             MessageBeep(0);

             MessageBox( szMsg, WARNING );

             bSpaceOk = FALSE;

          endif;

          return bSpaceOk;

        end;

//-------------------------------------------------------------------------

//

//   Name    : CreateRegDBEntries

//

//   Purpose : This function will create necessary keys and values for

//             the sample program.

//

//-------------------------------------------------------------------------

function CreateRegDBEntries()

        string szKey[255], szValue, szDemo, szProgram;

begin

        // Create PRODUCT_KEY key

        szKey = "SOFTWARE\\" + COMPANY_NAME + "\\" + PRODUCT_NAME + "\\" +

                PRODUCT_VERSION + "\\" + "DESIGNER";

        RegDBCreateKeyEx( szKey, "" );

        RegDBSetKeyValueEx( szKey, "Template", REGDB_STRING, "good.tpl", -1 );

        RegDBSetKeyValueEx( szKey, "TemplatePath", REGDB_STRING,

                      svMainDirectory ^ "TEMPLATE", -1 );

        if (bIncludeSamples) then

           // Create "DEMOS" key

           szKey = "SOFTWARE\\" + COMPANY_NAME + "\\" + PRODUCT_NAME + "\\" +

                   PRODUCT_VERSION + "\\" + "DEMOS";

           RegDBCreateKeyEx( szKey, "" );

           szDemo    = svMainDirectory ^ "PROGRAM\\MULTI.DBD";

           szProgram = svMainDirectory ^ "PROGRAM\\DEMO.EXE";

           RegDBSetKeyValueEx( szKey, "path0", REGDB_STRING, szDemo, -1 );

           RegDBSetKeyValueEx( szKey, "exe0", REGDB_STRING, szProgram, -1 );

           RegDBSetKeyValueEx( szKey, "active0", REGDB_STRING, "Play", -1 );

           szDemo    = svMainDirectory ^ "SAMPLES\\LAUNCHER.DBD";

           szProgram = svMainDirectory ^ "PROGRAM\\DEMO.EXE";

           RegDBSetKeyValueEx( szKey, "path1", REGDB_STRING, szDemo, -1 );

           RegDBSetKeyValueEx( szKey, "exe1", REGDB_STRING, szProgram, -1 );

           RegDBSetKeyValueEx( szKey, "active1", REGDB_STRING, "Play", -1 );

           RegDBSetKeyValueEx( szKey, "exe2", REGDB_STRING, szProgram, -1 );

           RegDBSetKeyValueEx( szKey, "active2", REGDB_STRING, "Play", -1 );

           RegDBSetKeyValueEx( szKey, "exe3", REGDB_STRING, szProgram, -1 );

           RegDBSetKeyValueEx( szKey, "active3", REGDB_STRING, "Play", -1 );

           RegDBSetKeyValueEx( szKey, "exe4", REGDB_STRING, szProgram, -1 );

           RegDBSetKeyValueEx( szKey, "active4", REGDB_STRING, "Play", -1 );

           RegDBSetKeyValueEx( szKey, "exe5", REGDB_STRING, szProgram, -1 );

           RegDBSetKeyValueEx( szKey, "active5", REGDB_STRING, "Play", -1 );

           RegDBSetKeyValueEx( szKey, "exe6", REGDB_STRING, szProgram, -1 );

           RegDBSetKeyValueEx( szKey, "active6", REGDB_STRING, "Play", -1 );

           RegDBSetKeyValueEx( szKey, "exe7", REGDB_STRING, szProgram, -1 );

           RegDBSetKeyValueEx( szKey, "active7", REGDB_STRING, "Play", -1 );

           RegDBSetKeyValueEx( szKey, "exe8", REGDB_STRING, szProgram, -1 );

           RegDBSetKeyValueEx( szKey, "active8", REGDB_STRING, "Play", -1 );

           RegDBSetKeyValueEx( szKey, "exe9", REGDB_STRING, szProgram, -1 );

           RegDBSetKeyValueEx( szKey, "active9", REGDB_STRING, "Play", -1 );

        endif;

        // Create "HELPMENU" key

        szKey = "SOFTWARE\\" + COMPANY_NAME + "\\" + PRODUCT_NAME + "\\" +

                PRODUCT_VERSION + "\\" + "HELPMENU";

        RegDBCreateKeyEx( szKey, "" );

        RegDBSetKeyValueEx( szKey, "MaxNum", REGDB_NUMBER, "1", -1 );

        RegDBSetKeyValueEx( szKey, "path0", REGDB_STRING, svMainDirectory ^

                                          "README.TXT", -1 );

        RegDBSetKeyValueEx( szKey, "exe0", REGDB_STRING, "NOTEPAD.EXE", -1 );

        RegDBSetKeyValueEx( szKey, "active0", REGDB_STRING, "Read Me", -1 );

end;
Even though SETUP.RUL is a long file (more than 500 lines), it's well-documented and logical. You should have little difficulty modifying this file to suit your purposes.
The packing list file, shown in Listing 24.3, is much shorter. Like the SETUP.INS file, the packing list file must be processed (using the PACKLIST.EXE program) and placed on the first disk of your product's distribution disk set.
Listing 24.3. PACK.LST: The packing list input file.
1;

..\disk1\data.z
In this example, the application's files will fit on a single disk, so there is only one source file for Setup to process.
The documentation from InstallShield Corporation refers to the InstallSHIELD Professional version as InstallSHIELD PE. This chapter uses the same designation. InstallSHIELD PE is very much an expanded version of InstallSHIELD SE. The Professional version covers more operating systems, including Windows 3.x, Windows 95, Windows NT, and OS/2.
InstallSHIELD PE offers the following features:
If after using InstallSHIELD SE you find that you need a more powerful and flexible installation program, you can migrate to InstallSHIELD PE. The InstallSHIELD PE product is compatible with InstallSHIELD SE. This means that you can create a simple installation using InstallSHIELD SE, and, as your needs expand, you can easily migrate to InstallSHIELD PE.
You can incorporate Visual C++ binary file instructions and functions in your setup application to read the AUTOEXEC.BAT and CONFIG.SYS files on the recipient's fixed disk to determine whether you need to make modifications to these files so that your application will execute properly. If the user isn't running Windows for Workgroups, you must load SHARE.EXE in order for OLE 2.0, OLE Automation, and data access to operate properly. Thus, you might need to add a SHARE.EXE /L:500 entry to the AUTOEXEC.BAT file. (The parameter reserves DOS environment space for 500 locks, which is sufficient for most applications.)
Your setup program must open and manipulate the AUTOEXEC.BAT and CONFIG.SYS files by reading and parsing them. It's important to realize that it's unacceptable to simply add more lines to the ends of these files. Your application must test to see whether the desired command or string is present and then add the string only if it's missing. This addition usually can be done at the end (or beginning) of the AUTOEXEC.BAT and CONFIG.SYS files, but not always.
There are few cases with Windows 95 in which you need to work with either the CONFIG.SYS or AUTOEXEC.BAT files. With Windows 95, neither of these files needs to exist, and with Windows NT, neither of these files does exist.
TIP
Polite setup applications use a message box to advise the user that the AUTOEXEC.BAT and CONFIG.SYS files might need to be altered. Before making any changes to these files, save a copy of the original versions with the FileCopy instruction and advise the user of the names of the backup files. An even more polite approach is to offer the user the option of modifying the existing AUOTEXEC.BAT and CONFIG.SYS files or creating a new set of files that the user can inspect before copying over AUTOEXEC.BAT and CONFIG.SYS.
Microsoft has added a new feature to Windows 95—the capability to have a program run whenever an AutoPlay-enabled CD is inserted into the CD-ROM drive. This enables software developers who distribute by (or execute from) CD-ROMs to have either the program or an installation routine start whenever the CD-ROM is inserted into the drive. The AutoPlay facility enables "Plug-n-Play" to extend into the software arena.
Users benefit from a product that is easy to use. Using CDs under Windows 95 is easy. You can select the property page for a given CD-ROM by right-clicking on the CD in Explorer, as shown later in Figure 24.7.
Many users (and developers) have decried the poor interface between CD-ROM-based applications and Windows. With applications created before AutoPlay, the user had to insert a CD-ROM into the drive and enter a command (often, but not always, called setup) to install the product. Many setup programs ran well, but the concept behind CD-ROM-based applications is that the application (and much of its static data) doesn't need to be copied to the computer's local hard disk; instead, it may remain on the CD-ROM. This permits the user to have a large library of CD-ROM-based applications without having to dedicate substantial portions of the hard disk to these CD-ROM applications.
With AutoPlay, the following things happen when you insert a CD:
Sometimes users won't want to activate a program (or play an audio CD) automatically. In this case, they can hold down the Shift key when the CD-ROM (or CD) is inserted to disable AutoPlay. This enables the user to perhaps simply do a directory of the CD-ROM, run a different program from the CD-ROM, or otherwise use the CD-ROM.
NOTE
People tend to believe that if they stick a CD into their computer, it won't have a virus, trojan horse, or other nasty surprise in store. However, it would be wise to treat most CDs with the same care you would give a diskette or a file downloaded from a BBS: Do a virus scan!
NOTE
One alternative would be for AutoPlay to display a dialog that gives the user one button to continue the AutoPlay process and another button to kill the process and continue with the task that had focus. With this technique, the user doesn't need to remember to press the Shift key. Microsoft also recommends this technique: A quick-loading splash screen that lets the user abort.
To make AutoRun work, Windows 95 looks at the CD or CD-ROM that the user inserts. If it's an audio CD, the CD Player applet is launched and the CD is played. If the CD-ROM has an AUTORUN.INF file, this file is examined, and the actions specified in the AUTORUN.INF file are followed. (The AUTORUN.INF file is stored in the CD-ROM's root directory.)
The minimum necessary AUTORUN.INF file is shown in Listing 24.4.
Listing 24.4. The minimal AUTORUN.INF file for AutoRun compliance.
[autorun]

open=filename.exe

icon=filename.ico
Even this minimal AUTORUN.INF file, with only three lines of information, can be expanded. Take a look at each of the options available and what you can use in your AUTORUN.INF files:
open=subdir1\subdir2\filename.exe
icon=filename.exe,2In this example, you have specified that the third icon (the icons are zero-based) will be used. Unlike the open= expression, the icon= line doesn't let you use a path. To use a path, you should use the defaulticon= expression, which is discussed next.
WARNING
Don't code your programs to expect a C: drive to be present or writeable. There is no guarantee that a computer will have a C: drive, or that it will be accessible to applications. Diskless workstations might have drives that are found at different locations each time the system is started. You must take this into consideration when you're writing your application.
When an AutoPlay-enabled CD is inserted into the CD-ROM drive, the user can right-click the CD's icon and get a menu of choices. If your AUTORUN.INF file has an open= line, the menu that Explorer displays includes the commands shown in Figure 24.7.
Figure 24.7. An AutoPlay-enabled CD-ROM in Explorer.
The AutoRun facility added the AutoPlay selection to the list of actions in the pop-up menu. If you add the following lines to your AUTORUN.INF file, a new menu item will be added to the menu with the text Item For Menu. When this menu item is selected, the program specified in the command line will be executed.
shell\verb\command=filename.exe

shell\verb=Item For Menu
For example, to have the user check out a README file, you could add the following to the AUTORUN.INF file:
shell\readme\command=notepad readme.txt

shell\readme=Read &Me
In this example, the user's menu will include a Read Me selection. When selected, it will execute the Notepad program, loading and displaying the README.TXT file. Normally, the default menu selection for an AutoPlay-enabled CD is AutoPlay (as shown in Figure 24.7). You can change this default by adding
shell=verb
The shell= line specifies the action that will take place when the user selects the AutoPlay menu option. For example, to activate the readme selection, you could include the following lines in your AUTORUN.INF file:
shell=readme

shell\readme\command=notepad readme.txt

shell\readme=Read &Me
In this example, if the user selects AutoPlay from the menu, the README.TXT file will be loaded in Notepad.
Microsoft has several suggestions for developers who are creating AutoPlay CDs. The most important is that the application that is launched automatically be small. For performance reasons, Microsoft recommends that you not try to load a large application whenever the CD is inserted. Instead, load the smaller teaser application, which will then let the user load the larger application.
For CD-ROMs that contain only data and no executable program, the teaser program could simply display a README file. This lets the user quickly determine the CD-ROM's contents. For data CD-ROMs, be sure to date the data using a date format that is easily understood. Don't use summer/winter/spring/fall designators: these seasons mean different things to people in different parts of the world. Also, don't use "1Q" designators, because these terms aren't always meaningful to all users. Instead, use months and years, such as January 1995, to date data. Your README file should also indicate how often the data on the CD-ROM is updated. For example, for a database of company information that is updated on a quarterly basis, you will want to inform the user when the data has become "stale" so that he or she can get an update to the CD-ROM. Here is the potential for marketing upgrades to products that are prone to become obsolete.
With applications in which the teaser or introduction program includes a button to let the user launch the full application, you can take advantage of Windows 95's multithreaded processes to begin the loading process. That way, if the user decides to start the application, you're one step ahead of the game and will be able to start the application (hopefully) without having to incur a long delay while the main program loads.
Try to create applications that run well from CD-ROMs when possible. This lets the user better manage his or her hard disk. If you must install programs or other files on the hard disk, use a recognized installation program (such as the InstallSHIELD SDK program, mentioned earlier) to let the user easily uninstall the program from his or her hard disk. There's nothing worse than having a CD-ROM-based application create a directory that contains virtually everything that is on the CD-ROM.
It's always nice to be able to send a demo (either a working version or a canned demo, usually called a show) to a prospective purchaser. It's now possible to publish demos of your products using traditional techniques (such as either by itself or as part of a CD-ROM compilation) or using online publication techniques, including the Internet.
There are a number of packages for creating demo programs. One such product is DemoSHIELD. It lets the developer create a professional demonstration of the product's capabilities without having to resort to low-level programming.
Using DemoSHIELD is easy. The WIN32SDK has a working demo model of DemoSHIELD that you can use. This version of the product is limited to three panels, but even with this limitation, you can still examine the product and see its capabilities.
Many programmers distribute their applications using the "working demo" technique. This enables the potential user to use the application, get a feel for its weaknesses and strengths, and see how well the application fills his or her projected needs.
There is a difference between a working demo and using shareware to distribute your application. A working demo is almost always a copy of a product and has some limitation, such as a disabled save function. There is no way for most working demo programs to be upgraded without the user being sent a new copy of the program, whereas shareware programs typically either are fully functional or can be upgraded to full functionality by the user when the application is registered.
Distributing working demos and shareware applications is no different from distributing any other application. A smooth installation of the demo version goes a long way toward convincing a potential user to buy your product. A poor installation will convince users that your product is substandard, regardless of how well the application has been written.
Creating distribution disks is the final step in developing a Visual C++ database application, so it's fitting that this chapter closes this book. The objective of this book was to give DOS database developers and Visual C++ programmers who are new to database applications the background needed to create professional-grade database front ends with Visual C++. We hope this objective was accomplished.
Visual C++ is reportedly Microsoft's most successful and profitable language product. Therefore, you can expect Microsoft to release a continuing series of upgrades to Visual C++. Fortunately for Visual C++ developers, Microsoft has given its highest development priority to ensuring the compatibility of new versions of Visual C++ with code written for prior versions.
The remainder of this book consists of appendixes. Appendix A lists sources of add-on products and provides additional information for Visual C++ programmers. Appendix B lists the standard naming conventions for Visual C++ objects and variables. Appendix C gives you instructions for using the CD that comes with this book.
![]()
![]()
![]()
![]()