![]()
![]()
![]()
A database application isn't complete until you've prepared professional-grade documentation for each element of the application. The "Visual C++" qualifier is missing from the preceding truism of professional database developers because this statement applies to all database applications created with any front-end development tool or programming language. Visual C++ doesn't provide any documentation tools specific to database applications, and what is provided (help file shells and source comments) is rather basic.
This chapter describes the following three basic documentation elements for all database applications:
The major sections of this chapter deal sequentially with each of the documentation elements in the preceding list.
Data dictionaries are the most important element of database documentation. If you use a product such as Asymetrix's InfoModeler, the process of documenting the database will be a bit easier. InfoModeler provides a vast array of printed reports, tables, and charts to document your database. This chapter describes some of InfoModeler's capabilities, as well as other database documentation techniques.
At the very least, data dictionaries should include the following components:
The following sections describe writing your own Visual C++ application to create a data dictionary, using a CASE tool to create an Access database (including a data dictionary for the database), obtaining table data from Access's Database Documentor (described later), and using a commercial Access documentation tool such as InfoModeler to create data dictionaries for Access databases. The emphasis of this chapter is on the .MDB database format, because the Access database structure is the most likely to be used in the majority of new Visual C++ applications.
It's relatively easy to write a Visual C++ database application to create a fully formatted data dictionary as a text file that you can import into Word for Windows or any another word processing or spreadsheet application. It's an even simpler process if you've created (or have access to the source code for) a data dictionary generator for Access databases that relies primarily on C or C++ code.
DOCDB, the sample data dictionary application that is described in the following sections, is based on the ODBC access routines described in Chapter 7, "Using the Open Database Connectivity API."
DOCDB is a simple form-view Visual C++ program. It was originally developed with Visual C++ 1.5 and was then recompiled as a 32-bit application using Visual C++ 4. It's not uncommon to have to convert 16-bit applications to 32-bit when you're converting to either Visual C++ 2.x or 4. The 32-bit version of DOCDB is available on the CD that comes with this book.
DOCDB performs a simple task: It provides all the information that ODBC can provide about the columns in a specified table. This information is presented in a form. It would be easy to add report printing capabilities to DOCDB, and even to add the capability to report on all tables in a given database when you create a printed report. However, printed reports would be secondary to adding additional functionality to DOCDB to enhance DOCDB's retrieval of information about a database.
DOCDB is a simple program. It was created using AppWizard, with only two changes to the default "stock" program: It is a Single Document Interface (SDI) program with a CFormView view class. Neither database nor OLE support has been added to DOCDB, because these features weren't needed.
After DOCDB has been created, the first step is to incorporate the ODBC routines. Adding this support is detailed in Chapter 3, "Using Visual C++ Data Access Functions," and it consists of these steps:
#include "odbcmisc.h"
You can refer to Chapter 3 for more-detailed steps if you need to.
After you've followed the preceding steps, you can do a test compile of the ODCDB project. If the compilation succeeds without errors, you can continue to create the DOCDB program.
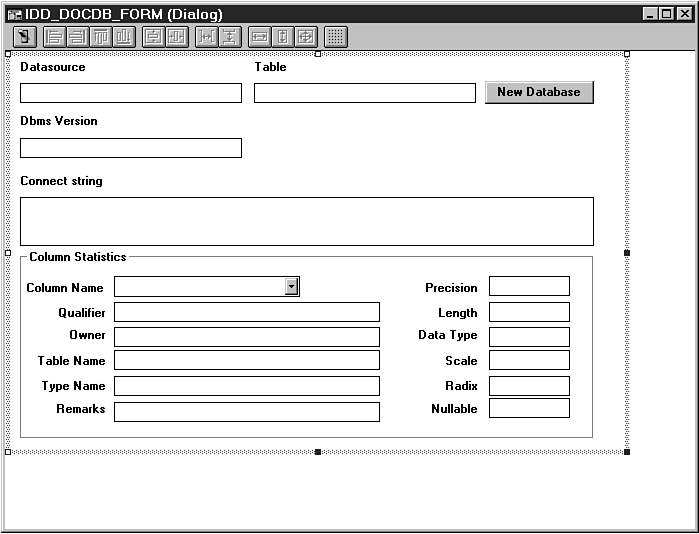
The next step is to use the resource editor to add the controls to the DOCDB main dialog box. Figure 22.1 shows this dialog box, including the dialog control IDs.
Figure 22.1. DOCDB's main window dialog box.
NOTE
All unmarked controls in Figure 22.1 are IDC_STATIC.
Each control in DOCDB must be bound to a variable, with the exception of the New Database button, which has an attached function, and the Column Name combo box, which calls a function whenever the current selection (the column in the table) has changed. The dialog is managed by the CDocdbView class (found in DOCDBVW.CPP).
After the dialog box has been created, in Visual C++ use ClassWizard to bind variables to the controls, as shown in Table 22.1.
| Control | Variable Name | Variable Type | Description |
| IDC_COLUMN | m_ColumnList | CComboBox | The list of all the columns in the selected table is stored here. This is both an input and an output control. |
| IDC_CONNECT | m_Connect | CString | This output control shows the current connect string. |
| IDC_DATASOURCE | m_DataSource | CString | This output control shows the datasource name. |
| IDC_DATATYPE | m_DataType | int | This output control shows the column's data type. |
| IDC_NULLABLE | m_Nullable | int | This output control indicates whether the column supports nulls. |
| IDC_OWNER | m_Owner | CString | This output control shows the table's owner. |
| IDC_QUALIFIER | m_Qualifier | CString | This output control shows the table's qualifier. |
| IDC_RADIX | m_Radix | int | This output control shows the column's radix, if applicable. |
| IDC_REMARKS | m_Remarks | CString | This output control shows remarks on this column, if any. |
| IDC_SCALE | m_Scale | int | This output control shows the scale of the column, if applicable. |
| IDC_TABLENAME | m_TableName | CString | This output control shows the name of the table. |
| IDC_TYPENAME | m_TypeName | CString | This output control shows the column's data type, in character format. |
| IDC_PRECISION | m_Precision | int | This output control shows the precision of the column. |
| IDC_LENGTH | m_Length | int | This output control shows the length of the column. |
| IDC_TABLE | m_Table | CString | This output control shows the name of the current table. |
Although DOCDB can show information about columns in a table in a database, it's important to realize that not all ODBC drivers can return all the information. For example, in a text datasource (such as a CSV file), it isn't reasonable to have remarks, scale, or precision information. In fact, most ODBC drivers don't return all the information that DOCDB tries to display. Any information that is unavailable will be displayed as either a blank or a zero, depending on the variable's data type.
When Visual C++'s ClassWizard binds a variable to a control, it creates the code to initialize the variable and to actually transfer the variable's contents to the control. When there must be conversions (such as the conversion of integer variables to text for edit controls), the DDX_Text() macros take care of this conversion automatically.
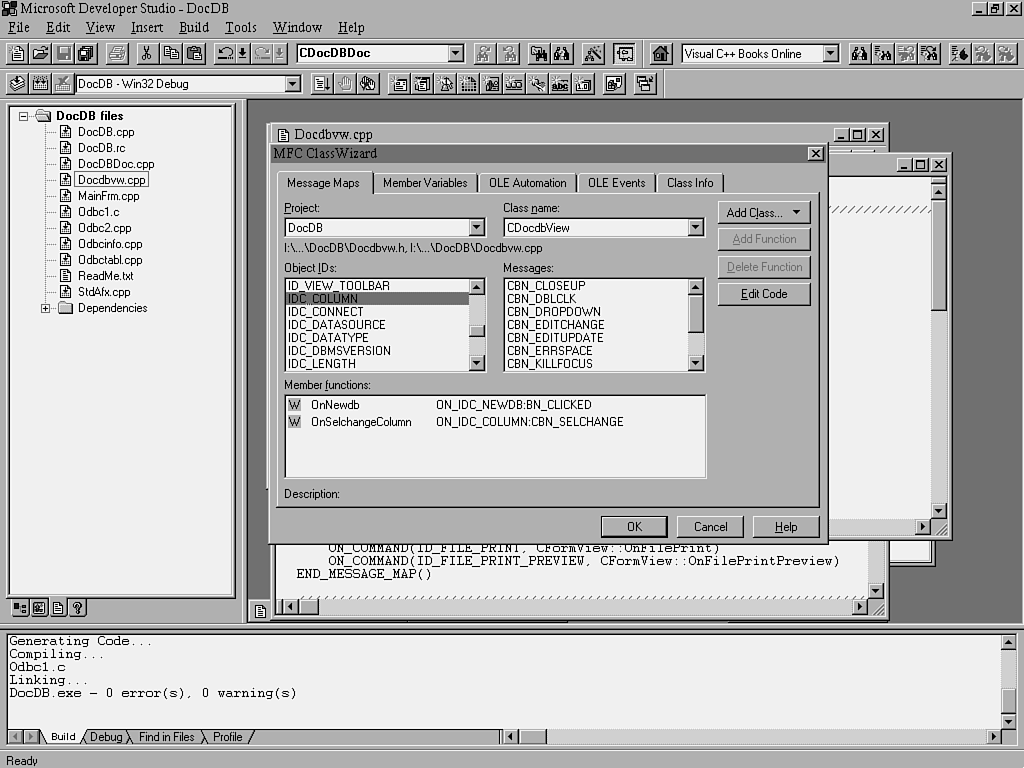
In addition to binding variables to the controls (as described earlier), it's necessary to also have functions for the IDC_NEWDB button and the IDC_COLUMN combo box. Using ClassWizard (see Figure 22.2), create two functions. For the IDC_NEWDB button, create a function for the message BN_CLICKED. This function will be called each time the user clicks the New Database button. For the IDC_COLUMN button, create a function for the message CBN_SELCHANGE. This function will be called each time the user changes the current column in the table.
Figure 22.2. Functions bound to controls in DOCDB.
The only changes you need to make to the code created by AppWizard are in DOCDBVW.CPP. You must add the functionality of the two functions created by ClassWizard. Listing 22.1 shows DOCDBVW.CPP. All the code that must be added appears in bold.
Listing 22.1. DOCDBWV.CPP with added code.
// docdbvw.cpp : implementation of the CDocdbView class

//

#include "stdafx.h"

#include "docdb.h"

#include "docdbdoc.h"

#include "docdbvw.h"

#include "odbcmisc.h"

#ifdef _DEBUG

#undef THIS_FILE

static char BASED_CODE THIS_FILE[] = __FILE__;

#endif

/////////////////////////////////////////////////////////////////////////////

// CDocdbView

IMPLEMENT_DYNCREATE(CDocdbView, CFormView)

BEGIN_MESSAGE_MAP(CDocdbView, CFormView)

    //{{AFX_MSG_MAP(CDocdbView)

    ON_BN_CLICKED(IDC_NEWDB, OnNewdb)

    ON_CBN_SELCHANGE(IDC_COLUMN, OnSelchangeColumn)

    //}}AFX_MSG_MAP

    // Standard printing commands

    ON_COMMAND(ID_FILE_PRINT, CFormView::OnFilePrint)

    ON_COMMAND(ID_FILE_PRINT_PREVIEW, CFormView::OnFilePrintPreview)

END_MESSAGE_MAP()

/////////////////////////////////////////////////////////////////////////////

// CDocdbView construction/destruction

CDocdbView::CDocdbView()

    : CFormView(CDocdbView::IDD)

{

    //{{AFX_DATA_INIT(CDocdbView)

    m_Connect = "";

    m_DataSource = "";

    m_DataType = 0;

    m_Nullable = 0;

    m_Owner = "";

    m_Qualifier = "";

    m_Radix = 0;

    m_Remarks = "";

    m_Scale = 0;

    m_TableName = "";

    m_TypeName = "";

    m_Precision = 0;

    m_Length = 0;

    m_Table = "";

    m_DbmsVersion = "";

    //}}AFX_DATA_INIT

    // TODO: Add construction code here

}

CDocdbView::~CDocdbView()

{

}

void CDocdbView::DoDataExchange(CDataExchange* pDX)

{

    CFormView::DoDataExchange(pDX);

    //{{AFX_DATA_MAP(CDocdbView)

    DDX_Control(pDX, IDC_COLUMN, m_ColumnList);

    DDX_Text(pDX, IDC_CONNECT, m_Connect);

    DDX_Text(pDX, IDC_DATASOURCE, m_DataSource);

    DDX_Text(pDX, IDC_DATATYPE, m_DataType);

    DDX_Text(pDX, IDC_NULLABLE, m_Nullable);

    DDX_Text(pDX, IDC_OWNER, m_Owner);

    DDX_Text(pDX, IDC_QUALIFIER, m_Qualifier);

    DDX_Text(pDX, IDC_RADIX, m_Radix);

    DDX_Text(pDX, IDC_REMARKS, m_Remarks);

    DDX_Text(pDX, IDC_SCALE, m_Scale);

    DDX_Text(pDX, IDC_TABLENAME, m_TableName);

    DDX_Text(pDX, IDC_TYPENAME, m_TypeName);

    DDX_Text(pDX, IDC_PRECISION, m_Precision);

    DDX_Text(pDX, IDC_LENGTH, m_Length);

    DDX_Text(pDX, IDC_TABLE, m_Table);

    DDX_Text(pDX, IDC_DBMSVERSION, m_DbmsVersion);

    //}}AFX_DATA_MAP

}

/////////////////////////////////////////////////////////////////////////////

// CDocdbView printing

BOOL CDocdbView::OnPreparePrinting(CPrintInfo* pInfo)

{

    // Default preparation

    return DoPreparePrinting(pInfo);

}

void CDocdbView::OnBeginPrinting(CDC* /*pDC*/, CPrintInfo* /*pInfo*/)

{

    // TODO: Add extra initialization before printing

}

void CDocdbView::OnEndPrinting(CDC* /*pDC*/, CPrintInfo* /*pInfo*/)

{

    // TODO: Add cleanup after printing

}

void CDocdbView::OnPrint(CDC* pDC, CPrintInfo*)

{

    // TODO: Add code to print the controls

}

/////////////////////////////////////////////////////////////////////////////

// CDocdbView diagnostics

#ifdef _DEBUG

void CDocdbView::AssertValid() const

{

    CFormView::AssertValid();

}

void CDocdbView::Dump(CDumpContext& dc) const

{

    CFormView::Dump(dc);

}

CDocdbDoc* CDocdbView::GetDocument() // Non-debug version is inline

{

    ASSERT(m_pDocument->IsKindOf(RUNTIME_CLASS(CDocdbDoc)));

    return (CDocdbDoc*)m_pDocument;

}

#endif  //_DEBUG

/////////////////////////////////////////////////////////////////////////////

// CDocdbView message handlers

typedef struct {

    UCHAR  szQualifier[STR_LEN];

    UCHAR  szOwner[STR_LEN];

    UCHAR  szTableName[STR_LEN];

    UCHAR  szColName[STR_LEN];

    UCHAR  szTypeName[STR_LEN];

    UCHAR  szRemarks[REM_LEN];

    SDWORD Precision;

    SDWORD Length;

    SWORD  DataType;

    SWORD  Scale;

    SWORD  Radix;

    SWORD  Nullable;

} COLUMN_ATTRIBUTES;

COLUMN_ATTRIBUTES Columns[70];

void CDocdbView::OnNewdb()

{

// Declare storage locations for result set data

UCHAR  szQualifier[STR_LEN];

UCHAR  szOwner[STR_LEN];

UCHAR  szTableName[STR_LEN];

UCHAR  szColName[STR_LEN];

UCHAR  szTypeName[STR_LEN];

UCHAR  szRemarks[REM_LEN];

SDWORD Precision = 0;

SDWORD Length = 0;

SWORD  DataType = 0;

SWORD  Scale = 0;

SWORD  Radix = 0;

SWORD  Nullable = 0;

// Storage locations for returned bytes stored

SDWORD cbQualifier;

SDWORD cbOwner;

SDWORD cbTableName;

SDWORD cbColName;

SDWORD cbRemarks;

SDWORD cbDataType;

SDWORD cbTypeName;

SDWORD cbPrecision;

SDWORD cbLength;

SDWORD cbScale;

SDWORD cbRadix;

SDWORD cbNullable;

// Declare miscellaneous variables

char    szSource[60];

char    szDirectory[132];

char    szTable[60];

char    szDSN[256];

char    szConStrOut[256];

char    szDbmsVersion[256];

char    szBuffer[513];

int     i;

int     j;

HENV    henv;

HDBC    hdbc;

HSTMT   hstmt = SQL_NULL_HSTMT;

RETCODE RC;

int     nConStrOut;

SWORD   swReturn;

    szSource[0] = '\0';

    szTable[0] = '\0';

    szDirectory[0] = '\0';

    GetODBC(

        szSource, sizeof(szSource),

        szTable, sizeof(szTable),

        szDirectory, sizeof(szDirectory));

    m_DataSource = szSource;

    m_Table = szTable;

    SQLAllocEnv(&henv);

    SQLAllocConnect(henv, &hdbc);

    sprintf(szBuffer, "DSN=%s", szSource);

    strcpy(szDSN, szBuffer);

//    To display ConnectDlg(), set the DSN to a null-length string:

//    szDSN[0] = '\0';

    RC = SQLDriverConnect(hdbc, m_hWnd,

        (unsigned char far *)szDSN, SQL_NTS,  // strlen(szDSN),

        (unsigned char far *)szConStrOut, sizeof(szConStrOut),

        (short far *)&nConStrOut,

        SQL_DRIVER_COMPLETE);

    if (RC != SQL_SUCCESS && RC != SQL_SUCCESS_WITH_INFO)

    {

         SQLPrintError(henv, hdbc, hstmt);

    }

    else

    {// Display the connect string returned:

        for (i = 0, j = 0; i < (int)strlen(szConStrOut); i++)

        {// Copy and format. Add space after each ';' in string:

            szBuffer[j++] = szConStrOut[i];

            if (szConStrOut[i] == ';')

                szBuffer[j++] = ' ';

        }

        szBuffer[j++] = '\0';

        m_Connect = szBuffer;

    }

    RC = SQLAllocStmt(hdbc, &hstmt);

    if (RC != SQL_SUCCESS && RC != SQL_SUCCESS_WITH_INFO)

    {

         SQLPrintError(henv, hdbc, hstmt);

    }

//    Get the columns in the specified table:

    RC = SQLColumns(hstmt,

        NULL, 0,    // All qualifiers

        NULL, 0,    // All owners

        (unsigned char __far *)szTable, SQL_NTS,  // The table!

        NULL, 0);   // All columns

    if (RC != SQL_SUCCESS && RC != SQL_SUCCESS_WITH_INFO)

    {

        SQLPrintError(henv, hdbc, hstmt);

    }

// Get and display the DBMS version number:

    SQLGetInfo(hdbc, SQL_DBMS_VER, szDbmsVersion,

         sizeof(szDbmsVersion), &swReturn);

   m_DbmsVersion = szDbmsVersion;

//    Now bind variables to columns!

    RC = SQLBindCol(hstmt, 1,  SQL_C_CHAR, szQualifier, STR_LEN,&cbQualifier);

    RC = SQLBindCol(hstmt, 2,  SQL_C_CHAR, szOwner, STR_LEN, &cbOwner);

    RC = SQLBindCol(hstmt, 3,  SQL_C_CHAR, szTableName, STR_LEN,&cbTableName);

    RC = SQLBindCol(hstmt, 4,  SQL_C_CHAR, szColName, STR_LEN, &cbColName);

    RC = SQLBindCol(hstmt, 5,  SQL_C_SSHORT,

         &DataType, sizeof(DataType), &cbDataType);

    RC = SQLBindCol(hstmt, 6,  SQL_C_CHAR, szTypeName, STR_LEN, &cbTypeName);

    RC = SQLBindCol(hstmt, 7,  SQL_C_SLONG,

         &Precision, sizeof(Precision), &cbPrecision);

    RC = SQLBindCol(hstmt, 8,  SQL_C_SLONG, &Length, sizeof(Length), &cbLength);

    RC = SQLBindCol(hstmt, 9,  SQL_C_SSHORT, &Scale, sizeof(Scale), &cbScale);

    RC = SQLBindCol(hstmt, 10, SQL_C_SSHORT, &Radix, sizeof(Radix), &cbRadix);

    RC = SQLBindCol(hstmt, 11, SQL_C_SSHORT,

         &Nullable, sizeof(Nullable), &cbNullable);

    RC = SQLBindCol(hstmt, 12, SQL_C_CHAR, szRemarks, REM_LEN, &cbRemarks);

// Then get the column names (clear list and fill array)

    m_ColumnList.ResetContent();

    i = 0;

    j = 0;

    while(i < 70)  // Maximum number of columns we allow!

    {

         RC = SQLFetch(hstmt);

        if (RC == SQL_ERROR || RC == SQL_SUCCESS_WITH_INFO)

        {

            SQLPrintError(henv, hdbc, hstmt);

        }

        if (RC == SQL_SUCCESS || RC == SQL_SUCCESS_WITH_INFO)

        {

            // Save this column for the future!

            strcpy((LPSTR)Columns[i].szQualifier, (LPCSTR)szQualifier);

            strcpy((LPSTR)Columns[i].szOwner, (LPCSTR)szOwner);

            strcpy((LPSTR)Columns[i].szTableName, (LPCSTR)szTableName);

            strcpy((LPSTR)Columns[i].szColName, (LPCSTR)szColName);

            strcpy((LPSTR)Columns[i].szTypeName, (LPCSTR)szTypeName);

            strcpy((LPSTR)Columns[i].szRemarks, (LPCSTR)szRemarks);

            Columns[i].Precision = Precision;

            Columns[i].Length = Length;

            Columns[i].DataType = DataType;

            Columns[i].Scale = Scale;

            Columns[i].Radix = Radix;

            Columns[i].Nullable = Nullable;

            j = m_ColumnList.AddString((LPCSTR)szColName);

            m_ColumnList.SetItemData(j, i++);

        }

         else

        {// That's all, folks...

            break;

        }

    }

    m_ColumnList.SetCurSel(0);

    OnSelchangeColumn();

     SQLFreeStmt(hstmt, SQL_CLOSE);

    SQLFreeStmt(hstmt, SQL_UNBIND);

//    END: Got the columns in the specified table:

    SQLDisconnect(hdbc);

    SQLFreeConnect(hdbc);

    SQLFreeEnv(henv);

}

void CDocdbView::OnSelchangeColumn()

{

int    nCurSel = (int)m_ColumnList.GetItemData(m_ColumnList.GetCurSel());

    m_Qualifier = (LPSTR)Columns[nCurSel].szQualifier;

    m_Owner = (LPSTR)Columns[nCurSel].szOwner;

    m_TableName = (LPSTR)Columns[nCurSel].szTableName;

    m_TypeName = (LPSTR)Columns[nCurSel].szTypeName;

    m_Remarks = (LPSTR)Columns[nCurSel].szRemarks;

    m_Precision = Columns[nCurSel].Precision;

    m_Length = Columns[nCurSel].Length;

    m_DataType = Columns[nCurSel].DataType;

    m_Scale = Columns[nCurSel].Scale;

    m_Radix = Columns[nCurSel].Radix;

    m_Nullable = Columns[nCurSel].Nullable;

    UpdateData(FALSE);

}
In this listing you see how the ODBC helper routine GetODBC() has been called, which prompts the user for database, table, and (if applicable) directory names. The names will be stored in the locations specified in the call:
szSource[0] = '\0';

szTable[0] = '\0';

szDirectory[0] = '\0';

GetODBC(

    szSource, sizeof(szSource),

    szTable, sizeof(szTable),

    szDirectory, sizeof(szDirectory));
After you have the name of the database and table, you can open the database and determine attributes. This is done using the SQL...() functions, which are described more fully in Chapter 3.
The process of using a database consists of the following steps:
The following code fragment shows the function that gets information about the columns in a given table. All the lines that aren't directly related to the database process have been eliminated:
SQLAllocEnv(&henv);

SQLAllocConnect(henv, &hdbc);

RC = SQLDriverConnect(hdbc, m_hWnd,

    (unsigned char far *)szDSN, SQL_NTS,  // strlen(szDSN),

    (unsigned char far *)szConStrOut, sizeof(szConStrOut),

    (short far *)&nConStrOut,

    SQL_DRIVER_COMPLETE);

RC = SQLAllocStmt(hdbc, &hstmt);

RC = SQLColumns(hstmt,

    NULL, 0,    // All Qualifiers

    NULL, 0,    // All owners

    (unsigned char __far *)szTable, SQL_NTS,  // The table!

    NULL, 0);   // All columns

//    Now bind variables to columns!

RC = SQLBindCol(hstmt, 1,  SQL_C_CHAR, szQualifier, STR_LEN,&cbQualifier);

RC = SQLBindCol(hstmt, 2,  SQL_C_CHAR, szOwner, STR_LEN, &cbOwner);

RC = SQLBindCol(hstmt, 3,  SQL_C_CHAR, szTableName, STR_LEN,&cbTableName);

RC = SQLBindCol(hstmt, 4,  SQL_C_CHAR, szColName, STR_LEN, &cbColName);

RC = SQLBindCol(hstmt, 5,  SQL_C_SSHORT,

     &DataType, sizeof(DataType), &cbDataType);

RC = SQLBindCol(hstmt, 6,  SQL_C_CHAR, szTypeName, STR_LEN, &cbTypeName);

RC = SQLBindCol(hstmt, 7,  SQL_C_SLONG,

     &Precision, sizeof(Precision), &cbPrecision);

RC = SQLBindCol(hstmt, 8,  SQL_C_SLONG, &Length, sizeof(Length), &cbLength);

RC = SQLBindCol(hstmt, 9,  SQL_C_SSHORT, &Scale, sizeof(Scale), &cbScale);

RC = SQLBindCol(hstmt, 10, SQL_C_SSHORT, &Radix, sizeof(Radix), &cbRadix);

RC = SQLBindCol(hstmt, 11, SQL_C_SSHORT,

     &Nullable, sizeof(Nullable), &cbNullable);

RC = SQLBindCol(hstmt, 12, SQL_C_CHAR, szRemarks, REM_LEN, &cbRemarks);

while()

{

     RC = SQLFetch(hstmt);

     // Save this column for the future!

}

SQLFreeStmt(hstmt, SQL_CLOSE);

SQLFreeStmt(hstmt, SQL_UNBIND);

SQLDisconnect(hdbc);

SQLFreeConnect(hdbc);

SQLFreeEnv(henv);
No accoutrements, such as progress-metering gauges, are added to DOCDB, because one of the purposes of this sample application is to demonstrate the ease with which databases created with Access can be accessed by Visual C++ applications. However, the CTL3DV2.DLL library is used to add a gray background and a 3-D effect to dialog boxes and message boxes under some versions of Windows.
NOTE
At this stage in the life of Windows, only Windows 3.x and Windows NT really need to use CTL32V2.DLL. Windows 95 has this functionality built in. However, there is a version of CTL32V2.DLL for Windows 95 for applications that need it.
CTL3DV2.DLL is a small (about 25K) library that is included with Visual C++, Microsoft Office, and several other Microsoft applications. CTL3DV2 can be found in the \REDIST directory, where the ODBC and SQL redistributable components reside.
Because CTL3DV2.DLL is included as part of ODBC's installation, you can generally assume that most users of Windows database applications have a copy of CTL3DV2.DLL in their \WINDOWS\SYSTEMS directory. Excel 5, Word 6, and other Microsoft products released in late 1993 use CTL3DV2.DLL rather than CTL3D.DLL because of problems caused by incompatible versions of CTL3D. Some software suppliers modified CTL3D for their applications without renaming the files. There are also several versions of CTL3DV2.DLL, some of which might not be compatible with Visual C++ and the current releases of other Microsoft applications. The version used in DOCDB is dated 9/16/95, has a file size of 27,136 bytes, and is for Windows NT. For Windows 95, this file is 26,624 bytes long and is dated 9/16/95. CTL3DV2.DLL files with dates later than mid-1995 (when Windows 95 was released) that have approximately the same file size should work as well, because Microsoft often redates files using the release date of the product that the file is distributed with.
TIP
You can obtain a copy of CTL3DV2.DLL by copying it from the \MSDEV\REDIST directory from your Visual C++ CD. For applications that will be created to run solely under Windows 95, you don't need to include CTL3DV2, because this functionality is built into Windows 95. Windows NT users should use the file CTL3D32.DLL (or copy it and rename it CTL32NT.DLL), which is in the \MSDEV\REDIST directory on the Visual C++ 4 CD.
NOTE
The CTL3DV2.DLL and CTL3D32.DLL libraries are copyrighted by Microsoft, and the license to distribute Microsoft's copyrighted files in conjunction with your Visual C++ applications does include the right to distribute CTL3DV2.DLL as part of the OLE and ODBC distribution kit you include with your applications. You need to determine whether prospective users of your applications currently have access to CTL3DV2.DLL from \WINDOWS\SYSTEM on their local computers. If it isn't installed, you must install it. If it's already installed, and it's an older version than the one your application is supplying, you should replace it.
To run DOCDB, follow these steps:
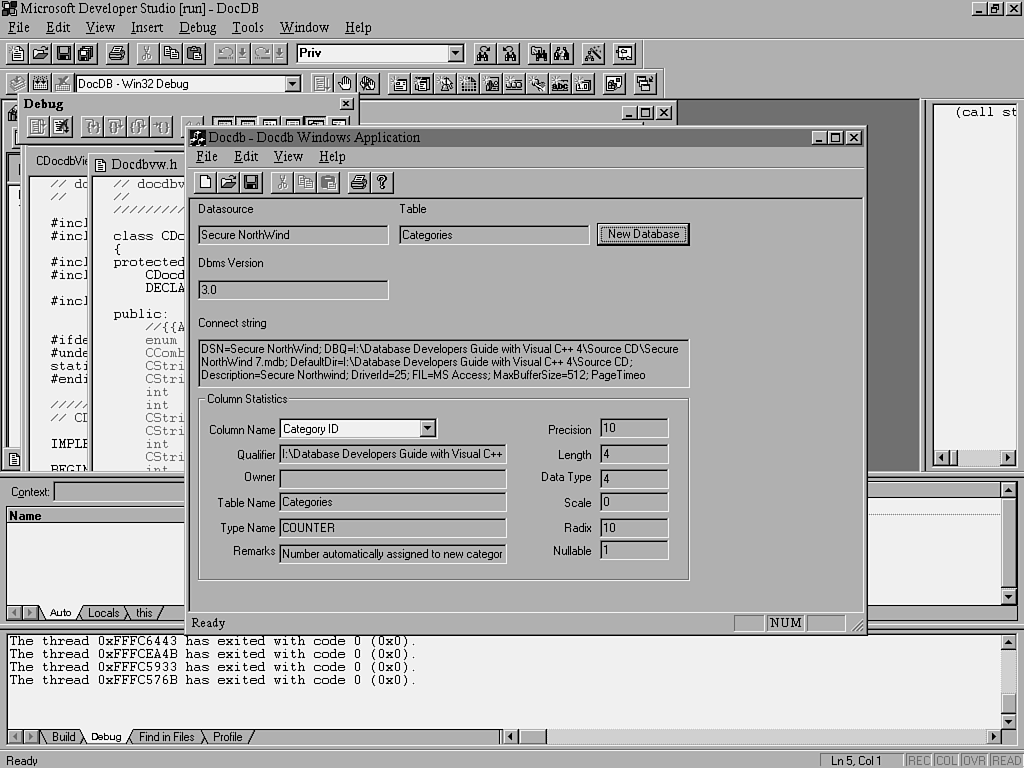
Figure 22.4. DOCDB and the dialog allowing a database file to be opened.
Figure 22.5. The DOCDB program with the NorthWind sample database open.
NOTE
If you receive an Error Opening File message, or if the Column Name combo box is blank, open the database in Access and make sure that the Admin user (or your user ID) has read permissions on all system tables in the database.
TIP
You can compare the speed of operation of Access and Visual C++ database applications on your computer by timing the execution of both a Visual C++ application and an equivalent application that runs under Access.
Also, if you're competent with Visual C++ 4's DAO, you might want to compare DAO with both ODBC and Access. The results might be enlightening!
You have the capability to print reports that contain the information that DOCDB displays in its main window. A CFormView application doesn't have printing enabled by default, and there is no code to print the window's contents. However, it's not difficult to take the information contained in the Columns[] array and format a simple report for your records. The SQLGetInfo() function will return a vast amount of information about drivers, SQL, and datasources.
Access 2's Database Documentor lets you export a database document report; however, it won't export the subreports. This makes the exporting of database documents virtually useless. There is a solution, however, that requires only a minimal amount of work. You must install a generic, text-only printer in Windows, and then assign this printer to a file instead of a printer port. When the Database Documentor report is printed, it will be printed to a standard ASCII file. You can then import this file into Excel as desired. This problem has been fixed in Access 7, which exports in text formats and as an Excel spreadsheet.
NOTE
Access 7 allows you to directly save your documentation in an Excel, RTF, or DOS text format. If you will be using this documentation in Excel, you should export it directly in the Excel format rather than trying to load the text-formatted file into Excel.
Listing 22.2 shows the NorthWind database documentation saved using the technique just described. This file can be saved directly in an Excel or Word (RTF) format or in a DOS text file format. Of course, any formatting that the report originally contained will be lost if exported in a DOX text file, but the report's information will be complete. In Listing 22.2, I've included only one table for the sake of brevity. The full report as produced by Access is over 50 pages long. (You can find this listing on the CD that comes with this book. It's called rptObjects.txt.)
Listing 22.2. NorthWind documented by Access's Database Documentor.
Thursday, January 18, 1996
Table: Categories Page: 1
Properties
Date Created: 3/17/94 3:01:37 PM Def. Updatable: True
Last Updated: 3/17/94 3:02:46 PM Record Count: 8
Columns
Name Type Size
Category ID Number (Long) 4
Allow Zero Length: False
Attributes: Fixed Size, Auto-Increment
Collating Order: General
Column Hidden: False
Column Order: Default
Column Width: 1110
Description: Number automatically assigned
to new category.
Ordinal Position: 0
Required: False
Source Field: Category ID
Source Table: Categories
Category Name Text 15
Allow Zero Length: False
Attributes: Variable Length
Collating Order: General
Column Hidden: False
Column Order: Default
Column Width: 1395
Description: Name of food category.
Ordinal Position: 1
Required: True
Source Field: Category Name
Source Table: Categories
Description Memo -
Allow Zero Length: False
Attributes: Variable Length
Collating Order: General
Column Hidden: False
Column Order: Default
Column Width: 4380
Ordinal Position: 2
Required: False
Source Field: Description
Source Table: Categories
Picture OLE Object -
Allow Zero Length: False
Attributes: Variable Length
Collating Order: General
Column Hidden: False
Column Order: Default
Thursday, January 18, 1996
Table: Categories Page: 2
Column Width: 1470
Description: A picture representing
the food category.
Ordinal Position: 3
Required: False
Source Field: Picture
Source Table: Categories
Relationships
Reference1_Products
Categories Products
Category ID 1 Category ID
Attributes: Enforced
Attributes: One-To-Many
Table Indexes
Name Number of Fields
Category Name 1
Clustered: False
Distinct Count: 8
Foreign: False
Ignore Nulls: False
Name: Category Name
Primary: False
Required: False
Unique: True
Fields: Category Name, Ascending
PrimaryKey 1
Clustered: False
Distinct Count: 8
Foreign: False
Ignore Nulls: False
Name: PrimaryKey
Primary: True
Required: True
Unique: True
Fields: Category ID, Ascending
Thursday, January 18, 1996
Database: I:\Database Developers Guide with Visual C++ 4\Source Page: 3
CD\NorthWind 7.mdb
Properties
AccessVersion: 06.68 Build: 4
Collating Order: General Def. Updatable: True
Query Timeout: 60 Records Affected: 0
Transactions: True Version: 3.0
User Permissions
admin
User
User1
Group Permissions
Admins
Users
Thursday, January 18, 1996
Relationships: All Page: 4
Relationships
Reference
Customers Orders
Customer ID 1 Customer ID
Attributes: Enforced, Cascade Updates
Permissions: One-To-Many
Reference1
Suppliers Products
Supplier ID 1 Supplier ID
Attributes: Enforced
Attributes: One-To-Many
Reference1_Products
Categories Products
Category ID 1 Category ID
Attributes: Enforced
Attributes: One-To-Many
Reference2
Products Order Details
Product ID 1 Product ID
Attributes: Enforced
Attributes: One-To-Many
Thursday, January 18, 1996
Relationships: All Page: 5
Reference3
Shippers Orders
1
Shipper ID Ship Via
Attributes: Enforced
Attributes: One-To-Many
Reference4
Orders Order Details
1
Order ID Order ID
Attributes: Enforced, Cascade Deletes
Attributes: One-To-Many
Reference5
Employees Orders
Employee ID 1 Employee ID
Attributes: Enforced
Attributes: One-To-Many
Of course, you can simply print the report generated by the Database Documentor using a high-quality printer. Figure 22.6 shows the first page of the report in Access. The actual printout is identical to the screen image.
Figure 22.6. The first page from Database Documentor.
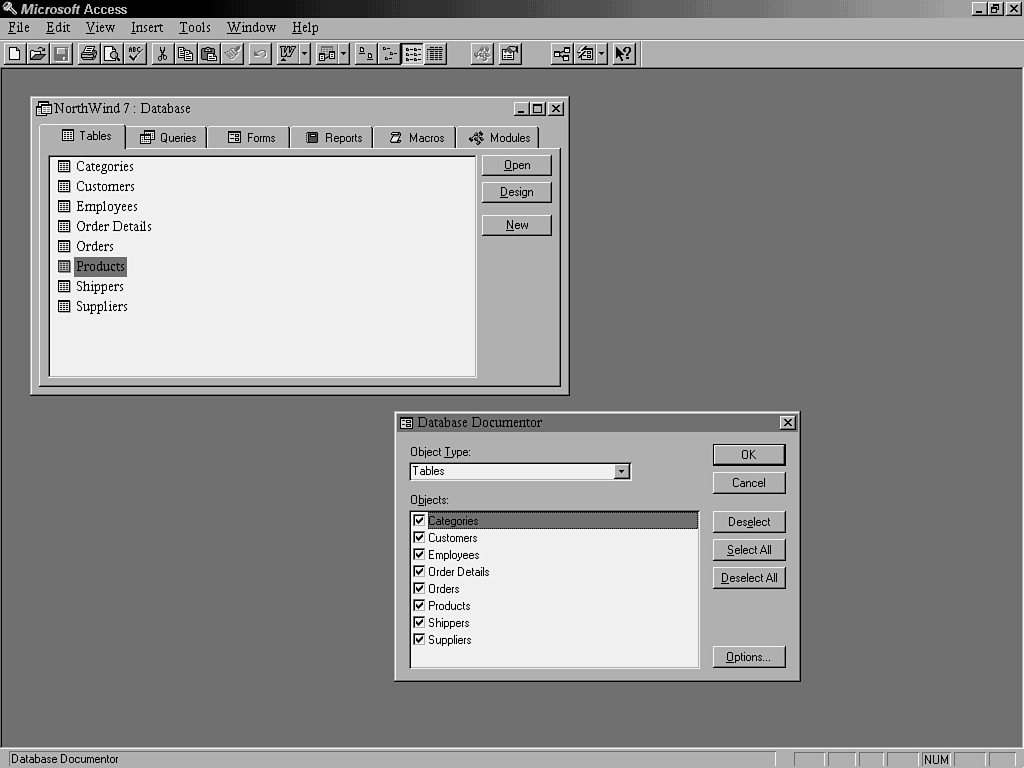
Access 2's Database Documentor lets you create tables you can use to develop a data-dictionary application. The Database Documentor is located under Tools | Analyze | Documentor in Access 7.
To use the Database Documentor to create information from which you can build a data dictionary, follow these steps:
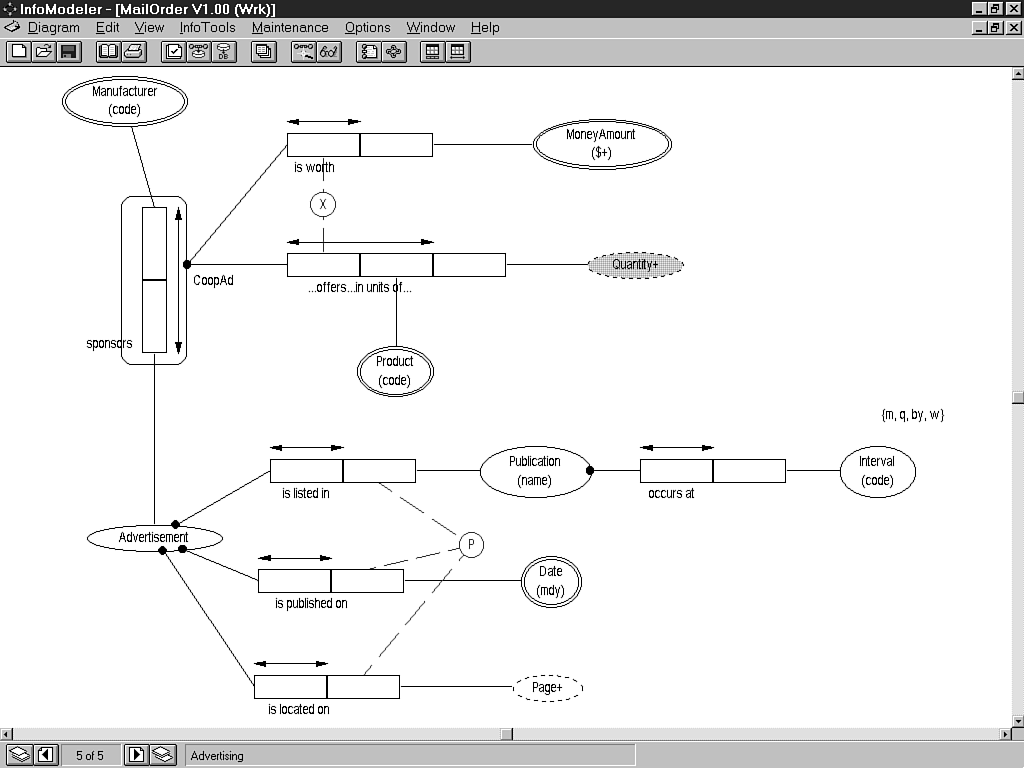
If you create your Access or client-server databases with a computer-aided software engineering (CASE) tool, such as Asymetrix's InfoModeler, you can expand the contents of your data dictionary to include descriptions of the underlying object types, fact types, and constraints from which the design of the database is created. Using InfoModeler to create Access databases is one of the subjects of Chapter 4, "Optimizing the Design of Relational Databases." Figure 22.8 shows part of one page (Advertising) of the database diagram of the MailOrder tutorial application that accompanies InfoModeler version 1.5.
Figure 22.8. A part of the Advertising element of InfoModeler 1.5's MailOrder tutorial application.
All the information about object types, fact types, and constraints is stored in a repository, a database that contains information about databases. Using InfoModeler's reporting features, you can create a report that you can integrate with a data dictionary for the database that InfoModeler creates for you. A part of the report that InfoModeler creates for the Advertising element of the MailOrder application is shown in Figure 22.9. (The entire report is eight pages long.)
Figure 22.9. Part of an InfoModeler report in print preview mode.
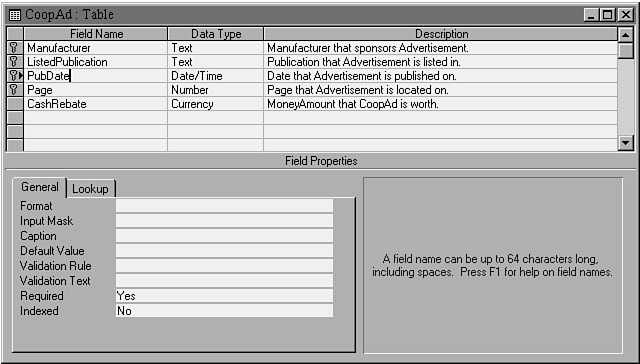
After you've completed your database design, InfoModeler creates the database for you. If you have the retail version of Access, you can create an Access database. Otherwise, InfoModeler creates the ANSI (generic) SQL statements required to build the database. Figure 22.10 shows Access's design-mode view of the CoopAd table. InfoModeler creates the CoopAd table from the information stored in the repository that underlies the database diagram shown in Figure 22.8 and that is described in the report file, part of which appears in Figure 22.9.
Figure 22.10. An Access table in the MAIL_ORD.MDB database created by InfoModeler.
NOTE
One of the advantages of using a CASE tool such as InfoModeler is that you can include the table and field descriptions in your data dictionary. The table and field descriptions originate in InfoModeler, not in Access, so the values of the Description property of the Table and Field objects that InfoModeler creates are available to your data dictionary application. You'll need to dig a bit, however, to obtain the data from Raima's Vista database, which is used as InfoModeler's repository.
Financial Modeling Specialists (FMS), Inc.'s Total Access is an Access 2 library database that you attach to the retail version of Access using a setup program supplied by FMS. FMS's Total Access provides comprehensive documentation and analysis of Access databases, not just the simple listing of some table and field properties that Access's Database Documentor generates. Total Access includes a large number of built-in reports that you can use to print a complete description of the database, including a detailed data dictionary for Table and Field objects. You also can modify Total Access's reports to suit your own requirements.
Total Access generates thorough documentation for all Access database objects. Figure 22.11 shows Total Access's Document Form, which corresponds to the Database Analyzer, with NorthWind.MDB as the active database. If you're using Access databases only with Visual C++ applications, you'll only be able to take advantage of Total Access's Table and Queries documentation features.
Figure 22.11. Total Access's main analysis window.
Start Total Access by selecting File | Add-ins | Total Access Analyzer. After you've selected the objects you want to document, click the Next button and wait while Total Access does its job. A progress monitor shows you how much of the documentation process has been completed. Preparing the documentation for the 125 objects of NorthWind.MDB (everything in the NorthWind.MDB database) took about 10 minutes on a Pentium server and a Pentium 90 computer with 32M of RAM and a total of 6 gigabytes of high-speed SCSI fixed-disk space. If you limit your documentation to tables and queries, for example, this processing time will be less.
Figure 22.11 shows all objects contained in NorthWind.MDB following an analysis.
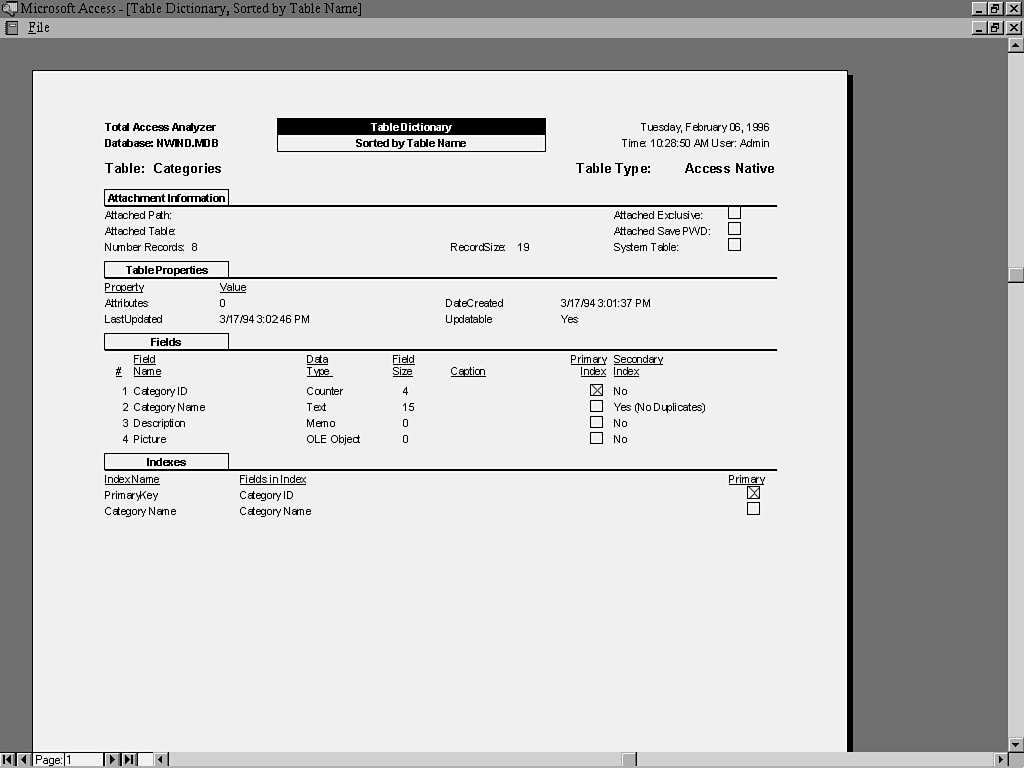
After Total Access builds the required tables, creating and printing reports such as the Table Dictionary shown in Figure 22.12 is a fast process.
Figure 22.12. Total Access's Table Dictionary report in print preview mode.
One of the principal benefits of using Total Access for creating data dictionaries is that you can open TA2DOC_C.MDA as a database in your Visual C++ data dictionary generator. Total Access creates one or more internal tables with a TA2_ prefix for each class of Access database object. Figure 22.13 shows part of the TA2_OutputFields table for the NorthWind.MDB database. Total Access includes the Description properties of Table and Field objects in its tables and reports. FMS obtains this information by opening each Table object in design mode and reading the value of the property.
Figure 22.13. One of the tables created by Total Access to document Access Table objects.
Despite the almost universal reluctance of software users to refer to printed manuals, your application isn't complete until you've written its user documentation. Relying on users to read or print the README.TXT file that accompanies your application before installing it is seldom an effective approach. Most users will simply insert your distribution disk 1 in a drive, choose File | Run from Program Manager, type a:\setup or b:\setup in the Command Line text box, and then click the OK button. If this entry doesn't work, the user next tries a:\install or b:\install. When this fails, he might read the "Installation" section of your documentation. It's more likely, however, that the user will call you to find out what's wrong. Microsoft reports that the vast majority of the questions posed to members of the Product Support Staff for Access can be answered in either README.TXT or the documentation that accompanies Access. The same is undoubtedly true for Visual C++.
Of course, you could be smart and include installation instructions on the label of the first disk of your application. If the installation instructions don't fit on the label, the installation is probably too complex and should be reworked.
Remember that Windows 95 has specific installation requirements, many of which are discussed in Chapter 24, "Creating Distribution Disks for Visual C++ Applications." You should also refer to the Windows 95 documentation for more information about the Windows 95 logo requirements.
The structure of user manuals for Visual C++ is similar to that of a book, even if the manual contains only a few pages. The following three sections describe the basic structure of a conventional software user manual.
NOTE
Much of the material in the following sections is based on information contained in Graphic Design for the Electronic Age by Jan V. White, a Xerox Press book published by Watson-Guptill Publications of New York. The book's subtitle, The Manual for Traditional and Desktop Publishing, aptly describes its content. Graphic Design for the Electronic Age provides background and pointers on type selection, page design, and publication construction.
Front matter for user manuals usually is more extensive than that for a conventional textbook and follows the general structure of the front matter for computer software tutorial and reference works, such as this book. The following are the elements of front matter for a typical user manual:
Except for the table of contents, front matter normally isn't included in the online help file for your application. You can move the installation instructions to the text section of the book if you want, but the preferred location is close to the front of the manual. Users are more likely to refer to the instructions if they appear in the first few pages of the manual.
The text of manuals usually is broken into chapters and sections. If the manual consists of more than about 10 chapters, you might want to break the text into collections of related chapters, called parts. If your manual contains a tutorial and a reference guide for the application, separate parts should be assigned to contain the chapters in each category. The text component of the manual is used to create the online help file. Separate help files often are used for the tutorial and reference parts.
Material that is supplemental to the text or that assists readers in understanding the text is included in the back matter. Back matter may contain the following elements:
Adding the glossary to the online help system is optional but recommended. Appendixes don't usually appear in help files, and the index serves as the backbone of the search topics in the help system.
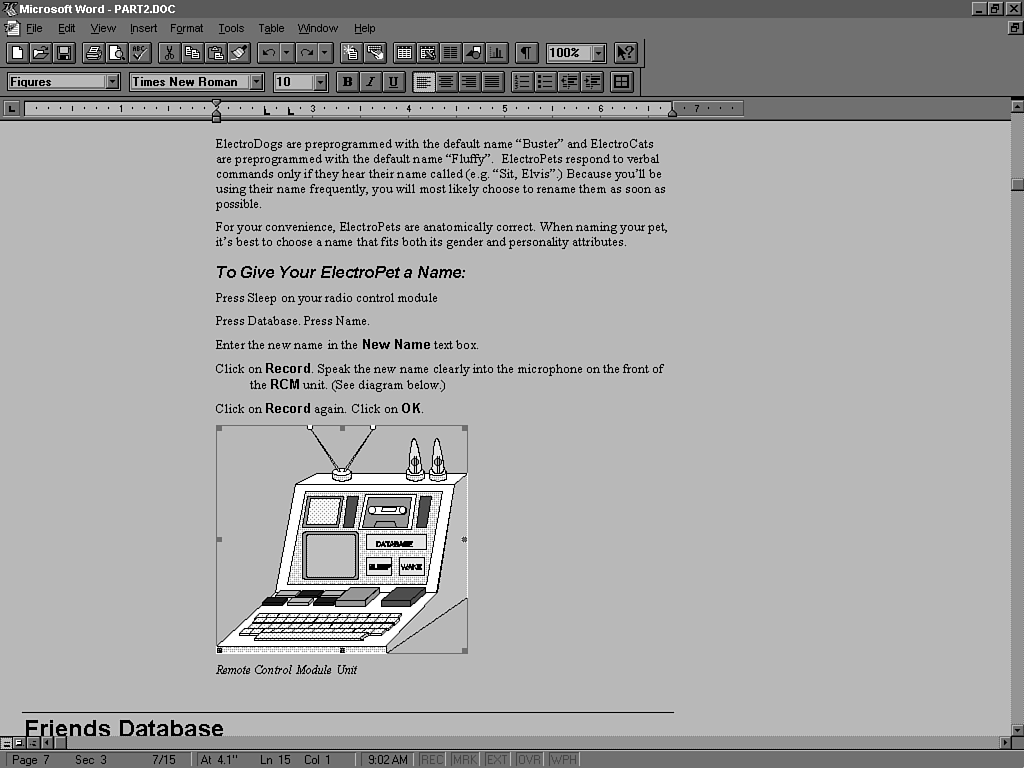
WexTech Systems, Inc.'s Doc-To-Help application consists of a set of templates for Word for Windows that are specifically designed for writing software user manuals, plus other files that are associated with converting the manuals into Windows WinHelp (.HLP) files. Chapter 23 describes how to use Doc-To-Help to convert the user manuals you write into .HLP files. Standard templates are included for conventional 8 1/2- by 11-inch manuals with conventional section headings, like those used in this book (D2H_NORM.DOT), or a side-head style, in which the headings appear in the left margin (D2H_SIDE.DOT). Doc-To-Help also supports the standard 7- by 9-inch manual format (D2H_SMAL.DOT). Figure 22.14 shows a WexTech sample file, D2HINTRO.DOC, that uses D2H_NORM.DOT opened in Word for Windows.
Figure 22.14. A Doc-To-Help sample file with an embedded illustration in metafile format.
NOTE
Doc-to-Help comes in two versions. Version 1.7 supports both Word 2 and Word 6. Version 2 supports Word 7. There is an upgrade path to let Doc-To-Help 1.6 users upgrade to either version 1.7 or 2 as needed.
Although you can write manuals that you can convert to WinHelp .HLP files with any word processing application that supports footnotes and can export text and images as Microsoft rich text format (.RTF) files, using Word for Windows together with Doc-To-Help saves considerable time in creating the printed version of your manual. Doc-To-Help's standard templates provide the foundation for attractively formatted manuals, but you can alter the styles employed by the standard templates if you need to conform to company-wide publication standards. Figure 22.15 illustrates Doc-To-Help's standard 8 1/2- by 11-inch manual style. The major time-saving feature of Doc-To-Help—and thus the principal justification for acquiring Doc-To-Help—is the ease with which you can compile your manuals into WinHelp .HLP files that provide access to almost every feature offered by the Windows 3.1 version of WINHELP.EXE.
Figure 22.15. A page that illustrates Doc-To-Help's standard manual style.
This chapter described several methods of creating data dictionaries for your Visual C++ database applications, how to use a commercial cross-referencing application to document your Visual C++ code, and the basic structure of the printed manual that should accompany every production database application.
The next chapter shows you how to use WexTech's Doc-To-Help to convert user manuals to Windows WinHelp files.
![]()
![]()
![]()
![]()