|
|
 |
 |
To access the contents, click the chapter and section titles.
Platinum Edition Using HTML 4, XML, and Java 1.2
(Publisher: Macmillan Computer Publishing)
Author(s): Eric Ladd
ISBN: 078971759x
Publication Date: 11/01/98

The major components of the interface include:
- • Main Toolbar—The Main Toolbar contains buttons that do common file related tasks such as opening, saving, and printing and editing tasks such as cut, copy, and paste. Buttons also launch Studio’s verification tools: a link checker, a document weight computation tool (how long it will take to download the document and its dependent files), and an HTML validator.
- • Tag Toolbar—The Tag Toolbar plays host to several tabs (all of which you can display or hide easily), including QuickTab, Fonts, Tables, Frames, Lists, Forms, CFML, Script, and Active Server Pages (ASP). Each tab, in turn, contains buttons that place HTML and CFML tags into your documents. By putting the tags into logical grouping on the tabs, it becomes easy to switch back and forth between sets of buttons as you need them.
|
 | If you’re writing JavaScript and you’ve forgotten some part of the browser object model, the Script tab contains a drop-down box with a collapsible tree that outlines the entire model for you (see Figure 34.21).
|
|
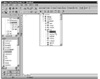
FIGURE 34.21 A reference for the browser object model is built right in to the Script tab of the Tags Toolbar.
- • Editor Toolbar—The behavior of the editing window is controlled by the Editor Toolbar (located along the left side of the editing window). Buttons on this toolbar control properties such as word wrapping, block indenting, and numbering of the lines of code. In addition, you can toggle the window between browser preview mode and edit mode and between full-screen and partial-screen modes.
- • The remaining buttons on the Editor Toolbar support what Allaire calls Studio’s What-You-See-Is-What-You-Need (WYSIWYN) feature. This includes Tag Completion (a container tag’s closing tag will automatically appear when you finish typing in the opening tag), Tag Tips (pop-up messages that show all the possible attributes permitted by the tag’s syntax), and Tag Insight (which provides a drop-down list of attributes the tag can take, enabling you to easily choose the ones you want). Figure 34.22 shows the Tag Insight in action.

FIGURE 34.22 With Tag Insight activated, you can select which attributes you want to place inside a tag from a context-sensitive list.
NOTE: With some practice, most users acclimate themselves to the WYSIWYN features and are able to develop more rapidly. If you find them more of a hindrance, you can suppress them by deselecting their buttons on the Edit Toolbar.
- • Resource Tab—The Resource Tab typically appears to the left of the edit window, although you can change its position easily enough. The Resource Tab is itself tabbed to give you access to local and remote disk drives, ColdFusion data sources on remote servers, groups of related templates called projects, tag snippets (chunks of reusable code), and the full set of ColdFusion and ColdFusion Studio documentation in HTML format.
- • Palette—The bar running along the bottom of the Resource Tab and the edit window is called the Palette. From here, you can select colors for backgrounds, text, links, and any other situation where you might need a hexadecimal color triplet. The default color palette is the “browser safe” color palette advanced by Lynda Weinman (http://www.lynda.com/).
CAUTION:
Be careful when using hexadecimal color triplets because the pound sign (#) that precedes them can confuse the ColdFusion Application Server when it parses the file. As long as you keep the color triplets outside of any CFML container tags, your code should be parsed without any problems.
Using the Resource Tab
The Resource Tab is an incredibly useful window to many of the resources developers need while creating a ColdFusion application. This section takes a closer look at the tabs on the Resource Tab and what they let you access.
The tab you see open in Figure 34.20 is the Local Tab. When this tab is selected, the Resource Tab is divided into two windows. In the upper window, you can navigate drives and folders on your machine. As you change from one folder to another, the files in that folder appear in the lower window. Having the list of files at your disposal is very valuable. You can double-click a file to open it, drag and drop an HTML file or a ColdFusion template into the edit window to set up a link to it, or drag and drop an image file into the edit window to place the image in your document.
The Remote Tab is shown open in Figure 34.23. Again, the Resource Tab is split into two windows and both windows perform similar functions. But in this case, you are working with files on a remote server via FTP. When you double-click a file, the file is downloaded to your machine and presented in the edit window so you can work on it. When you save your changes, Studio uploads the modified file to the remote machine.
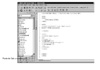
FIGURE 34.23 No need to use a separate FTP client because ColdFusion Studio has one built right in.
NOTE: When you first open the Remote Tab, you see a list of the FTP server profiles you have set up. If you haven’t set up any yet, right-click the Resource Tab and select the Add FTP Server option.
CAUTION:
If you don’t save frequently, your FTP connection may time out, and you’ll have to reconnect to the remote server.
|


)
)
)
)
)
)