|
|
 |
 |
To access the contents, click the chapter and section titles.
Platinum Edition Using HTML 4, XML, and Java 1.2
(Publisher: Macmillan Computer Publishing)
Author(s): Eric Ladd
ISBN: 078971759x
Publication Date: 11/01/98

Setting Up Data Sources
Clicking the Data Sources button in the left frame yields a screen such as the one you see in Figure 34.4. This is where you create, modify, test, and delete ODBC data sources. These data sources are pointers to database files, together with specifications on how ColdFusion should interact with the database.

FIGURE 34.4 The Data Sources section of the ColdFusion Administrator is where you specify which databases ColdFusion is able to use and how it should connect to those databases.
On the initial page of the Data Sources section, you’ll see a list of all the available data sources and what kind of ODBC driver is being used to access the data source. Below this list, you’ll see a drop-down list that contains the names of all the data sources. By selecting one of these and clicking the Verify button, ColdFusion will test its connection to that data source and let you know if the test succeeded or failed.
To create a new data source, follow these steps:
- 1. Type the name of the data source into the text field at the top of the Data Source Name column.
- 2. Select which kind of ODBC driver you want to use from the drop-down list at the top of the ODBC Driver column. The list of ODBC drivers available depends on your operating system. If you’re using a Windows machine, you’ll see drivers for all the Microsoft database formats (Access, SQL Server, FoxPro, Excel), as well as Oracle drivers and any other drivers you may have installed yourself. On a Solaris machine, you will not find drivers for the Microsoft database formats.
- 3. Click the button labeled Add to create the data source. The right frame will change to show you the Create ODBC Data Source page similar to the one you see in Figure 34.5.
NOTE: The Create ODBC Data Source page will look slightly different for each kind of ODBC driver because each driver has its own specific parameters that need to be set.
- 4. Fill in the information requested on the Create ODBC Data Source page, making sure to specify the drive and directory path to the database file. ColdFusion comes with a Java applet that enables you to browse the drives and directories until you find the file you want.
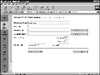
FIGURE 34.5 When setting up a data source, you need to give it a name, specify the location of the database file, and set other driver-specific parameters.
- 5. At this point, you have two options. You can click the Create button to create the data source and return to the initial data source page, or you can click the CF Settings button to reveal a more detailed version of the Create ODBC Data Source page (see Figure 34.6).
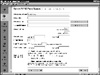
FIGURE 34.6 You can also configure how ColdFusion interacts with the data source when you create it.
- 6. Choose values for the ColdFusion settings to associate with the data source. This includes values for the login timeout (how long ColdFusion will try to connect to the data source), how many simultaneous connections to allow to the database, a special username and password for ColdFusion to use when logging into the database, whether or not to maintain a connection to the database between requests, and any restrictions on SQL operations done against the database.
|
 | Don’t maintain connections to the database if you frequently have to upload updated copies of the database. If ColdFusion maintains the connection, then it keeps a lock on the database file and you can’t overwrite it with the new file without stopping the ColdFusion service.
|
|
- 7. Click the Create button to create the data source and return to the main data source page.
To edit an existing data source, click its name from the main data source page. This will take you to a page that looks almost like the one you saw in Figure 34.5. From there, you can edit the data source’s properties or click the CF Settings button to get an expanded edit page that is similar to what you saw in Figure 34.6. After you’re done making your changes, click the Update button to save them.
If you need to delete a data source, click the data source’s name to go to the edit page, and then click the Delete button.
CAUTION: After you delete a data source, it will no longer be available to any of your ColdFusion applications. Before deleting a data source, make sure that none of your applications contain references to it.
Also, keep in mind that deleting a data source is not the same as deleting a database file. If you want to delete the database file, you’ll need do that through your operating system’s interface.
Using Debugging
ColdFusion’s debugging feature is invaluable when you’re troubleshooting an application. Figure 34.7 shows you the Debug Settings section of the ColdFusion Administrator. The four check boxes at the top control what kinds of debugging messages you get from the server. You can choose any combination of
- • Variables—If checked, you get a list of all form, URL, cookie, and CGI environment variables as well as the values of each variable.
- • Processing time—Knowing the total processing time for a request can help you determine if changes to your code are making it more efficient or if they are impairing performance.
- • SQL and data source name—In the event of a query error, ColdFusion will show you the SQL statement and the target data source that caused the error.
- • Query information—ColdFusion can tell you the processing time, how many records were returned, and what SQL statement was used for each query in the request.
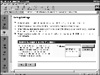
FIGURE 34.7 You can choose which kinds of debugging messages you want displayed during application development and testing.
ColdFusion appends debugging information to the bottom of the HTML page it generates in response to a browser’s request. As you can see in Figure 34.8, the debugging information is rendered in a typewriter font, so it is easy to pick out from the rest of the document.
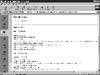
FIGURE 34.8 Debugging information always appears at the end of the ColdFusion page.
|


)
)
)
)
)
)
)
)
)
)